Tuesday, September 27, 2011

Village of Cuteness

At Convention 2011, there were extra evening classes offered, so of course I had to sign up. The class I took was called Village of Cuteness... the perfect name  :)

I had so much fun making these 3 little houses!!
Each 2x4 is painted with 1 layer of acrylic paint, then given a distressed look using the ink spots and flat rubber stamp in the Distressing Essentials kit. The doors are cut from the Wood Sheets. To add color (Cherry Cobbler, Old Olive, and More Mustard) just run the "door" over a Classic Ink Pad.
We used a ton of great supplies to decorate the houses:
Card stock: Cherry Cobbler, More Mustard, Baja Breeze, Old Olive Textured
DSP: Pocket Full of Posies and First Edition
Stamps: Good Grid background stamp and Calendar Alphabet & Numbers set
Accessories: Metallic Brads, Silver Brads, Antique Brads, Vintage Trinkets, Trinket Keys, Brights Designer Buttons, Mini Library Clips, Basic Rhinestones, Basic Pearls, Early Espresso Baker's Twine, Mini Vintage Tags
Punches: 1/16" Circle punch, 1/2" Circle punch, Blossom Bouquet punch, Petite Pennants punch, Itty Bitty Shapes Punch Pack

Here are the individual houses and close-ups...

This is the tallest house at almost 10" high. The roof shingles are made by punching card stock and Designer Series Paper with the 1/2" Circle Punch. They are attached to the roof with Mini Glue Dots.


This house is 8" tall. To make the medallion, use the new Simply Scored Tool to score a 1x12" strip of DSP every 1/4". Then accordion fold the strip. Trim off 1/4" from one end, and adhere the ends together with Multipurpose Liquid Glue. The DSP for the roof measures 7-1/2" x 1-5/8" and is attached with Multipurpose Liquid Glue.


The smallest house is 6" tall. To create the door hinges, clip a Mini Library Clip to the Wood Sheet door. Then use your Craft & Rubber Scissors to trim the protruding ends. To attach the DSP roof, use your Multipurpose Liquid Glue.

I loved this class so much, that I decided to make a Spooky Village class, which I am teaching tonight. I can't wait!! Check back tomorrow to see pictures of the Spooky Village  :)

Pin It!

Monday, September 26, 2011

Lucky Limeade and Calypso Coral

It's no secret that I love playing with all of the fabulous colors that Stampin' Up! has. Every year I am like a kid on Christmas Eve waiting to see the new In Color collection. In July, five new colors (Lucky Limeade, Calypso Coral, Pool Party, Island Indigo, and Wisteria Wonder) were released.
I love how nicely Lucky Limeade and Calypso Coral "play" together  :)
Both of the today's cards use these colors and the Array of Sunshine Hostess stamp set.

 This card pulled double duty as a team meeting project as well as a class project. It is a GREAT layout... so easy to create with. The sentiment is from the Word Play stamp set.


Crumb Cake makes a nice, neutral background for these bold colors. The sentiment is from the My Friend stamp set.

Well, I'm off to add the finishing details to my Spooky Village houses... I can't wait to share them at my Technique Tuesday class tomorrow night! It's going to be soooooo much fun  :)

Pin It!

Friday, September 23, 2011

Happy 1st day of Fall

There's a chill in the air each morning while I wait at the bus stops... reminding us that Fall is here. I can't wait to show you all of the yummy fall projects I've been making with the Spice Cake product Suite -- those are coming soon, so keep checking back :)
Today's post is a name tag I made on My Digital Studio (MDS) for my youngest son. MDS is a great tool for when you need multiples of your projects. When you want to create something, but have limited time, let MDS help you! I can print as many as I need for name tags and supply labels. Since Aaron is only 4 years old, having the same design on all of his items will make it easy for him to locate. Plus, the folders look really cute with this label :)

I created this project as a "card" and only designed "page 1." I saved the image as a jpeg on my desktop so I can quickly print a new one as needed, say, when one of the children spills breakfast cereal all over the table where the folder is sitting.
If you would like to know more about My Digital Studio, check out MyDigitalStudio.net for tons of great information and samples. Have a fabulous day!

Pin It!

Tuesday, September 20, 2011

more team-meeting projects

Hello stamping friends! I'm playing a little catch-up this week, but it feels good to be back into my stamping groove. I have two projects to share with you today, both from my August team meeting.


I really wanted to use the Flirtatious Designer Fabric to make a cute rosette, like the one I learned to make with my Convention Make-and-Take projects. (Yes, I have actually finished every single Convention project... first time ever!) I am really enjoying using the new Wisteria Wonder, so I turned to my Color Coach, which suggested I add Lucky Limeade and Elegant Eggplant. To make the fabric rosette, I used a 1" x 12" strip of fabric. First, tie a knot at one end, and adhere to the center of a square cut from a Sticky Sheet. Using every ounce of coordination you have, twist the fabric strip at the same time as you wrap it around the knot, pressing it into the Sticky Sheet. Trim excess Sticky Sheet, and adhere the rosette to your project. On this card, the rosette is adhered to Elegant Eggplant card stock punched using the Blossom Bouquet Triple Layer Punch.
I stamped the stem image from Raining Flowers in Lucky Limeade ink onto Lucky Limeade card stock, and slipped a piece of Flirtatious Specialty DSP (that matches the fabric -- LOVE that!) behind that layer before attaching to the Elegant Eggplant layer. The sentiment from Curly Cute is stamped in Elegant Eggplant ink.


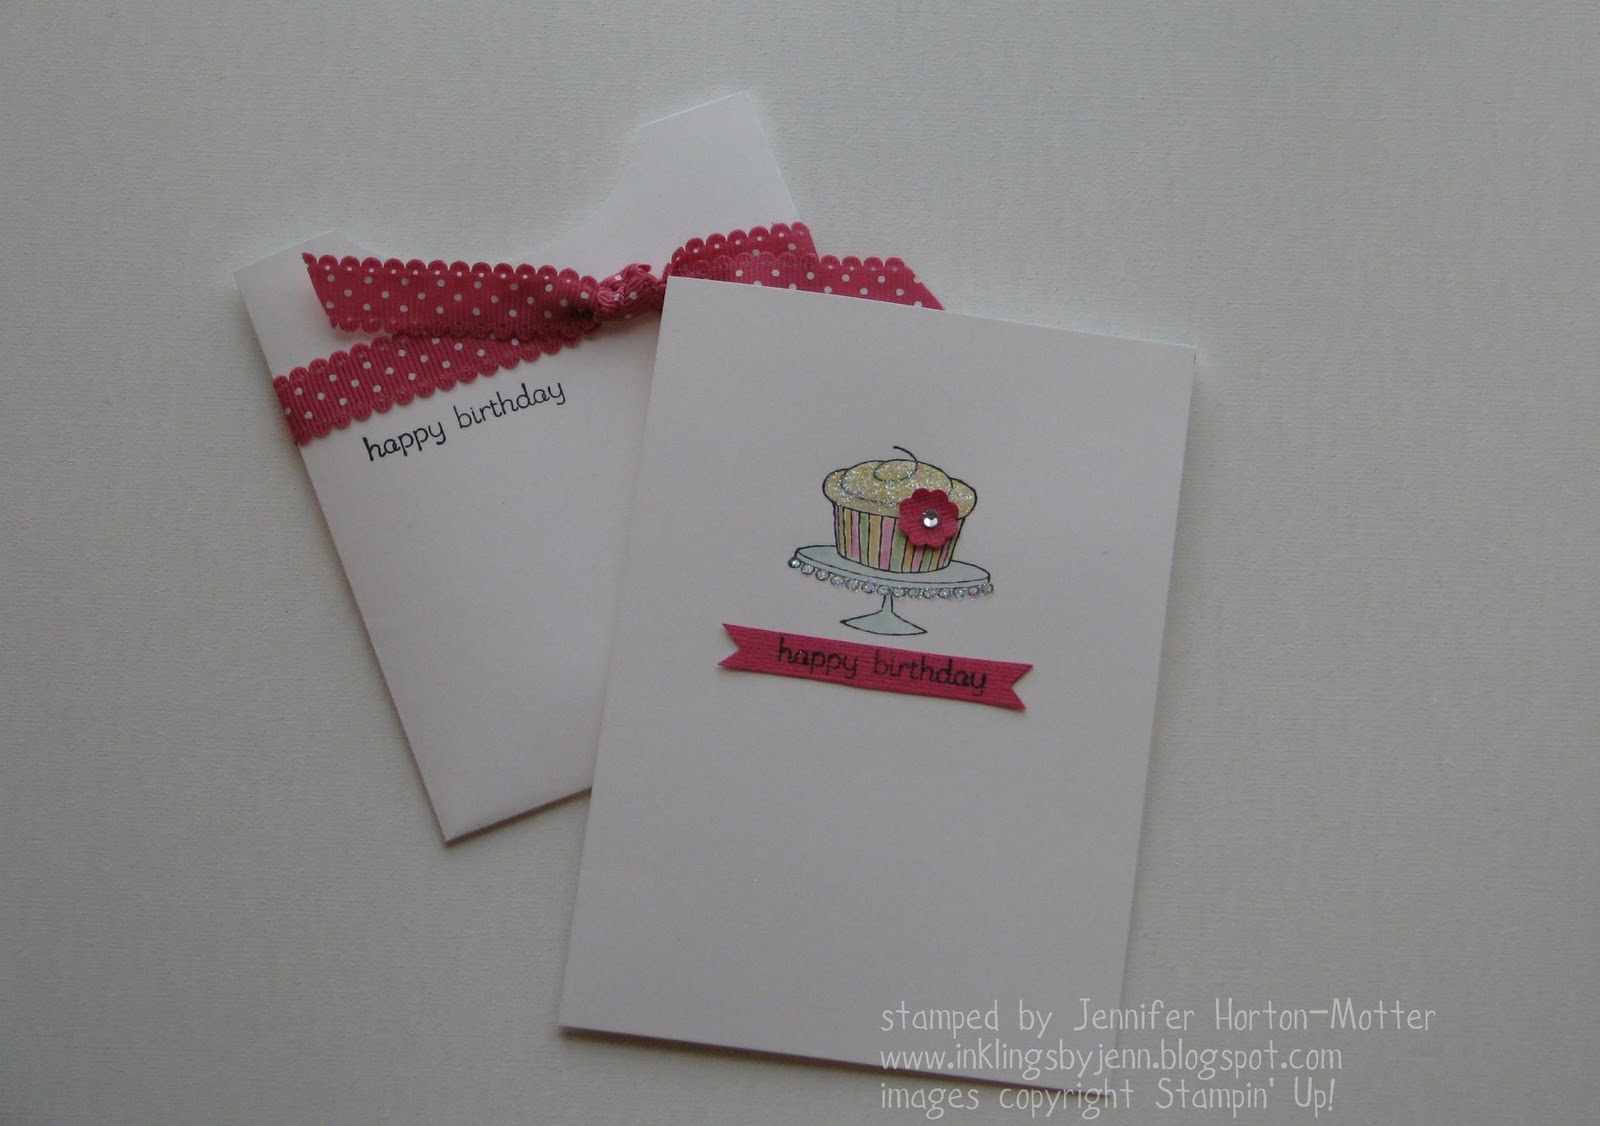
This card is from my "Workshop in a Bag" treat I got at Convention. It uses the Note Cards, which are great to have around in your stamping stash for quick little projects. You get twenty 3-1/2"x5" pre-cut and pre-scored notecards, plus envelopes... awesome!

While the card looks very fancy, it's really quite simple. Just be sure to stamp your image with StazOn® ink if you are going to color it in. This pretty little cupcake is from Easy Events - a great "covers-everything" kind of set. I used a Blender Pen with Daffodil Delight, Melon Mambo, Peach Parfait, and Wild Wasabi to color the cupcake; the cake stand is colored with Pool Party.
Here's a close-up of the "bling":
To get a little sparkle on your projects, tap your 2-Way Glue Pen onto the chosen area, and sprinkle on some Dazzling Diamonds Glitter. So pretty!!

Pin It!

Monday, September 19, 2011

Fall Fun

Okay... so my last post began with how happy I was to see September so our family could get back into a routine. Well, apparently I forgot that part of that routine is for the children to bring home all of the "back-to-school" germs. Yuck! Of course everyone in the house gets sick as Mom tends to them... leaving Mom to get sick last. I lost track of how many tissue boxes we went through in the last few weeks. Double yuck!! Anywho... everyone is much better, and I'm up to about 98% health, so it's time to post some projects :)

I have two projects to share with you today.
This fun little pumpkin was the project for my scrapbook club. It's so easy to make, and would be adorable at your Thanksgiving table as a decoration or as place cards with a little tag added for the name.

To make this project at home, you will need 12 strips of Pumpkin Pie card stock (6" x 3/4"). Lightly sponge Pumpkin Pie ink on the long sides of the card stock to add some "depth." Use the largest hole punch on the Crop-A-Dile™ to punch each end -- you can easily punch six strips at once. At this point, I like to gently run each strip against my bone folder (think curling ribbon) to give them a slight curl. Stack the strips up, and use a 5/16" brad to hold each end together. Then, just fan the strips apart -- it will be a little tight at first, so be patient :)
I wrapped two skinny strips of Old Olive card stock around my Paper-Piercing Tool for the curly vines. One leaf is die cut from Certainly Celery DSP with the Leaves #2 Die; the other leaf is stamped from the Day of Gratitude stamp set onto Very Vanilla card stock and cut out with the Paper Snips. The leaves and Old Olive button are attached using Stampin' Dimensionals.


This adorable Halloween card is from my September team meeting. I wanted to showcase the new Simply Scored -- Stampin' Up!'s exclusively designed scoring tool. It is AWESOME!! You absolutely must own one of these! It comes with three Place Markers (which makes it fast and easy for a group project or to make multiples), and a Stylus featuring ergonomic style and comfort grip.

To make this "standard size" card at home, cut your card stock base to measure 4-1/4" x 11" and using your Simply Scored Scoring Tool, score at 2-3/4" and again at 8-1/4".
I used a 12" strip of Cajun Craze card stock to create the "belly band." To make the medallion behind that cute little owl, I scored a 1" x 12" strip of Old Olive DSP every 1/4". Here's a closeup (sorry it's a little out of focus):
I think I am in love with this little owl from the Warmest of Wishes Hostess stamp set. In fact, I think I am in love with the whole set! You wouldn't have to ask me twice to host a workshop just for this great stamp set. If you haven't scheduled your fall workshop yet, contact me today. With the Holiday Mini Catalog and our new Hostess Benefits, you are sure to have a great time! Happy stamping :)

Pin It!

Saturday, September 3, 2011

so much to stamp, so little time

I am so happy to see September! The kids are in school, so I can get back into my routine, and the Holiday Mini is here! Yippee!!!!
I have a quick post to share with you today...
One more project using Glossy card stock:

This card features the color burnishing technique. The images from Flower Fest are stamped in StazOn® ink onto Glossy card stock. I used sponge daubers to swirl in the color (Lucky Limeade, Riding Hood Red, and Perfect Plum).

Here's another example of the color burnishing technique on a telescoping card:
This card also uses the Flower Fest stamp set. Colors: Old Olive, Daffodil Delight, Peach Parfait, and Poppy Parade.


Pin It!

Friday, August 19, 2011

new shape!!

Sometimes I make the best discoveries when I'm just playing with my toys... stamping toys, that is. Yesterday, I was just having fun at my desk using new goodies from the "Big Top" Product Suite (IBC pages 62-65). While I was making a variety of projects, I came up with a brand new shape! See if you can spot it on these 2 projects:


Need a hint? Here's a few close-ups:


I'm probably more excited about this shape than I should be, but I just love it!! I use my Decorative Label punch all the time, so it's nice to have something to mat behind it.

Want to know how to make this shape? It's super easy!


First punch out your card stock (or paper) with the 2-1/2" Circle punch. Then, slip one side of the circle into the Decorative Label punch, going through the bottom opening. After punching, repeat this process on the opposite side of the circle. Yay!! New shape!!
Have fun playing in your stamping room today!  :)


Pin It!

Thursday, August 18, 2011

faux Mother of Pearl

I LOVE the faux Mother of Pearl technique! What a great way to add elegance to your project. And, it's really easy...  Stamp (and color if desired) your image on Glossy card stock. I recommend using StazOn® ink to stamp with. Pour a tiny bit of Frost White Shimmer Paint onto a plastic lid or foam plate. Crumple up a ball of cling wrap, and tap it into the Shimmer Paint. I like to pounce once onto scrap paper, just to make sure I don't get too much paint on my project. Gently pounce / tap your "inked" cling-wrap-ball over your stamped Glossy card stock. A little goes a long way; you don't want too much paint on your project. Let the Shimmer Paint dry, and then the magic happens. Using a sponge or a brayer, add ink over the Glossy card stock. Start with a small amount of ink first, you can always add more. I like to have lighter and darker spots on my pieces.

I love how this card turned out! I used the Strength & Hope stamp set - only a few days left to order this set, which Stampin' Up! will donate a portion of the sales to the Breast Cancer Research Foundation®.  {Click here for more information and a short video.} The unique color combination is Blushing Bride and Calypso Coral.


I used the new Delicate Doilies stamp set for this card. The colors are Lucky Limeade, Soft Suede, and Calypso Coral. So pretty!  :)

Pin It!

Wednesday, August 17, 2011

Soot Stamping

Good morning! I have another card to share with you from my technique class on using Glossy card stock. I have to say, it was an interesting class to prepare for... in addition to the stamping supplies, I also had to get cling wrap, wax paper, a craft iron, a candle and match, baby wipes, a spray sealant, and a fire extinguisher (just in case). I can only image how crazy my class participants thought I was when they came in!  ;)  But we had a great time, and that's what it's all about.


 This card uses the technique called "soot stamping." To begin, you light a small pillar candle. I tried to do the technique using a tea-light candle, and it just didn't produce a big enough flame. Holding the Glossy card stock with tweezers or a clothes pin, pass the glossy side over the candle flame, allowing the glossy surface to brush across the flame. You want the Glossy card stock to actually touch the flame so it will produce a black soot mark, but obviously you don't want to keep the card stock in any one place for too long. Again, having a fire extinguisher close by is a smart idea (just in case). When the glossy surface is all "sooted," place your Glossy card stock in your work space - soot side up - being careful not to touch it so you won't leave finger prints.
Choose a stamp with a more solid image. Without adding any ink, "stamp" your image into the soot. The rubber will remove soot, creating a very unique image. The next step is to spray your "stamped" Glossy card stock piece with a clear, permanent acrylic coating. I used a matte finish acrylic spray (from my local home improvement store) that is safe for artwork, wood, metal, paper, silk flowers, etc. Be sure to use the spray outside; I placed my card stock in a cardboard box to collect the overspray. I sprayed a thin coat, waited a few minutes, and then sprayed a second thin coat. Then I let it dry for almost 2 hours before completing the card.
For this card, I used the My Friend stamp set. I carefully tore the edge along the flower image, and sponged with Soft Suede ink. The small strip of Baja Breeze card stock is also sponged in Soft Suede. The layer of Soft Suede card stock is distressed along the right edge to add more subtle detail.
I really like the unique look of this card. Have fun experimenting with Soot Stamping... why not try it on a few Halloween projects?  :)

*Note: while this technique is a great look for cards, I wouldn't recommend it for your treasured scrapbook pages.

Pin It!

Tuesday, August 16, 2011

family time

Apologies for the long break in posts... I took a little break to spend some more family time. For those of you who don't know, my husband (a synthetic - organic chemist) was laid off at the end of January. While he continues to keep a positive attitude and diligently search for a new position, it has been challenging emotionally. We needed some "fresh air," so we took a short trip to visit family. I even got to spend a whole day with my niece, Olive, who is almost 4 months old. I just love her to pieces! I'll have a digital scrapbook page to share with you later, but in the meantime, here's today's card:

This card features the "striped wipe" technique. It's super easy! On the 4"x5-1/4" layer of Glossy card stock, I made the striped background using a baby wipe and 4 colors of Classic Ink Refill (Wisteria Wonder, Lucky Limeade, Blushing Bride, and Poppy Parade). All you have to do is fold up a baby wipe and add a few drops of ink on the front of one of the folded edges. Then just drag the wipe along the Glossy card stock.
The focal point uses the Hello Blossoms stamp on page 7 of the Summer Mini. I used markers to "ink" the stamp (Wisteria Wonder, Lucky Limeade, Blushing Bride, Poppy Parade, Peach Parfait, Daffodil Delight, and Always Artichoke). A bit of 1/8" Taffeta Ribbon in Old Olive adds a nice finishing touch.
Have fun experimenting with different color combinations on your next background!

Pin It!
Related Posts Plugin for WordPress, Blogger...