Showing posts with label Wisteria Wonder. Show all posts

Sunday, May 5, 2013

trends in papercrafting

Sometimes it's fun to be trendy... run with the IN crowd. Just be sure to put down your craft scissors before you run.   ;) 
This card is the "cat's meow," and has some of the latest craft trends all over it! I started with the idea of wanting to make a card using blues and purples. Then I thought giving it sort of an ombre look would be great. And you can't leave out chevrons or flags. Throw in some Baker's Twine and a good amount of white space, and you've got yourself one of the hippest cards in town! 
I used the Tasteful Trim Bigz XL die to cut scraps of (from top to bottom) Wisteria Wonder, Elegant Eggplant, Perfect Plum, Baja Breeze, Island Indigo, and Pool Party card stock. Wisteria Wonder Baker's Twine tied into a bow around the 1-1/4 x 2-1/2" Pool Party DSP looks pretty darn cute. 
What? What stamp? Oh! You want to know where I got that neat-o greeting that's stamped in Elegant Eggplant? Um, yeah. That's from an awesome (and very trendy!) Hostess stamp set in the upcoming catalog. That's right, Banner Greetings is a Hostess stamp set. Why? Because we know that you want to be like all the other super-cool people and host your own stampin' party so you can get cute, trendy, free stuff too! C'mon... you know you want too...   ;) 

Pin It!

Thursday, February 14, 2013

Happy Valentine's Day!!

I hope everyone had a fabulous day. I have a quick post to share with you tonight... a little Valentine's love I left in the teacher's lounge (at the kids' school) today  :} 
I simply covered a can of coffee with some Twitterpated DSP and card stock. The cute little coffee cup stamp is from one of the stamp sets you can get for free right now during Sale-a-Bration  -- Patterned Occasions (w:129621  c:129624) 

I used the 3-1/2" Circle die to create the perfect background to cover the lid. The heart Embosslit and Punches made it easy to add pretty details. If you don't already have the Teeny Tiny Wishes stamp set, add it to your cart - it has 24 greetings to cover almost every occasion! 

How about a bonus project tonight??? Here's the Valentine card Aaron chose for his teacher:
He likes the images from the Up, Up & Away stamp set... but what kid doesn't like baloons??? 

 Thanks for dropping by!! Love ya... mmmmwaaah!  :} 

Pin It!

Tuesday, August 28, 2012

green and purple

And so the crayon gifts continue... 

Green Day
A big "thank you" to my Mom for creating this darling froggie to hold the green crayons! Isn't he adorable???  :} 

Purple Day 
And a big "thank you" to the Beautiful Butterflies Bigz Die for making this gift super cute and super easy to create!


Pin It!

Tuesday, February 7, 2012

eventful morning

There's nothing like trying to grab a few extra minutes of sleep, only to jump out of bed at the sound of scraping metal coming from the front of your house. I live in a nice neighborhood, with lots of nice neighbors, and a few "not-so-nice" neighbors. One of my "not-so-nice" neighbors backed up his large delivery truck and got stuck at the end of my driveway. While I was getting dressed so I could go speak with him, he and his friends got the truck un-stuck, and then he drove off.  Not nice  :(  Here's the damage he left behind:
I am so very thankful to live in a nice community with such a nice police department. The officer that took my report this morning was so friendly and helpful.  Hmmm... I might just have to send a thank-you card to the police station...

Anywho... on to more pleasant things!
I LOVE, LOVE, LOVE this card! It's one of the cards from my "Oh Scrap" class, and works perfectly for the theme challenge on the Paper Players blog - using flowers.
You know how you end up with all those skinny strips of Designer Series Paper? This is a fun way to make sure those little coordinating strips of paper don't go to waste!
All of the 1/2" wide strips of paper on this card are from the Berry Blossoms DSP. The three flowers (stamped in Calypso Coral, Lucky Limeade, and Wisteria Wonder) are from the coordinating Fruit & Flowers stamp set. I snipped each flower (I do love the 'fussy-cutting'), attached each with a Dimensional, and added a Rhinestone to each center for some fun bling. The sentiment from Elementary Elegance is stamped in Early Espresso.
I wish you could see the card in person... it's even cuter than what I can capture with the camera! Here's a view from another angle:
Love it! So stinkin' cute  :}
Do you have a favorite flower stamp or technique? I'd love to hear about it - feel free to leave a comment on your favorite way to use flowers on your projects.

Pin It!

Thursday, October 27, 2011

Sweet Centers Halloween

I have to admit that I don't use the Sweet Centers stamp set as much as I'd like. It does take a little bit more time to make a card with this set, and time is something I wish I had more of. So I was really happy the other day when I had a few extra minutes to make a Halloween card with this set. In case you have ever wondered how to use this stamp set and the Circle Treat Cups, I took a few pictures as I was working.
This is the finished card, which measures 5" x 3-1/2". I took my color cues from the candy corn - Daffodil Delight, Pumpkin Pie, and Whisper White - and added Wisteria Wonder and Basic Black for contrast. So, here's how it all came together...
I inked my stamp in Wisteria Wonder, and then colored the spider image and smaller words with a Basic Black marker before stamping onto Whisper White card stock. I punched out the center image with the 1-1/4" Circle punch. Then, I punched out the remaining center with the 1-3/4" circle punch, and discarded that "ring." After trimming the outside image with my Snips, I attached it to a 3" x 2-3/4" layer of Pumpkin Pie card stock. Lining up the 1-3/4" Circle punch over the hole, I punched through the Pumpkin Pie card stock. I layered the "eek" sentiment onto Basic Black punched with the 1-3/8" Circle punch, and set my two pieces off to the side.
Using the focal point image as a guide for the placement of the treat cup, I punched my card base with the 1-3/4" Circle Punch. Then I filled a Circle Treat Cup with candy corn, removed the backing, and adhered a layer of heavy duty aluminum foil that I punched with the 2-1/2" Circle Punch.
To make it easier to line up the card base and the treat cup, I pressed my finger (gently) along the inside rim to indent the foil. Then I used Sticky Strip to attach the treat cup to the card base.
The treat cup is attached to the front of the card; I kept the treat cup on the desk and placed the card over it. This is the inside view of the card. It will be very easy to get the candy out  :)
Next, I worked on the front of the card. I tied on the ribbon first, then attached the focal point using dimensionals. To finish the card, I attached a Mini Brad to the sentiment and adhered that to my card using a dimensional.
So, here's the finished card again...
I hope you think it's as cute as I do :) Luckily there's a stamp in this set to make your Circle Treat Cup look like an ornament, so I get to make some Christmas cards with Sweet Centers... just as soon as I find another extra minute ;)

Pin It!

Tuesday, September 20, 2011

more team-meeting projects

Hello stamping friends! I'm playing a little catch-up this week, but it feels good to be back into my stamping groove. I have two projects to share with you today, both from my August team meeting.


I really wanted to use the Flirtatious Designer Fabric to make a cute rosette, like the one I learned to make with my Convention Make-and-Take projects. (Yes, I have actually finished every single Convention project... first time ever!) I am really enjoying using the new Wisteria Wonder, so I turned to my Color Coach, which suggested I add Lucky Limeade and Elegant Eggplant. To make the fabric rosette, I used a 1" x 12" strip of fabric. First, tie a knot at one end, and adhere to the center of a square cut from a Sticky Sheet. Using every ounce of coordination you have, twist the fabric strip at the same time as you wrap it around the knot, pressing it into the Sticky Sheet. Trim excess Sticky Sheet, and adhere the rosette to your project. On this card, the rosette is adhered to Elegant Eggplant card stock punched using the Blossom Bouquet Triple Layer Punch.
I stamped the stem image from Raining Flowers in Lucky Limeade ink onto Lucky Limeade card stock, and slipped a piece of Flirtatious Specialty DSP (that matches the fabric -- LOVE that!) behind that layer before attaching to the Elegant Eggplant layer. The sentiment from Curly Cute is stamped in Elegant Eggplant ink.


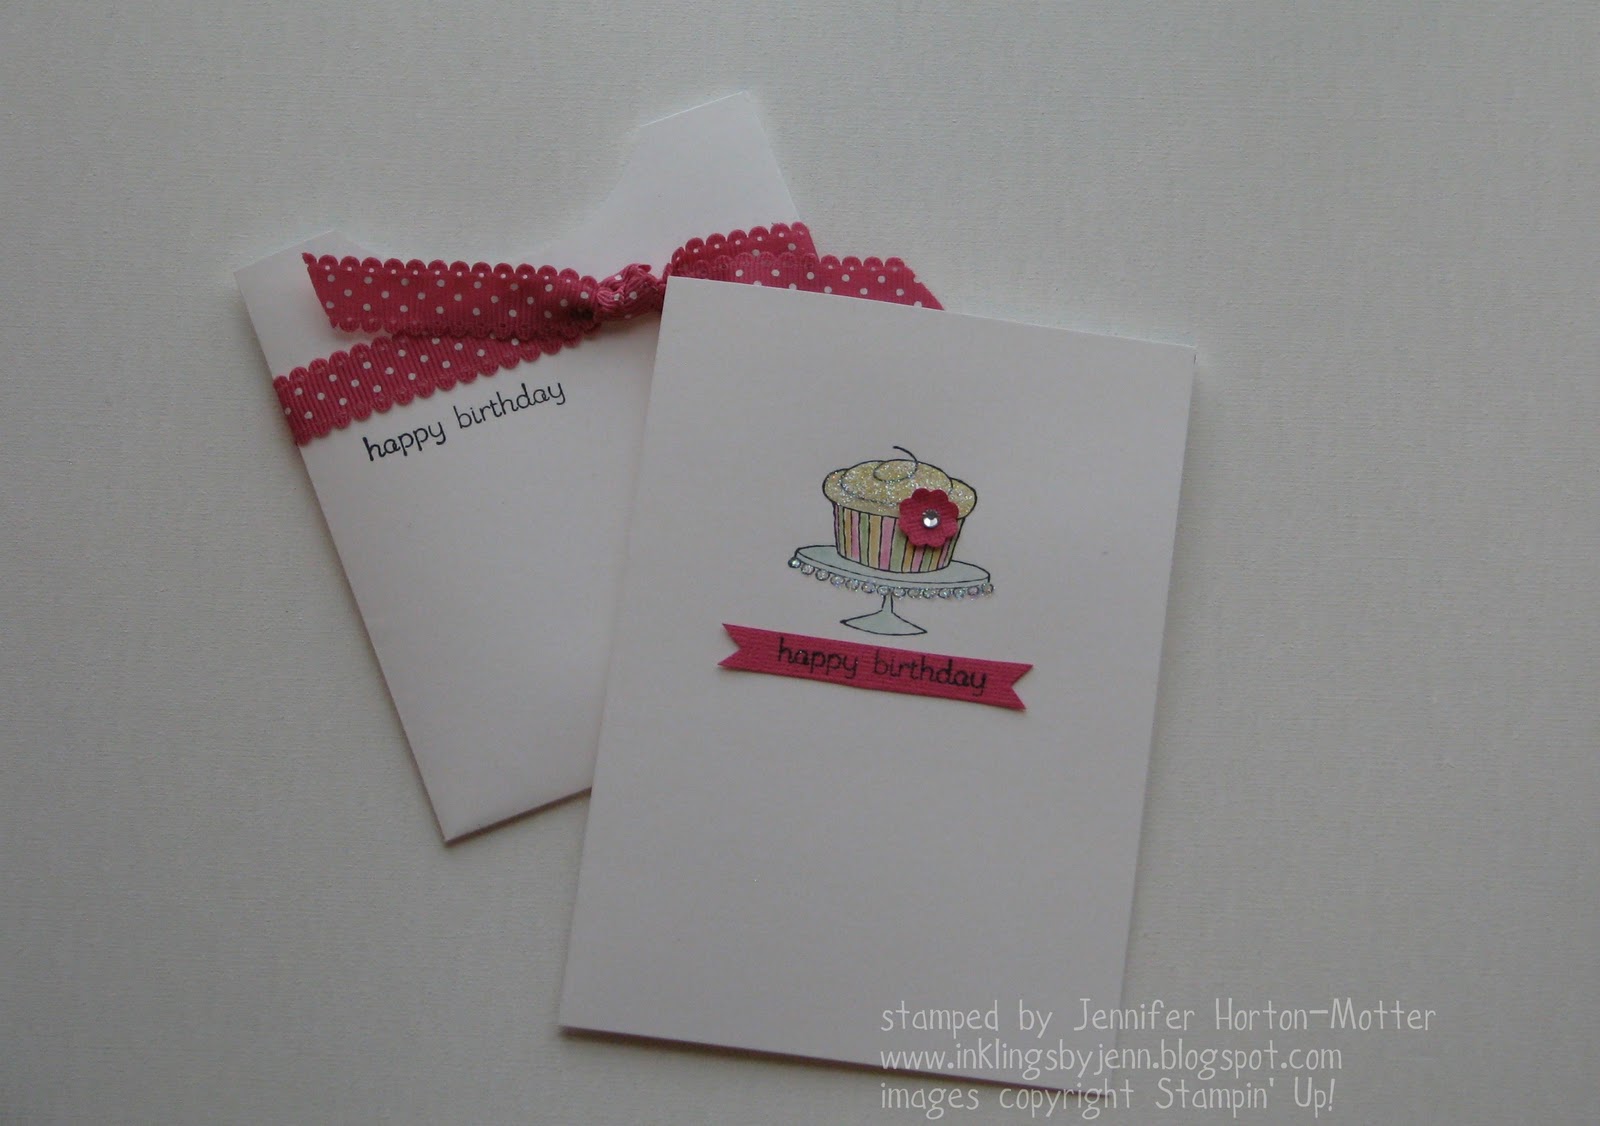
This card is from my "Workshop in a Bag" treat I got at Convention. It uses the Note Cards, which are great to have around in your stamping stash for quick little projects. You get twenty 3-1/2"x5" pre-cut and pre-scored notecards, plus envelopes... awesome!

While the card looks very fancy, it's really quite simple. Just be sure to stamp your image with StazOn® ink if you are going to color it in. This pretty little cupcake is from Easy Events - a great "covers-everything" kind of set. I used a Blender Pen with Daffodil Delight, Melon Mambo, Peach Parfait, and Wild Wasabi to color the cupcake; the cake stand is colored with Pool Party.
Here's a close-up of the "bling":
To get a little sparkle on your projects, tap your 2-Way Glue Pen onto the chosen area, and sprinkle on some Dazzling Diamonds Glitter. So pretty!!

Pin It!

Tuesday, August 16, 2011

family time

Apologies for the long break in posts... I took a little break to spend some more family time. For those of you who don't know, my husband (a synthetic - organic chemist) was laid off at the end of January. While he continues to keep a positive attitude and diligently search for a new position, it has been challenging emotionally. We needed some "fresh air," so we took a short trip to visit family. I even got to spend a whole day with my niece, Olive, who is almost 4 months old. I just love her to pieces! I'll have a digital scrapbook page to share with you later, but in the meantime, here's today's card:

This card features the "striped wipe" technique. It's super easy! On the 4"x5-1/4" layer of Glossy card stock, I made the striped background using a baby wipe and 4 colors of Classic Ink Refill (Wisteria Wonder, Lucky Limeade, Blushing Bride, and Poppy Parade). All you have to do is fold up a baby wipe and add a few drops of ink on the front of one of the folded edges. Then just drag the wipe along the Glossy card stock.
The focal point uses the Hello Blossoms stamp on page 7 of the Summer Mini. I used markers to "ink" the stamp (Wisteria Wonder, Lucky Limeade, Blushing Bride, Poppy Parade, Peach Parfait, Daffodil Delight, and Always Artichoke). A bit of 1/8" Taffeta Ribbon in Old Olive adds a nice finishing touch.
Have fun experimenting with different color combinations on your next background!

Pin It!

Thursday, July 21, 2011

Hostess Gift

So I got home very late Monday night, and ran around like a crazy woman all day Tuesday getting ready for Tuesday night's workshop. But it was a good crazy - I was so happy to be stamping right away after all of the Convention excitement.

Shelli's daughter, Shalae, did her first Convention stage presentation this year. Shelli and Shalae demonstrated a cute little gift box, that I thought would be a perfect hostess gift. So, here is my version of the gift box:
I really wanted to show off the pretty new 'In Color' Wisteria Wonder. So I turned to my Color Coach to guide me in choosing other colors to coordinate with my project. The Color Coach suggested adding Lucky Limeade and Elegant Eggplant. I like this combo, but I wanted to add some pink, so I chose Pretty in Pink to brighten up the project.
I used the Box #2 Bigz XL die to make the box, and then filled it with  little chocolates. The 11" long band of Wisteria Wonder card stock has been punched on each end with the Scallop Edge Border punch, and adhered to the bottom and sides of the box. I used the circle punch from the Itty Bitty Shapes Punch Pack to make a hole, and then I tied on Pretty in Pink 1-1/4" Striped Grosgrain Ribbon. I used the Fun Flowers Bigz L die to cut the Lucky Limeade and Elegant Eggplant flowers. The flower image from Raining Flowers (available in wood mount or clear mount) is stamped in Wisteria Wonder ink and cut out with Snips. A Wisteria Wonder Designer Printed Brad makes a great flower center. All of the flower layers are attached with Dimensionals.
Can't you just picture yourself making some of these for your coworkers? It would be a great, inexpensive gift, sure to bring a smile to everyone's face.
I have more ideas for hostess gifts... Contact me today so we can schedule your next stampin' play time :)

Pin It!

Saturday, June 4, 2011

In Color fun

I really like how the new "In Colors" look together! Scraps of each color were out on my desk this morning, which made me want to create a card to show them off. And that just made me happy :)

Supplies: Delicate Doilies and Heard from the Heart stamp sets; Crumb Cake, Whisper White, Calypso Coral, Island Indigo, Lucky Limeade, Pool Party, & Wisteria Wonder card stock; Calypso Coral, Island Indigo, Lucky Limeade, Pool Party, & Wisteria Wonder ink; Basic Rhinestones, Doily Triple Layer Punch.

Pin It!
Related Posts Plugin for WordPress, Blogger...