 | |
| www.stamp_pad.stampinup.net Be sure to check out the Clearance Rack, too! |

Monday, November 21, 2011
Wednesday, November 16, 2011
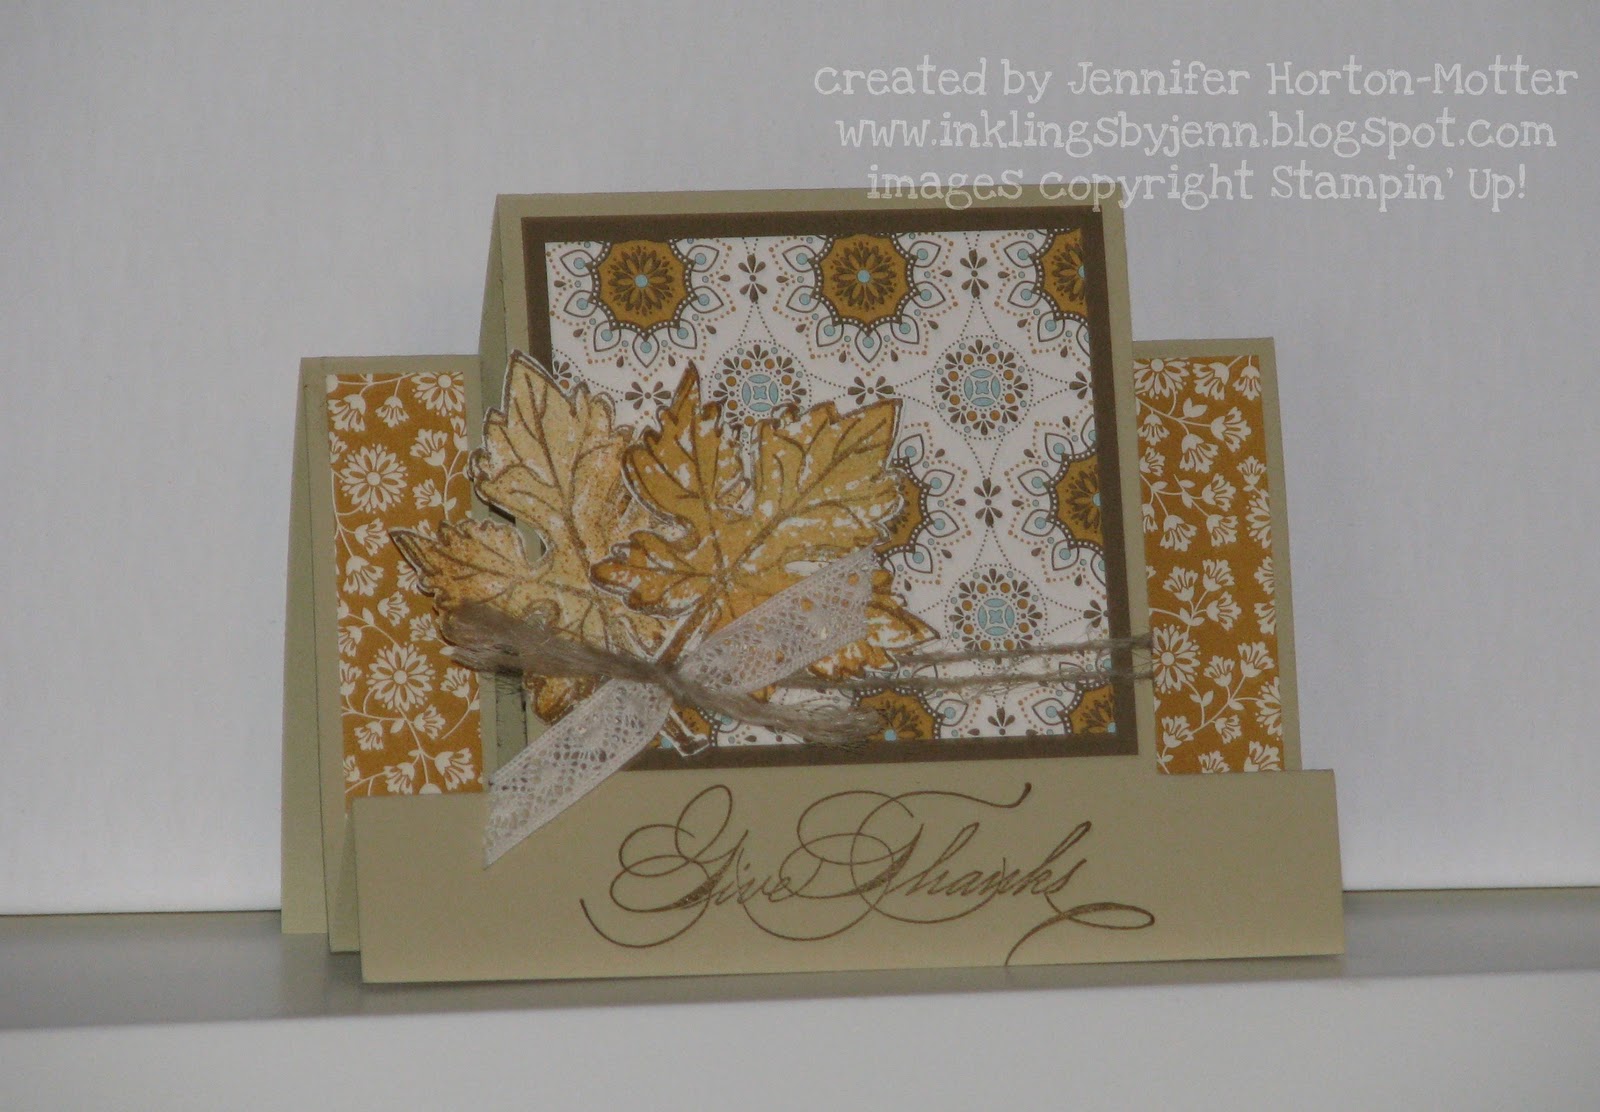
Give Thanks card
As promised, here is the other "make-and-take" project from Kimberly's workshop:
 I love using this layout for quick and easy cards. The layout is simple, but you can make the individual pieces as complex as you like. Click here to see another card using the same layout.
For this card, we used Soft Suede for the card base. The strip of Spice Cake DSP has a Basic Pearl at the corner for some pretty elegance. To create the focal point, we stamped the solid image leaves from Gently Falling in River Rock, Pear Pizzazz(stamped off), and Soft Suede(stamped off) ink. The outline images are all stamped in Early Espresso. To add some texture, we ran the stamped piece of Very Vanilla card stock through the Big Shot using the Houndstooth Embossing Folder. The sentiment from Hand-Penned Holidays is stamped in Early Espresso onto Pear Pizzazz card stock. Then we distressed the edges for more texture.
Here's a close-up so you can see the added details:
 Thanks for stopping by today - what cards will you make using this layout??? :)

For this card, we used Soft Suede for the card base. The strip of Spice Cake DSP has a Basic Pearl at the corner for some pretty elegance. To create the focal point, we stamped the solid image leaves from Gently Falling in River Rock, Pear Pizzazz(stamped off), and Soft Suede(stamped off) ink. The outline images are all stamped in Early Espresso. To add some texture, we ran the stamped piece of Very Vanilla card stock through the Big Shot using the Houndstooth Embossing Folder. The sentiment from Hand-Penned Holidays is stamped in Early Espresso onto Pear Pizzazz card stock. Then we distressed the edges for more texture.
Here's a close-up so you can see the added details:


Monday, November 14, 2011
A little Christmas Card
Hello stamping friends! I am super excited for tonight... Kimberly's workshop! Kim is very new to stamping, so I'll have to go easy on her ;)
Here's one of the Make-and-Take projects for tonight:
 This 3x3 card is so cute! The base is Cherry Cobbler, and the Garden Green layer is die cut using the Perfect Pennants Bigz L die. I punched a layer of Crumb Cake textured card stock with the 2-1/2" Circle punch, crumbled it, and sponged on some Crumb Cake ink. The cute little stocking from Stitched Stockings is stamped in Cherry Cobbler and punched out with the Stocking builder punch. And how cute is that Mini Jingle Bell tied on with Cherry Cobbler Baker's Twine??!! :)
Well, bye for now... I'll share the rest of the projects from tonight's workshop with you later this week. Happy stamping!!
Here's one of the Make-and-Take projects for tonight:

Well, bye for now... I'll share the rest of the projects from tonight's workshop with you later this week. Happy stamping!!
Saturday, November 12, 2011
Easel Card
This easel card was one of my favorites from my Fun Folds class (yes, I have lots of favorites).
 It's a standard size card (4-1/4" x 5-1/2") that can be propped open for display. Cute!! And really easy to create...
I scored a 4-1/4" x 11" (1/2 sheet of card stock cut the 'long way') piece of Island Indigo card stock at 5-1/2" and 9". Then, I folded the card stock in half at the 5-1/2" score. You will now have a score line on the front of your card base. This bottom part of the card gets folded up. Then I took a 4-1/4" x 5-1/2" piece of Island Indigo card stock and adhered it to that folded up portion of the card base. So when the card is closed (flat), you won't see that there's an extra piece. I finished the front of my card with a layer of Lucky Limeade card stock and a layer of Whisper White card stock, stamped all pretty using using the Raining Flowers stamp set. The sentiment on the front is from the It's Your Day stamp set. A piece of Island Indigo Ruffled Ribbon with a simple knot is the perfect embellishment.
 On the inside of the card, I adhered a strip of Lucky Limeade card stock. I stamped the sentiment from Heard From the Heart in Island Indigo onto Whisper White, and adhered a strip of Cherry Cobbler card stock (punched with the Dotted Scallop Ribbon Border punch) behind it. Then I attached this piece using Dimensionals, so that when the card is opened, you can rest the bottom edge of the card front against the 'popped up' strip.
I know lots of friends and family who save every hand-stamped creation, and like to display them. This is the perfect card for that! Happy stamping!!

I scored a 4-1/4" x 11" (1/2 sheet of card stock cut the 'long way') piece of Island Indigo card stock at 5-1/2" and 9". Then, I folded the card stock in half at the 5-1/2" score. You will now have a score line on the front of your card base. This bottom part of the card gets folded up. Then I took a 4-1/4" x 5-1/2" piece of Island Indigo card stock and adhered it to that folded up portion of the card base. So when the card is closed (flat), you won't see that there's an extra piece. I finished the front of my card with a layer of Lucky Limeade card stock and a layer of Whisper White card stock, stamped all pretty using using the Raining Flowers stamp set. The sentiment on the front is from the It's Your Day stamp set. A piece of Island Indigo Ruffled Ribbon with a simple knot is the perfect embellishment.

I know lots of friends and family who save every hand-stamped creation, and like to display them. This is the perfect card for that! Happy stamping!!
Friday, November 11, 2011
Shutter Card
Today's post is another card from my Fun Folds class - a Shutter Card.
 It's difficult to see the awesomeness of this card in a flat photo, so I'm working on a video tutorial for the Shutter Card. But for now, I'll give you some quick measurements.
Start with a piece of card stock 5-1/2" x 12". Score at 2", 4", 8", and 10". The next step is to make two cuts, each 1-1/2" from the outer edges. The cuts run from the 2" score line down to the 10" score line. The last step to make the card base is the folding, which is a little tricky for me to explain through typing. I added Paisley Petals DSP to each section except for the middle, which I left blank to write my message. The birthday sentiment is from the Perfect Punches stamp set, and the floral image is from the Simply Soft Hostess stamp set (colored with classic ink and a Blender Pen).
I have one more (adorable!) card to share with you from the Fun Folds class, so be sure to come back tomorrow :)
Wednesday, November 9, 2011
On Dasher...
I often wonder if my boys get confused from August through December. I spend so much time in the late summer and then into fall making Halloween, fall, Thanksgiving, and Christmas projects... all jumbled together. Do they really know when the holidays actually take place??? :)
Anywho, I have a Christmas card to share with you today. This was one of the cards from my October Technique Tuesday class - Fun Folds.


Anywho, I have a Christmas card to share with you today. This was one of the cards from my October Technique Tuesday class - Fun Folds.

The finished card (closed) measures 4"x4".

Slip the "belly band" off to open the card.
This is a "double Z-fold" card, which is super easy to make, and super cute. Start with a 4" x 12" piece of card stock. Score at 2", 4", 8" and 10". Fold and embellish... that's it! I stamped Dasher in Early Espresso onto Whisper White card stock, then I added a little detail to some spots in his antlers using Moonlight Smooch® Pearlized Accent Ink. The sentiment from Christmas Greetings is stamped inside the card using Early Espresso ink.
Thanks for stopping by... have fun stamping whichever holiday you are focused on right now :)
Tuesday, November 8, 2011
a "step up"
At my last Technique Tuesday class (held the last Tuesday of each month), we made cards with fun and unique folds. The "center step" card has a really unique look. I like that it starts out with a half-sheet of card stock, and ends up the same size as a "simple fold" card.

 Oopsies, one little detail that I forgot to add to the template... The "cut" lines are 1" in from each edge.
I look forward to sharing the rest of the Fun Folds cards we made at that class. I already posted the Diamond Fold card - click here to see that post. Have fun folding and stamping!! :)
stamp sets: Gently Falling, Hand-Penned Holidays
DSP: Spice Cake
card stock: River Rock, Very Vanilla, Soft Suede
ink: More Mustard, Soft Suede, Pool Party Marker
ribbon: Chantilly Crochet Trim, Hemp Twine
other: Simply Scored, Color Spritzer Tool, Snips, Dimensionals
I stamped one (solid image) leaf in More Mustard ink at full strength; the other leaf is stamped off first to get a lighter shade. The outline image is stamped in Soft Suede. I know it's nearly impossible to see in the photo, but I spritzed a little Pool Party ink onto the leaves with the Color Spritzer Tool.
To get a little bit softer look with the Hemp Twine, I cut the length I needed, frayed one end, and then pulled it apart into two sections. The sentiment barely fits at the bottom, so I used my Stamp-A-Ma-Jig to make sure I stamped in just the right spot.
As a bonus, I made up a little template for you so you can see where to score and cut your card stock to make these pretty cards at home :)

I look forward to sharing the rest of the Fun Folds cards we made at that class. I already posted the Diamond Fold card - click here to see that post. Have fun folding and stamping!! :)
Monday, November 7, 2011
Last day for your FREE digital downloads
I saved the best for last in my stretch of projects made using My Digital Studio...
 This is a full-page layout I made with photos from our weekend at my Mom's house. I am so thankful for the time I spend with my family, especially my adorable niece. I wanted to take some nice photos of the kids... Well, at least I have photos. Trying to get three children to not only sit still, but to look at the camera (preferably all at the same time), not make a goofy face, and smile proved to be impossible :)
While my first passion is to use the real life supplies, I like some of the cool techniques you can do with digital crafting. For example, if you look carefully, you can see the argyle "texture" I added to the background to mimic the design on the boys' shirts. And one of my favorite techniques, is using the "color picker" feature to match the colors on my project to the colors in my photos- awesome! Of course it's nice that I could use a TON of "supplies" to make this page, and I don't have anything that needs to be put away now that I am done :)
Punches: Tall Heart, Medium Heart, Small Heart, A Year in Review- Curve Punch
Embellishments: Button Latte, Stitching, Whisper White Brads, Whisper White Grosgrain Ribbon
If you haven't already done so, go right now to MyDigitalStudio.net to get your FREE downloads. Remember, if you don't have My Digital Studio - yet ;) - you can use these digital images in other programs. Everything you will ever need to know is on MyDigitalStudio.net :)
And, you can always shop for traditional and digital supplies in my online store. Have a great day!!

While my first passion is to use the real life supplies, I like some of the cool techniques you can do with digital crafting. For example, if you look carefully, you can see the argyle "texture" I added to the background to mimic the design on the boys' shirts. And one of my favorite techniques, is using the "color picker" feature to match the colors on my project to the colors in my photos- awesome! Of course it's nice that I could use a TON of "supplies" to make this page, and I don't have anything that needs to be put away now that I am done :)
MDS supplies-
Stampbrush Sets: So Typefelt, Fundamental Phrases, Fabulous Phrases, Convention 2011, Good Grid, One of a Kind, Hip & Handsome Overlays, Baroque Motifs, All Scallops, Holiday BlitzPunches: Tall Heart, Medium Heart, Small Heart, A Year in Review- Curve Punch
Embellishments: Button Latte, Stitching, Whisper White Brads, Whisper White Grosgrain Ribbon
If you haven't already done so, go right now to MyDigitalStudio.net to get your FREE downloads. Remember, if you don't have My Digital Studio - yet ;) - you can use these digital images in other programs. Everything you will ever need to know is on MyDigitalStudio.net :)
And, you can always shop for traditional and digital supplies in my online store. Have a great day!!
Sunday, November 6, 2011
Digital Postcard
Happy Sunday :)
Today I have a quick post for you... a postcard front I created using My Digital Studio.
 MDS supplies: Wisteria Wonder Textured card stock, So Typefelt and Creative Elements stampbrush sets.
So Typefelt is included in the FREE downloads from Stampin' Up!. If you haven't downloaded yours yet, be sure to stop by MyDigitalStudio.net today! Not only can these downloads be used with the My Digital Studio software, they can be used with other computer programs, too! So tell your Mom, your sister, your neighbors, your mail carrier... they're FREE!
Today I have a quick post for you... a postcard front I created using My Digital Studio.

So Typefelt is included in the FREE downloads from Stampin' Up!. If you haven't downloaded yours yet, be sure to stop by MyDigitalStudio.net today! Not only can these downloads be used with the My Digital Studio software, they can be used with other computer programs, too! So tell your Mom, your sister, your neighbors, your mail carrier... they're FREE!
Saturday, November 5, 2011
Happy Digital Scrapbooking Day!!
Did you get you FREE downloads yet? They're awesome! If you haven't, go to MyDigitalStudio.net by November 7th for project ideas and the free downloads. And while I think MDS is the best and easiest digital papercrafting program I have ever used, you can use Stampin' Up!'s digital downloads with other computer programs.
I used another template today. It's from the Home For The Holidays ensemble. Could holiday decorating get any easier??? Open template, print (or send to our professional printing service), frame, display. And, why not print more than 1 to give as gifts???!! Smart!
It was really easy to work with the template. (Hint- check out the project ideas on MyDigitalStudio.net) After opening my project, I moved a few of the "stamped" images to the right, deleted one image, added my photo with a mat, typed my journaling, and finished with two "staples" on the top corner of the photo. That part literally took less than 5 minutes. If you were making only the page, you would be done.
So here's the project, ready for framing...

Even though the template is an 8.5 x 11 page, I used the "add music/narration" feature to turn my project into a "movie" so I could include Aaron's sweet little voice singing a Christmas song. Now I can easily email this to friends and family :)
Adding the singing took me a little while... not due to the program - that part was easy. Aaron singing to me was originally a video on my phone. Long story short... I first embedded the video into my project, which works fine on my computer, but won't play back correctly on my blog. So I had to find a way to make it an audio file. I won't even go into those details, but I'm sure there was a more simple, faster way to do it. I was NOT born with the technology gene ;)
Anywho... I hope you enjoy my project. Isn't Aaron cute???!
Friday, November 4, 2011
8x8 Digital Page
I've already started having fun with my FREE downloads. I used one of the "designer templates" to scrapbook this wonderful photo of my boys. Using the templates is a great way to give your scrapbooking a fast start. I did adjust the photo size a little, and I moved some pieces of "tape" to work better with my photo. I also changed the title to suit my page.
 My Digital Studio supplies: Neutral Delightful Digital Tape Designer Template, So Typefelt Stampbrush Set
Be sure to go to MyDigitalStudio.net to get your FREE downloads.

Be sure to go to MyDigitalStudio.net to get your FREE downloads.
Time to Celebrate
I wasn't aware there was a Digital Scrapbooking Day... but hey, if it means free stuff for me, bring it on!! Be sure to go to MyDigitalStudio.net to fill out a short survey and get your free downloads.


Thursday, November 3, 2011
Gift Tag
One of my husband's hobbies is making wine... and as a good wife, one of my hobbies is making sure he has enough empty bottles to refill ;)
The handy part of having a good amount of wine in your basement, is that it makes a really nice gift. But, of course you can't give a friend a "naked" bottle.
 The Pool Party card stock measures 5-1/2" x 4". I dry embossed the Very Vanilla layer using the new Snow Burst embossing folder. Very Vanilla Seam Binding makes a pretty bow, and holds the tag onto the bottle.
 To make the medallion from the Spice Cake DSP, I used the Simply Scored to score a 12" long and a 6" long (1-1/2" wide) strip every 1/4". After accordion folding both strips, I adhered them together, and then adhered the ends together to form a loop. Then I pressed the loop flat onto a punched circle covered in Multipurpose Glue. I cut the Soft Suede scalloped circle using the Perfect Pennants Bigz L die and my Big Shot. I stamped the Triple Treat Flower three times in Soft Suede, More Mustard, and Pool Party ink, then punched each layer using the Fancy Flower, 5-Petal Flower, and 1/2" Circle punches. A Basic Pearl adds a nice finishing touch.
I love making the medallions with the Simply Scored! Right now I am working on a wreath similar to the one on p6 of the Holiday Mini Catalog. I can't wait to get it finished and share the pictures. Guess I'd better get back to work! :)
The handy part of having a good amount of wine in your basement, is that it makes a really nice gift. But, of course you can't give a friend a "naked" bottle.


I love making the medallions with the Simply Scored! Right now I am working on a wreath similar to the one on p6 of the Holiday Mini Catalog. I can't wait to get it finished and share the pictures. Guess I'd better get back to work! :)
Wednesday, November 2, 2011
Faux Tile
I love, love, love using my Simply Scored scoring tool. It's so easy to make fun projects with it! One neat technique is "faux tile."
 stamp set: Day of Gratitude
card stock: Pear Pizzazz, More Mustard, Very Vanilla, Soft Suede, River Rock
accessories: Chantilly Crochet Trim, a brad from Vintage Trinkets, Spice Cake DSP
tools: Color Spritzer Tool, Decorative Label punch, 1/16" Circle punch
ink: More Mustard, Pear Pizzazz, Soft Suede, River Rock, River Rock marker
The "faux tile" technique is super easy. Start with a piece of Whisper White or Very Vanilla card stock. For both the length and width, you will want to cut your piece in half-inch increments. The Very Vanilla card stock on the above card measures 2" x 5-1/2".
 Using the small tip of the stylus, score every 1/2". You will want to press firmly so that you get a really good indentation.
Next, just stamp your images using gentle pressure so that your image doesn't stamp in the "grout lines." You can also use a sponge to gently rub ink (River Rock used on my card) onto your "tiles." Again, rub gently to try to keep the "grout lines" clean.
That's it! Easy and fun :)
Stop by my Facebook Page to see another card using the "faux tile" technique.

card stock: Pear Pizzazz, More Mustard, Very Vanilla, Soft Suede, River Rock
accessories: Chantilly Crochet Trim, a brad from Vintage Trinkets, Spice Cake DSP
tools: Color Spritzer Tool, Decorative Label punch, 1/16" Circle punch
ink: More Mustard, Pear Pizzazz, Soft Suede, River Rock, River Rock marker
The "faux tile" technique is super easy. Start with a piece of Whisper White or Very Vanilla card stock. For both the length and width, you will want to cut your piece in half-inch increments. The Very Vanilla card stock on the above card measures 2" x 5-1/2".

Next, just stamp your images using gentle pressure so that your image doesn't stamp in the "grout lines." You can also use a sponge to gently rub ink (River Rock used on my card) onto your "tiles." Again, rub gently to try to keep the "grout lines" clean.
That's it! Easy and fun :)
Stop by my Facebook Page to see another card using the "faux tile" technique.
Subscribe to:
Comments (Atom)