Showing posts with label Lucky Limeade. Show all posts

Thursday, May 16, 2013

the best things in life

The best things in life really aren't things... but sometimes it takes a few things to help make the good stuff happen. 
Giving myself time to relax and let go of stress is definitely a good thing. Quiet time with my stamping goodies does just that. Sending a hand-stamped card to brighten someone's day is also one of the good things in life, so it works out quite nicely! 
After distressing the edges of the 4 x 5-1/4" Certainly Celery layer, I stamped my greeting (Feel Goods) in Lucky Limeade ink, and adhered that layer directly to my Certainly Celery card base. 
Even though coordinating stamp sets and Framelits are technically "things," I would have to say they might just lean towards being one of the best things in life simply because they make my crafting time easier and more enjoyable.  :}   For this card I used the Secret Garden stamp set and Framelits. The flowers are stamped in Calypso Coral ink onto Whisper White card stock, and the leaves are stamped in Lucky Limeade ink onto Certainly Celery card stock. One flower is adhered directly to the card, another has 1 Dimensional under it, and the third flower has two Dimensionals under it. 
Besides quiet stamping time for yourself, what are some of the "best things" in your life?

Pin It!

Sunday, May 12, 2013

Happy Mother's Day!

Today is such a special day... A day for thanking our Moms and all of the Mother figures in our lives who have guided us, prayed for us, and taught us to be who we are today. 
One of the best things about stamping your own cards, is that you can create a one-of-a-kind card that fits the personality of the receiver. My Mom loves the vintage style, and really loves cards with lots of layers. I worked on this card quite a while yesterday to get it "just right." Hope she likes it! 
I started with a Pretty in Pink card base. To that I added a layer of Tea For Two DSP, which I dry embossed in the Lacy Brocade Embossing Folder to double-up on the quilted look. Then came the layers... 
For the two sentiments I used two different stamp sets - You're Amazing and Teeny Tiny Wishes. Both sentiment layers have Crumb Cake ink sponged around the edges, and the larger sentiment also has a little spritzing on it with a Lucky Limeade marker. 
Since my darling angels that made me a mother are begging for breakfast, I'll give you the shorthand version for the rest of the layers.  :} 
Delicate Doilies Sizzlit, Lucky Limeade card stock

Happy Mother's Day to all of our mothers, in our homes and in our hearts, and to all those who have "mothered" us through the years. God bless you!  

Pin It!

Tuesday, May 7, 2013

Teacher Appreciation Week - Tuesday

I love how paper-crafting can turn something ordinary into something adorable. And giving it as a gift... well, that's just awesome! 
For Teacher Appreciation Week, I thought it would be nice for the boys to bring little treats wrapped up in cute packaging. I'm trying to keep the gifts small and light enough so they don't get destroyed during the twelve whole minutes on the bus.  ;)  The gift for Tuesday is strawberry flavored gum, wrapped in Real Red DSP
To ink the strawberry stamp (Fruit & Flowers): I inked the berry in Real Red ink, used a Blender Pen like an eraser to remove the red ink from the leaf area, and then colored the leaf and stem with a Lucky Limeade Marker
The image is punched out with the 1-3/8" Circle punch, then layered over Lucky Limeade card stock die-cut on the Delicate Doilies Sizzlit. A doubled bow of Lucky Limeade Baker's Twine adds the perfect finishing touch. 

In my last post, I started sharing Aaron's ABC animal alphabet book. I know several teachers who will like these, and I also know several punch art fans who will get some cute ideas. Here are a few more of the pages... 


Pin It!

Tuesday, April 30, 2013

sweet mojo

Here's a little insight into my floopy thought process... When I saw this week's Mojo Monday sketch, I thought, "aww, what a sweet card that would make! Sweet, sweet, something sweet... chocolate, chocolate covered cherries (no clue as to why I thought of those), oh hey - the cherries will be ready to pick in a few months... cherries! I have a cherry stamp!" Can't image where my son gets the ADD from... SQUIRREL!
And so here we are.   :} 
It is a pretty sweet card, isn't it?! The Riding Hood Red card base measures 4-1/4" square (closed). Can you believe I ended up raiding three DSPs (Twitterpated, Summer Smooches, Regals Stack) for those little strips?  *** Tip: I doubled up the Lucky Limeade Baker's Twine before tying it around the 4" square Lucky Limeade card stock so that my bow would stand out more - cute!!
I used Lucky Limeade and Riding Hood Red Markers to ink the cherry stamp (Button Buddies), which I die cut using a Labels Collection Framelit. Two Riding Hood Red buttons (from my vault, of course) are adhered over the fruit with Mini Glue Dots - mega cute!! For my greeting, I used a Basic Black Marker to ink the words on a stamp in the Storybook Friends stamp set.  Happy, happy, happy  :}   
I think pretty much everything I used, except the stamp for my greeting and the Framelit, is retiring. Remember, retiring accessories (DSP, embellishments, ribbon, stamp wheels, card stock) are available only while supplies last. You can shop for your favorites here, before they are all gone. Oh, and several goodies are on sale!  Have a SWEET day!! 

Pin It!

Sunday, April 28, 2013

saying farewell to favorites

While I do get super excited when a new Stampin' Up! catalog is about to start, sometimes it's hard to say goodbye to some of my favorite retiring products. The Build a Blossom stamp set and Blossom Petals punch are two coordinating goodies I'm having trouble letting go of. They will most likely make their way into my "vault."  :} 
I like how you can make a special, elegant flower that's sure to cheer anyone up! The stamp set has both flower and leaf images that fit perfectly in the punch. 
When assembling the flower, I like to punch out a scrap circle to have a base for adhering the petals. 
One of my favorite flowers to make with these goodies is a poinsettia. It looks nice on cards, scrapbook pages, and gifts!

And buried in my computer files was a video tutorial I made a while ago showing you how easy this is to make! 
Don't you just want to make some right now!!  ;)  I love how amazing the flowers turn out. Make a few for your friends and they will think you are the craftiest person they ever met.  :}  
Be to to shop for all of your favorite retiring goodies before they are all gone!

Pin It!

Wednesday, April 17, 2013

Thanks a Million

Well, after yesterday's post, it's time for something a little more normal.   ;) 
How about a simple "thank you" card? I love surprising people with a random act of kindness, and the teachers at the boys' school were due for a treat. I've said it before, but I'll say it again, I am so blessed that my boys attend one of the best schools around. The staff is fabulous! So I took in a pretty "thank you" card and left it in the teacher's lounge with some yummy goodness. Inside I wrote a message about sharing something from our old home with our new home.   :}
The Summer Smooches DSP and Bright Blossoms stamp set are so cute together. I chose my greeting from the Word Play stamp set to compliment my crisp, clean design. 
Isn't that Printed Brad through the Button cute? Somewhere... somewhere, in my craft stash are some craft pliers, but since I couldn't find them, I borrowed the manly garage pliers and squeezed the "legs" of the brad to a narrower width so I could thread them into the button holes. I simply poked two holes into the card stock for the brad "legs" to go through
For all of the teachers who read through my fabulous and amazing blog posts (wink, wink)... wouldn't you love to find this waiting for you in the teacher's lounge on a Monday morning? I loved the reaction from one of the teachers who said she'd never heard of Kringle, because neither had I until we moved to Wisconsin thirteen years ago. Now, after moving again, I know my tastebuds will miss it (not my waistline!). 
I might just have to plan a visit with some friends soon... I'm getting hungry.   ;)

Pin It!

Monday, April 15, 2013

from YUCK to WOW - the evolution of a card sketch

Today has been very productive - yay! Got some laundry done and my grocery shopping finished. (One thing that frustrates me with our new location - having to go to 2 grocery stores to get the things we need, and even then, doing without several things I was used to getting in a larger community.) Then, I had some crafting time with my sister-in-law - double yay!! She worked on birthday party decorations for my sweet little niece, and I worked on cards. 
To get me going, I started with the Mojo Monday sketch 289. Right away I knew it was going to be a challenge for me... it's kind of a "busy" sketch. I'm going to share the first card I made from the sketch, just so you know that I don't love everything I make. In fact, when I finished, I said "this might be one of the ugliest cards I ever made!" My sis-in-law is so sweet and tried to say nice things like, "well, it's bright... maybe it's just the paper." Ummm, yeah... 
The idea I had in my head did not translate well into card stock and paper.   :(   As a joke, my sis-in-law is sooooo getting this in the mail on some random day! I think the message inside will say something along the lines of "I made this just for you to show you how much I care..."

One thing I think turned out well was using two colors for the brad trios. I'll have to remember that for later.

I wasn't going to let this sketch beat me, and I had another triangle of Summer Smooches DSP left, so I started over and made a pretty awesome card, that I am quite pleased with!   :}
Love, love, LOVE, LOVE this color combo- Lucky Limeade, Whisper White, and Rich Razzleberry. It's so striking together! I eliminated the square from the sketch and let the bow from the Lucky Limeade Baker's Twine stand in for the small flower... aaaahh - much better. 
I used one of the Single Stamps for the focal point - the Basic Label stamp fits perfectly in one of the Apothecary Accents Framelits. Then, using the Stamp-a-ma-Jig, I stamped my sentiment (Forever with You) to the left of center, leaving room for the tiny DSP strip and flower to overlap. 
Isn't that flower pretty??? I made it by punching out 7 scallop circles from Rich Razzleberry card stock, which are held together with a brad (can you believe there are 9 brads on this card???). Starting with the top layer, I spritzed some water, and scrunched it up around the brad. I repeated the process, working my way down through the layers one at a time.
Looking at the finished card, I think it's one of the prettiest cards I ever made. So have you ever experienced a YUCK card - something that turned out completely different from your idea? Were you able to fix it? I'd love to hear your story!  :)


Pin It!

Wednesday, April 10, 2013

I've got Mojo, yes I do... I've got Mojo, how 'bout you?

You know when you get in a crafting groove and it just feels so awesome you can't stop??? I LOVE that feeling! And I love a good sketch that just "speaks" to me. This week's Mojo Monday sketch really grabbed my attention - I liked it so much I have both a card and a digi scrapbook page to share today!  Yahoo!!
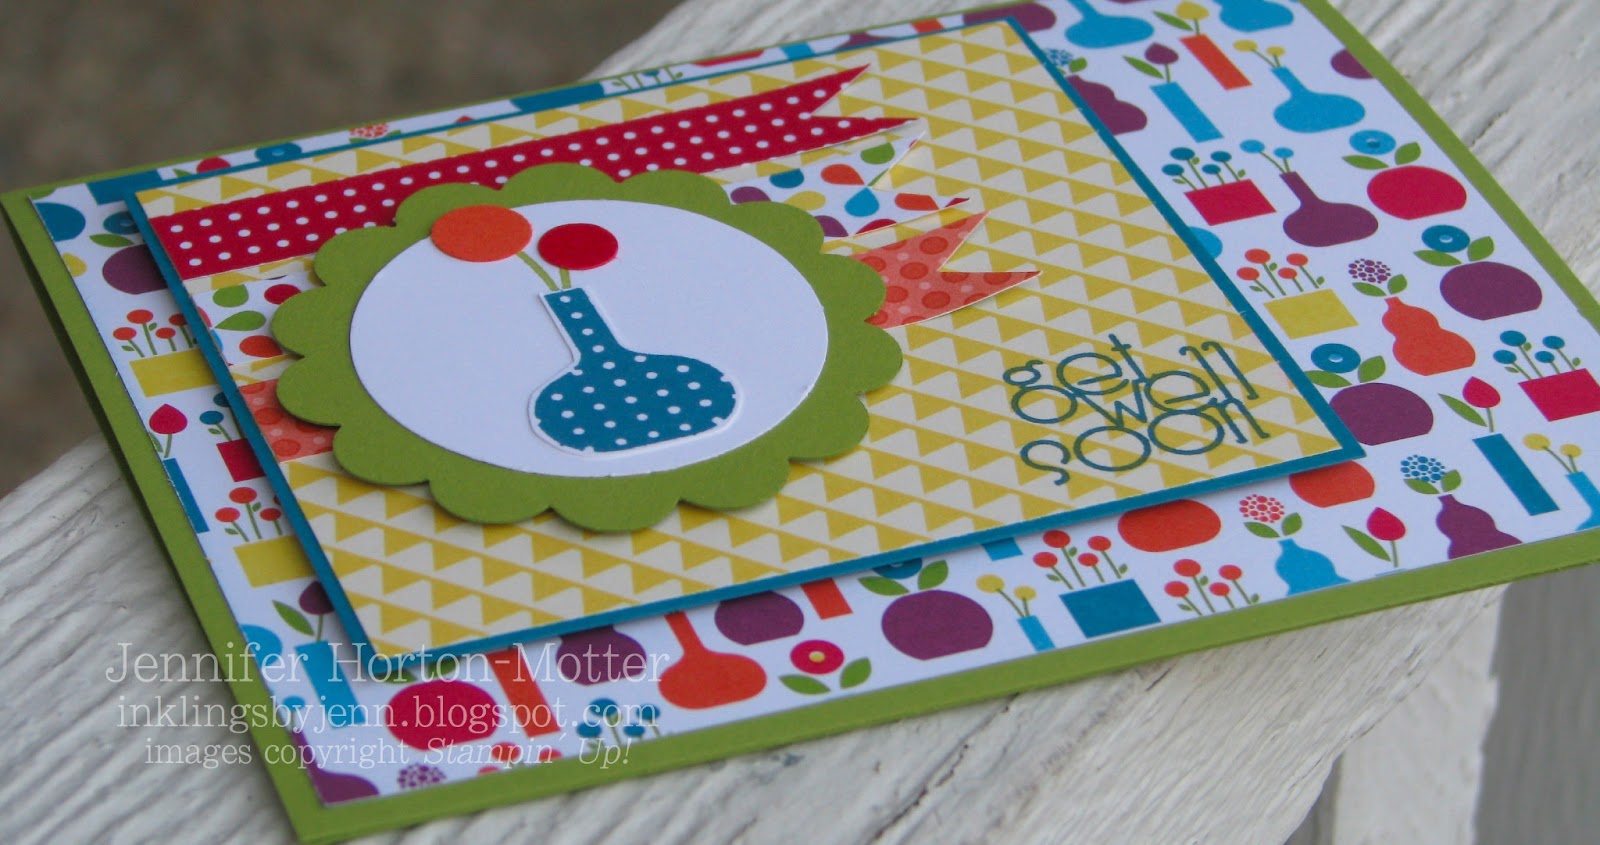
My first Mojo Monday project was this card for a family friend who fell and broke his hip. I thought the bright colors in the Summer Smooches DSP might cheer him up a bit.
For my focal point, I stamped the vase-of-flowers image in Lucky Limeade ink, punched it out with the 1-3/4" Circle punch, and adhered it to the Lucky Limeade Scallop Circle. After cleaning my stamp, I stamped the image again in Island Indigo so I could snip out the vase and adhere it over the Lucky Limeade vase. The circle-flowers on the stamped image were a little small (in my humble opinion), so I used an eye from the Owl punch and a Circle punch (Itty Bitty Shapes pack) to create Real Red and Tangerine Tango card stock flowers. 

Now, as I said, this card sketch really, really "spoke" to me... so I used it to digi-scrap (My Digital Studio) a funny picture of my son, Aaron.  **Warning - you might need your sunglasses! It's pretty bright!  :P  

My husband's Aunt bought the boys new swim trunks and goggles for Easter. Aaron slipped the goggles on right away and went to play outside. He looked so stinkin' funny running around in nice clothes while wearing those neon-yellow goggles.  

Seriously, if you can still see after looking at this neon background, you are smiling now, aren't you??? Gotta love little boys! 
So how did I get that crazy color that matches the goggles??? I used one of my favorite features in My Digital Studio - the color picker tool. Stay tuned next week for more deets on that.  ;) 

Thanks for dropping in today! I'd love to hear what you think about the card or the digital scrapbook page - feel free to leave me a little comment. Have a fabulous day!!  :}


Pin It!

Monday, April 8, 2013

a Fun pink Flower... and LAST day for FREE shipping

It occurred to me the other day that it's been a while since I used the Fun Flowers Bigz Die - gasp!! So I had to fix that situation right away. 
I used the Raining Flowers stamp set to stamp with Pretty in Pink ink onto the same color card stock. After tying some grosgrain ribbon onto a strip of Tea for Two DSP, the real fun began.   :}   
Using the Big Shot, I cut two layers of Regal Rose card stock on the Fun Flowers Bigz Die. To make the flowers soft and pretty, I spritzed them with a little water, crumbled them up, and then opened them and arranged the petals to have a slight curve. After the flowers were dry, I sponged some Regal Rose ink around the edges. A 3/4" Lucky Limeade Circle, and a pink button threaded with Lucky Limeade Baker's Twine make a simple flower center. 

*** Don't forget that today is the last day to get FREE SHIPPING from Stampin' Up! - no minimum; no limit!!!!  Shop now for everything you need to make fabulous Spring projects. ***

Pin It!

Thursday, April 4, 2013

Hey... Happy Birthday!

Today is my little brother's birthday! Sooooo, I'm sharing the card he'll be getting (late - aagh!) in the mail. 
I wanted a masculine card, but with a brighter color combination. I turned to the Color Coach for "advice" and chose the Creative Combination on the Island Indigo card, which suggests adding More Mustard and Lucky Limeade.  (Be sure to read to the end of the post for some information about More Mustard!) 

So what makes a "masculine card"... masculine? 
- texture (Argyle Embossing Folder, distressed and torn edges)
- masculine colors (I'll let each individual decide what that means, but for me it means neutrals, blues, "fall" colors) 
- a simple and/or clean design (I made this card in less than 10 minutes by keeping the details and layout easy) 
- no ribbon (in my humble opinion, Baker's Twine and Linen Thread are exempt from this rule  :P)
I also like to add "extra ink" by sponging edges and/or spritzing with markers and the Color Spritzer Tool
I'll bet you're wondering about those stamped images. Other than the "happy birthday" greeting from the Teeny Tiny Wishes stamp set, the rest of the images are from the new Designer Typeset photopolymer stamps. They are completely clear, and are used with acrylic blocks

Apparently, even though my birthday isn't for another 2-1/2 weeks, I got an early birthday present this morning! 
I couldn't be more excited. I am especially pleased with the changes to the Subtles Collection! I have really missed Pear Pizzazz, and for those of you who haven't been stamping forever, you will really like Soft Sky.   :}     

 And here's a little "birthday present" for you... for whenever your birthday is! It's the card sketch for today's card - yay!! It would make me super happy if you "pinned" this sketch. After all, it's nice to share.   ;)  All you have to do is click that tiny little red "Pin it" button at the bottom of the post. Thanks!
  

Pin It!

Wednesday, April 3, 2013

a fun color combination

While I was playing around with different color combos for my Spring Cards class at the bakery, I came up with this fabulous winner: Certainly Celery, Early Espresso, Lucky Limeade, and Calypso Coral. 
I really like how the Calypso Coral pops against the softness of the Certainly Celery. The Calypso Coral card stock layer needed... something. So, the Honeycomb Embossing Folder came to my rescue. And the layer of Tea for Two DSP at the bottom of the card was the perfect print. I tied Lucky Limeade Baker's Twine around the card twice, and then tied it into a bow before adhering my focal point.
Don't you hate it when a great stamp set goes unused for a while? Me too! I hadn't played with the Best of Everything stamp set in way too long, so I'm glad I was able to dust it off and ink it up! My Lucky Limeade and Early Espresso markers inked the "branch" image, which worked out great as a "little Spring tree" for this card. After stamping the flower image in Calypso Coral onto the same color card stock, I snipped it out and used it on my card instead of a button or brad. 
So what do you think? Is this a color combination you would like to try for a Spring card? I challenge you to try it! Maybe even start with a favorite card sketch and grab a stamp set that might just need a little stampin' action.   ;)   Have fun! 

Pin It!

Monday, April 1, 2013

you're swell

You really are swell... so swell in fact, that you should see one of the easiest cards to make, ever!   :} 
I was inspired by a card in our demonstrator magazine - Stampin' Success. The layout is the same (and yes, I have the simple card sketch at the end of this post - yay!), but I changed everything else. It was a hit at my last card class down at the bakery.   :}
I started with a So Saffron card base, and the DSP layer measures 3-7/8" wide by 5-1/2" tall. 
I stamped the chevron-oval image from the Oh, Hello stamp set in Calypso Coral ink onto the same color card stock, then punched it out with the Curly Label punch. A skinny strip of Lucky Limeade card stock and a 1" punched circle of Early Espresso card stock add more necessary layers.  ;) 
The greeting (from the Ciao, Baby! stamp set) is stamped in Lucky Limeade and punched out with the Petite Curly Label punch. After adhering the layers together, I attached them to my card with Dimensionals. 

Isn't this about the easiest card ever??? I'll bet you're already planning some cards to make using this sketch. Have fun stamping!!

Pin It!

Thursday, March 21, 2013

Feeling Sentimental? Celebrate!

On Friday I had one the most fun classes ever! I hosted a card making class for the Community Club (it's like PTO / PTA) at the boys' school. I had all girls (and their Moms) for this class. These girls were so adorable and had so much fun. Here's one of the cards we made together- 
We used the Sale-A-Bration stamp set Feeling Sentimental. I loved listening to the girls as they made their cards and decided who was going to receive each one. I also enjoyed teaching them a technique or two along the way! 
On this card they learned about 2nd-generation stamping/ stamping off. The ferris wheel image is inked in Soft Suede, stamped off, and then stamped onto the Crumb Cake card stock so that it is a lighter shade. The "celebrate" greeting is stamped (full strength) in Lucky Limeade ink. 
After adhering a torn strip of First Edition DSP and then adhering the Crumb Cake layer to the Certainly Celery card base, I wrapped Lucky Limeade Baker's Twine around the card twice and tied the ends into a bow. You will need about 32" of Baker's Twine to wrap twice and have enough for a bow. 

Now, since Sale-A-Bration (aka: free stuff) ends tomorrow night, I'll do the "math" for you so you can get all the goodies and make a bunch of these cards yourself.  Isn't that just so nice of me???  ;} 

If you order:
$6.95     8-1/2x11 Certainly Celery card stock (pkg has 24 sheets) 
$6.95     8-1/2x11 Crumb Cake card stock (pkg has 24 sheets)
$12.95   First Edition DSP (pkg has 24 sheets) 
$5.95     Soft Suede Classic Stampin' Pad  
$5.95     Lucky Limeade Classic Stampin' Pad  
$2.95     Lucky Limeade Baker's Twine 
$6.50     Very Vanilla or Crumb Cake medium Envelopes (a pkg has 40 envies) 
$3.95     Multipurpose Liquid Glue
--------- 
$52.15 (plus tax, shipping)

Then you can choose the Feeling Sentimental stamp set for FREE (you can only get it during Sale-A-Bration... you can't buy it, and tomorrow is the last day). 

If you have any questions about online ordering, Sale-A-Bration, or stamping, feel free to ask - I'd be happy to help. 
 

Pin It!

Friday, February 1, 2013

family first

Hello again stamping friends... long time no "see." The past two months have been so topsy-turvy for me and my family! One of the great things about this job, is that I can fit it around my life. With Christmas, school activities, Scouts, church, packing boxes and loading UHauls so we could close on our house, and comforting my children consuming our days, I decided to take some time off from stamping. I'm so glad I could be there for my family! And now I'm slowly easing myself back into my crafting obsession.  :}  In fact, I have a lovely Valentine's Day card to share with you today!
This is just cute, cute, CUTE! And it went together pretty fast. I started with a Pretty in Pink card base and added a strip of Tea For Two DSP. Then I tied on some Pretty in Pink stitched grosgrain ribbon. I stamped my greeting (Seasonal Sayings) in Calypso Coral ink.

The Hearts a Flutter Framelits made it super easy to die-cut six hearts... three from the Tea For Two DSP, and three that I stamped first using the Hearts a Flutter stamp set. The hearts are adhered to a layer of Crumb Cake card stock, which is layered over Lucky Limeade card stock, and then attached to the card with Dimensionals.

I hope you are feeling the "love" and it keeps you warm on this chilly day!

Pin It!

Monday, November 26, 2012

simple, modern Christmas card

Hello stamping friends! Sorry for the inconsistent posting the last few days. Between traveling out of town for the holiday and fighting this cold, my head is "in the clouds." The cold, which started Thursday night, is winning the battle - grrr!  And while I really wanted to pound my phone into the floor when the alarm went off this morning, life goes on, and I didn't want to wait another day to share this cute card with you. 
This is my modern style Christmas card from my class at the bakery. To create that modern feel I used a clean design, eye-popping and unexpected colors, and lots of "white space." 
The Whisper White layer has two scored lines an 1/8" apart, a little strip of  Primrose Petals DSP folded over the top edge, and is adhered with Dimensionals. 
I stamped the greeting (Curly Cute stamp set) in Lucky Limeade ink, and then adhered the images. Those cute little Christmas images from the Merry Minis stamp set are stamped in Lucky Limeade, Primrose Petals, and Island Indigo ink, then punched out with the Merry Minis punches.    ***TIP: to adhere the images as evenly spaced as possible, I attached the center image first, then the outside images, and then the remaining two. 

While you are burning up the keyboard this Cyber Monday, don't forget all the great deals in the Online Extravaganza in my online store. Happy shopping:}


Pin It!

Monday, November 19, 2012

Christmas in the heart

I'm feeling a tad guilty posting Christmas cards before Thanksgiving, especially since I have a few opinions on how early the stores start pushing Christmas. BUT, I've pretty much mailed/ delivered all my Fall and Thanksgiving cards for the year, and I've started working on Christmas cards - a little here, a little there. 
I found another neat blog that posts card sketches, and the current sketch challenge - and by current I of course mean that I am posting this at the last minute ;) - made me think of one of the "single" stamps in the Holiday catalog - Heart of Christmas.
I stamped a simple background in Always Artichoke ink (same color as the card stock) using two of the snowflake stamps from the Snowflake Soiree stamp set
The sentiment is used as the focal point on this card. I stamped it in Always Artichoke ink - once onto the Lucky Limeade Layer, and then again onto Whisper White which I trimmed after stamping. 
Two punched hearts (Small Heart punch, and the tiny heart in the Owl Builder punch) and some Cherry Cobbler Baker's Twine are all the embellishments this card needs. 

So, just curious... when do you start making your Christmas cards? Are you an early bird or a procrastinator like me?  :}
If you still have some stamping to do, be sure to check out the amazing deals in my Online Store. There are some cute Christmas stamp sets at GREAT prices!!


Pin It!

Wednesday, November 7, 2012

gotta love the Mojo...

...Mojo Monday that is! Every week they put up a great sketch, and this week's sketch really caught my eye. I played around with several cards, and here's the one I liked best: 
The leaves I used for the circular area on the sketch are a little large, so I omitted the sentiment banner to keep it from looking too "busy." 
To create the leaves, I simply die cut Very Vanilla card stock using the Autumn Accents Bigz die through the Big Shot. Then I inked (More Mustard, Raspberry Ripple, Lucky Limeade) three leaves from the Wonderfall stamp set, and did a little maneuver that's like stamping upside down. All you have to do is ink the stamp, and then lay it on it's back/ block with the rubber facing up. Align your die-cut leaf over the inked stamp, and press down. I like to use a spare block to press evenly.
Can you believe that I didn't use any ribbon or even buttons on this card??? Crazy! But I really liked how the leaves looked so crisp and stood out, so the only "embellishment" I added was some paper piercing around the edge of the Lucky Limeade layer.

Well, I'm off to tackle some more stamping projects... I actually had a dream last night that I was making cards! How silly. Let's see how it influences today's creativity! :}

Pin It!
Related Posts Plugin for WordPress, Blogger...