Showing posts with label Pretty in Pink. Show all posts

Sunday, May 12, 2013

Happy Mother's Day!

Today is such a special day... A day for thanking our Moms and all of the Mother figures in our lives who have guided us, prayed for us, and taught us to be who we are today. 
One of the best things about stamping your own cards, is that you can create a one-of-a-kind card that fits the personality of the receiver. My Mom loves the vintage style, and really loves cards with lots of layers. I worked on this card quite a while yesterday to get it "just right." Hope she likes it! 
I started with a Pretty in Pink card base. To that I added a layer of Tea For Two DSP, which I dry embossed in the Lacy Brocade Embossing Folder to double-up on the quilted look. Then came the layers... 
For the two sentiments I used two different stamp sets - You're Amazing and Teeny Tiny Wishes. Both sentiment layers have Crumb Cake ink sponged around the edges, and the larger sentiment also has a little spritzing on it with a Lucky Limeade marker. 
Since my darling angels that made me a mother are begging for breakfast, I'll give you the shorthand version for the rest of the layers.  :} 
Delicate Doilies Sizzlit, Lucky Limeade card stock

Happy Mother's Day to all of our mothers, in our homes and in our hearts, and to all those who have "mothered" us through the years. God bless you!  

Pin It!

Sunday, April 28, 2013

saying farewell to favorites

While I do get super excited when a new Stampin' Up! catalog is about to start, sometimes it's hard to say goodbye to some of my favorite retiring products. The Build a Blossom stamp set and Blossom Petals punch are two coordinating goodies I'm having trouble letting go of. They will most likely make their way into my "vault."  :} 
I like how you can make a special, elegant flower that's sure to cheer anyone up! The stamp set has both flower and leaf images that fit perfectly in the punch. 
When assembling the flower, I like to punch out a scrap circle to have a base for adhering the petals. 
One of my favorite flowers to make with these goodies is a poinsettia. It looks nice on cards, scrapbook pages, and gifts!

And buried in my computer files was a video tutorial I made a while ago showing you how easy this is to make! 
Don't you just want to make some right now!!  ;)  I love how amazing the flowers turn out. Make a few for your friends and they will think you are the craftiest person they ever met.  :}  
Be to to shop for all of your favorite retiring goodies before they are all gone!

Pin It!

Saturday, April 27, 2013

happy 2nd birthday, Olive Jane

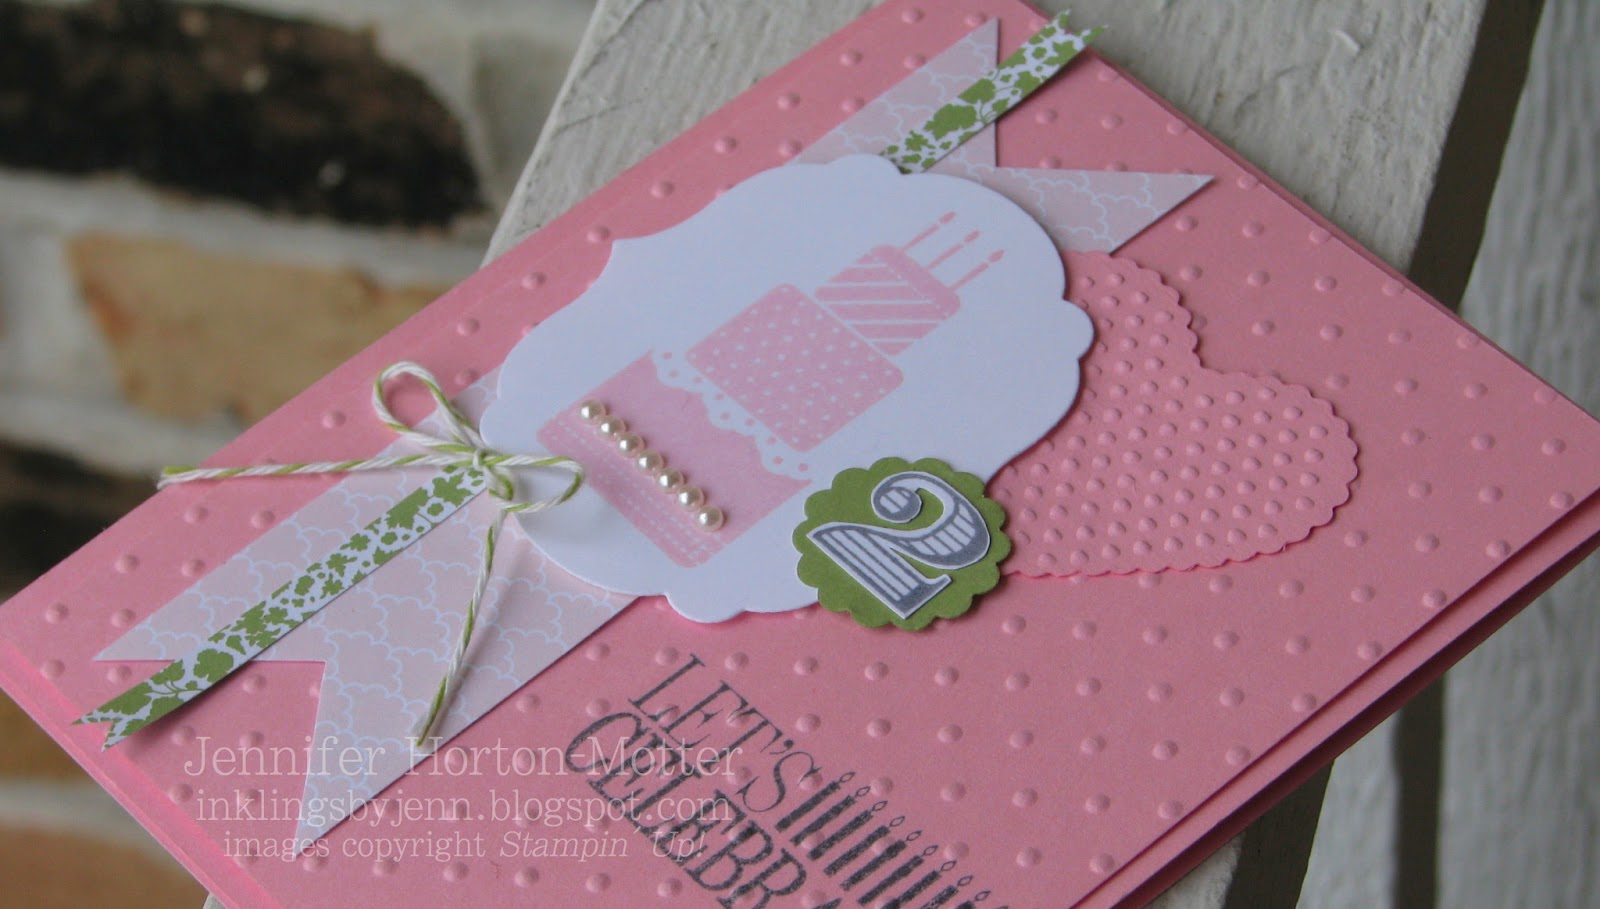
Today is my sweet little niece's 2nd birthday! I'm looking forward to celebrating with her tomorrow at her big birthday bash. Of course Aunt Jenn made coordinating tags and a special birthday card!  :} 
I chose Pretty in Pink (a retiring color), Pear Pizzazz (a returning color), and Basic Gray for my colors. The birthday cake (Make a Wish stamp set) looks so pretty after die-cutting with a Labels Collection Framelit, and adhering some Basic Pearls
Having the age number on birthday cards for little ones is just too cute, so I stamped and fussy-cut a number 2 (from the Memorable Moments stamp set), and adhered that to a Pear Pizzazz 7/8" Scallop Circle. Technically, the Baker's Twine is Lucky Limeade and not Pear Pizzazz, but I'm hoping Olive won't notice that subtle difference.   ;) 
Birthday gifts should have tags that coordinate with the card, right??? It was super easy to make the coordinating tags by using the same colors and DSP (Twitterpated), as well as incorporating some of the same design elements. 
I die cut the top edge of the tag with a Labels Collection Framelit.  *** Tip: if you want to use a Framelit to create a decorative edge, turn the handle on your Big Shot just enough so that only the portion you want trimmed gets cut, then turn the handle the other way to back up the platform. 
I used the same embossing folder on the card and tags. *** Tip: use the embossing folder after die-cutting or your texture will get smooshed. The Memorable Moments stamp set has that nice stitched image to fit perfectly in the Famelit, and I like the font of the greetings in this stamp set. I added a stamped number 2 (Number It) to the tags as well, and I used the same embellishments (Basic Pearls) on both projects. 

I can't wait to give Olive a great big hug and watch her open all the presents. Two is a fun age at gift opening time, since they now know exactly what those bags and boxes are all about! 

Pin It!

Monday, April 8, 2013

a Fun pink Flower... and LAST day for FREE shipping

It occurred to me the other day that it's been a while since I used the Fun Flowers Bigz Die - gasp!! So I had to fix that situation right away. 
I used the Raining Flowers stamp set to stamp with Pretty in Pink ink onto the same color card stock. After tying some grosgrain ribbon onto a strip of Tea for Two DSP, the real fun began.   :}   
Using the Big Shot, I cut two layers of Regal Rose card stock on the Fun Flowers Bigz Die. To make the flowers soft and pretty, I spritzed them with a little water, crumbled them up, and then opened them and arranged the petals to have a slight curve. After the flowers were dry, I sponged some Regal Rose ink around the edges. A 3/4" Lucky Limeade Circle, and a pink button threaded with Lucky Limeade Baker's Twine make a simple flower center. 

*** Don't forget that today is the last day to get FREE SHIPPING from Stampin' Up! - no minimum; no limit!!!!  Shop now for everything you need to make fabulous Spring projects. ***

Pin It!

Sunday, April 7, 2013

a pink princess card

I have two boys, so I don't create a whole lot of "girlie-girl" projects. I tend to overdo it with the pink when I'm making something for a little girl... just can't help myself! Today's card is very pink, but I toned it down a little bit by adding a layer of Brushed Silver card stock (dry embossed). 
I made this card for one of my neighbors to send to her niece. My neighbor, Fatima, has a sister who recently gave birth to twins. This has created the usual older-sibling tension for Fatima's niece, Amira. So I suggested that a pretty, girlie card would give Amira (who is affectionately called "princess") a little extra attention and cheer her up. I started with the You Rule stamp set, added lots of Regal Rose and Pretty in Pink, and finished with some bling to create the perfect card for a nice little girl. 
A fancy card needs extra special details. I used the Scallop Trim Border punch to create a delicate edge. Then I used the Scallop Trim Corner punch to create a pretty little ending on my 1/2" wide greeting strip. 
After adding some Rhinestones and Large Rhinestones, I spritzed the whole card liberally with my mixture of Frost White Shimmer Paint in rubbing alcohol. It only shows up a tiny bit in the photo, but trust me, it's super sparkly! I'm sure Amira will love it.   :}  

***** Need some pretty embellishments in your crafting stash? Get them now with FREE SHIPPING! The free shipping offer from Stampin' Up! only lasts through tomorrow, so don't delay. Be sure to check out my stampin' Rewards Spot to see what you can earn with your online order! ***** 


Pin It!

Saturday, April 6, 2013

FREE shipping on all of your scrapbook supplies!

It's been a while since I shared a "taditional" scrapbook page, so I have a pretty SPRING scrapbook layout to share with you today! 
The 12x12 pages are Certainly Celery card stock, and the three stamped chevron images that are stamped directly onto the pages in Lucky Limeade ink are from the Oh, Hello stamp set. All of the DSP on this two-page layout is from the Tea for Two package... I love how it all coordinates!
Remember in yesterday's post I said my card was inspired by a scrapbook page? Well, check out the title of this page! This is what gave me the idea for the card.  :}   
supplies used for the banner: 
Pretty in Pink grosgrain ribbon
Crumb Cake, Calypso Coral, Early Espresso, Certainly Celery, Pretty in Pink, and Very Vanilla card stock
Framelits: Hearts a Flutter
more supplies used on this page: 
Lucky Limeade Baker's Twine

Soooo, now that you want to scrapbook some of your Spring photos, how about getting FREE shipping on those supplies???  Yahoo!!! 
Remember, some of the colors I used on my scrapbook layout are retiring, so shop now before they're gone! Feel free to contact me if you have any questions. Happy shopping!  :}

Pin It!

Friday, March 29, 2013

a pretty Thank You card

Hello stamping friends! It's finally warming up a bit (close to 60 degrees this weekend!!) and the snow is melting. That means it's time to stamp some "thank you" cards with a springy theme.   :} 
We made this card in my class at the bakery last weekend. Don't you just love the butterflies?! I'm so glad the Bitty Butterfly punch came out in the Spring Catalog. It layers nicely with the Elegant Butterfly punch. Speaking of that Elegant Butterfly piece... notice the chevron image stamped onto the Calypso Coral card stock??? I used the oval-chevron image in the Oh, Hello stamp set to stamp with Calypso Coral ink onto the same color card stock, then punched out the butterfly. Easy peasy  ;)
And speaking of punches, I used four of them on this card! Layered under the butterflies is a circle of Tea for Two DSP. The 1-3/4" Circle punch centers perfectly over the stitched-circle image on the DSP - yay! And layered under the circle is a bit of Early Espresso card stock punched out with the Decorative Label punch. 
A strip of the Tea for Two DSP is adhered to the card after tying some grosgrain ribbon around it. I stamped the stitched-chevron image in Pretty in Pink, and then stamped my greeting (in Calypso Coral) so that it slightly overlapped. The layers of punched pieces are adhered to the card with Dimensionals.

I hope it is beginning to look like Spring wherever you are. If you have a minute, I have a little Friday Freebie on my Facebook Page today. Have a wonderful day!!

Pin It!

Thursday, March 28, 2013

happy Easter everybunny!

Don't you just love stamping cute Easter projects??? I have a fun Easter card to share today that shows a great way to use up some scraps! 
I had some card stock and Tea for Two DSP scraps left over after cutting kits for my card class at the bakery, and I just can't bear to waste. Soooooo, I put them to good use on this Easter card. 
Isn't that bunny in the balloon just the cutest?! I stamped this image from the Everybunny stamp set in StazOn® ink so I could "watercolor" without the ink smearing. After adding spots of color gently with the Watercolor Wonder® Crayons, I smoothed out the color in each section of the image with a Blender Pen.
Here's a close-up so you can see all the details. The Chevron Embossing Folder adds the needed texture to the So Saffron card stock... and I folded the "blue" DSP strip back and under (on the right side) before adhering that card stock layer. Everything is adhered with my favorite liquid glue except the focal point, which uses Dimensionals for some height. 
I liked the simplicity of this card, so I kept the embellishments simple too. A Certainly Celery Button with a bow of Lucky Limeade Baker's Twine is all this card needs.  :} 

After I finished the card, I thought it would be fun to create the same "layered strip" look on a digital scrapbook page! 
Aaron is so sweet... don't you just want to hug him?! I LOVE this Easter Bunny basket he brought home from school, and I had to take a photo right away. 
I used pieces from a few downloads on this layout, but most of the "supplies" come from the Eggceptional Easter kit.

Here's a close-up of the basket-
The top and the two flat sides opposite the handle are cut away to create the opening. The handle is left intact in the back. Aaron got to draw a bunny face on the front... "with a PERMANENT MARKER, Mom!" The two bunny ears are stapled to the top, and the students got to play Easter Bunny by bringing some goodies for each basket. How fun!!

Pin It!

Friday, March 15, 2013

quilting... my way :}

If only I could sew (sigh). I've tried, many times. And still, I can barely sew on a button, and it looks terrible when I'm finished! Taking some sewing classes/ lessons is definitely on my "to do" list... just as soon as I get some free time - ha! Anywho, I get a bit of a "fabric fix" by making quilt cards. Here's one I made for a swap last month-  
Two blocks of paper (Tea for Two DSP) instead of fabric have a quilted look and feel, and it's really easy to do! I adhered the DSP to a Lucky Limeade card stock layer, and dry embossed them in the Square Lattice Embossing Folder.
After adhering the "quilted" layer, I tied on the grosgrain ribbon over the "seam." I stamped the greeting (Pretty Petites*) three times in Lucky Limeade, punched them out with the Petite Curly Label* punch, and adhered them with Dimensionals. Easy Peasy! 

*Sale-A-Bration items


Want to see two more examples of quilt cards?  Woohoo!!  :} 
card stock: Cherry Cobbler, Crumb Cake, Always Artichoke, Very Vanilla


card stock: Cherry Cobbler, Lucky Limeade, Very Vanilla
DSP: Festival of Prints Stack
punch: Jewelry Tag

Pin It!

Wednesday, February 6, 2013

Chalkboard Art for Valentine's Day

I really wanted to create a card using a hot trend in crafting and decorating right now -- chalkboard art... so I made one for Valentine's Day.  :} 

SMILE!! It turned out so cute!  And I was surprised at how easy this technique is. For my card, I started with Pretty in Pink card stock and a layer of Twitterpated DSP

To create the chalkboard background:
Start with a layer of Basic Black card stock (on this card: 4-3/4" x 3-1/2").
If you want an embossed image, stamp your image in Whisper White Craft ink, sprinkle with White Embossing Powder, and heat set with a Heat Tool (the image on this card is from the Hearts a Flutter stamp set).
Using a section of a Stamping Sponge, lightly rub / swirl some Whisper White Craft ink in random spots to create the look of eraser marks. 
Using a White Pencil, add lines or images for a hand-drawn look. 

Add stamped / die-cut images to create a focal point. Adhering some of the images with Dimensionals makes layering a breeze. And of course a bit of ribbon and bling are the perfect little details!

So what do you think? Are you ready to try some chalkboard art today?


Pin It!

Monday, February 4, 2013

tickets to my heart

I like making Valentine's Day cards. It's just so much fun using lots of "girlie" colors, frilly papers, and ribbons.  :}
For this card I started with a Pretty in Pink card base, and then layered on Riding Hood Red card stock (distressed around the edges) and Tea For Two DSP

The two card stock hearts are die cut using the Scalloped Heart of Hearts Embosslit and the Fashionable Hearts Embosslit. For some extra pattern, I die cut the largest heart from Twitterpated DSP with a Framelit from the Hearts Collection.
Three stamps from That's the Ticket and the coordinating Ticket Duo punch make it super easy to add more pretty layers to this card. And of course I couldn't skip the ribbon!!  :} 

I don't make a ton of Valentine's Day cards, so I like to make each one unique. How many Valentines do you send each year?

Pin It!

Friday, February 1, 2013

family first

Hello again stamping friends... long time no "see." The past two months have been so topsy-turvy for me and my family! One of the great things about this job, is that I can fit it around my life. With Christmas, school activities, Scouts, church, packing boxes and loading UHauls so we could close on our house, and comforting my children consuming our days, I decided to take some time off from stamping. I'm so glad I could be there for my family! And now I'm slowly easing myself back into my crafting obsession.  :}  In fact, I have a lovely Valentine's Day card to share with you today!
This is just cute, cute, CUTE! And it went together pretty fast. I started with a Pretty in Pink card base and added a strip of Tea For Two DSP. Then I tied on some Pretty in Pink stitched grosgrain ribbon. I stamped my greeting (Seasonal Sayings) in Calypso Coral ink.

The Hearts a Flutter Framelits made it super easy to die-cut six hearts... three from the Tea For Two DSP, and three that I stamped first using the Hearts a Flutter stamp set. The hearts are adhered to a layer of Crumb Cake card stock, which is layered over Lucky Limeade card stock, and then attached to the card with Dimensionals.

I hope you are feeling the "love" and it keeps you warm on this chilly day!

Pin It!

Wednesday, May 23, 2012

Ribbon Wreath

I finally finished a project on my "really-really want-to-make" list!!! For those of you who have a 2010-2011 SU catalog handy, my inspiration comes from the ribbon wreath on p190. It's not like it takes a long time to make a ribbon wreath - I finished in a few hours. I probably would have finished sooner if I didn't take breaks to draw outside with chalk, lose a lightsaber battle, and have a snack in the shade... but those are some of the best parts of working from home  :}  It's just one of those projects that kept getting pushed to the side, but I had time today since I didn't want to get a ton of supplies out while the drywall was being sanded. For this project, all you need is a hoop, ribbon, and Craft & Paper Scissors. I have two of these high quality scissors - one for paper, and one for fabric and ribbon.
Isn't it pretty??? Since I have several miles spools of ribbon in my craft room, this is the perfect project for me! All of these ribbons are from Stampin' Up! ... some are current, some are old, some are really old. I chose a variety of pinks, yellows, oranges, and greens for a bright, summery look.

I started with a hoop (approximately 13" diameter) that I purchased from my local craft store (I think I found it in the same aisle as the mirror pieces). Then I tied all my ribbons on... that's it! So easy!! 

A few tips for you: 
I used approximately 1 to 3 yards of each ribbon.
Push the tied ribbons close together as you're working.
Trim the ends as you go; don't wait to trim them all at the end.
Use a good amount of the wider ribbons first; it's much easier to fill in with skinny ribbons.
Try to use a variety of ribbon textures (satin, twill, grosgrain, scalloped edges) on your wreath for visual interest.
Mixing solid, striped, stitched, and dotted ribbons of varying widths is fun!
If you are using Pleated Satin Ribbon, pull gently when tying.
Ribbons with a heavier stiffness hold up to being cut longer; floppy ribbons should be cut shorter.

I bought more than 1 hoop because I have plans to make more. I will definitely create a Ribbon Wreath for Christmas... what else... oooh! Fall colors would be pretty!!  :}  What colors do you think I should try next?


Pin It!

Monday, August 1, 2011

Hostess Club

I have been stamping like crazy this past week! I'm almost done with my "Make & Take" projects from Convention. I never finish all of my projects during the Make & Take session, but this year... well, I didn't complete one single thing! I had an enjoyable chat, though ;)
Today I am working on the project for my stamp club that meets tomorrow night. As I started working, I realized I forgot to post the July project. We made a cute little magnet:


Using the Big Shot, we cut Magnet Sheets, Flirtatious Specialty DSP, Pretty in Pink card stock, orange tulle, Flirtatious Fabric, and Melon Mambo Textured card stock on the Fun Flowers Bigz L die. The layer of Pumpkin Pie card stock is punched with the Doily Triple Layer punch. The sentiment from Fabulous Phrases is stamped in Melon Mambo ink onto Pretty in Pink card stock.

Here's a view of the back:


A little tip- Trim your magnet sheet to a "square" slightly larger than the shape your are die-cutting. Then peel off the paper backing and adhere your DSP "square." This way you cut both at the same time, and don't have to try to line everything up.

Well, I'm off to finish up the August club project. You can purchase supplies for this project any time from my online store. Don't forget the online only Clearance Rack! :)

Pin It!

Monday, April 25, 2011

Pretty in Pink

Today's card - Pretty in Pink - is from the Subtles Collection.


The "Dynamic Duo" colors are Pretty in Pink and Melon Mambo. Since it doesn't get any more 'girlie' than this, I thought... why not throw in some glitter? For this card I used the Birthday Bakery Hostess stamp set, and the Homemade stamp for a little detail on the card stock punched with the 2-3/8" Scallop Circle punch. All of the images are stamped in Melon Mambo ink, so I used Pretty in Pink and Melon Mambo markers to add a bit of color. The grosgrain ribbon and Dazzling Diamonds glitter just make it the perfect girlie birthday card :)


The "Creative Combination" colors are Pretty in Pink , Certainly Celery, and Bashful Blue. I guess I wanted to give the Homemade stamp a workout - it really does add a great little detail to card stock you want to punch with the 2-3/8" Scallop Circle punch. The cute little whale from Fox & Friends is stamped in Bashful Blue ink and punched out with the 1-3/4" Circle punch.


I love our collection of Build-A-Bear Workshop stamps and Big Shot dies. They are easy to use to make the cutest projects. I stamped the little bear three times - twice onto Whisper White card stock and once onto the DSP. I used my Snips to cut out the dress, which I attached after coloring the bear with markers and Watercolor Pencils. I used my Snips again to cut out only the dress collar from the remaining stamped image. Then, I added a tiny bit of Crystal Effects to her shoes and flower. While this will be a one-of-a-kind card, I will definitely use the "Getting Started Combination" colors again (Pretty in Pink, Marina Mist, and Daffodil Delight).

Pin It!
Related Posts Plugin for WordPress, Blogger...