Today is my little brother's birthday! Sooooo, I'm sharing the card he'll be getting (late - aagh!) in the mail.
I wanted a masculine card, but with a brighter color combination. I turned to the Color Coach for "advice" and chose the Creative Combination on the Island Indigo card, which suggests adding More Mustard and Lucky Limeade. (Be sure to read to the end of the post for some information about More Mustard!)
So what makes a "masculine card"... masculine?
- texture (Argyle Embossing Folder, distressed and torn edges)
- masculine colors (I'll let each individual decide what that means, but for me it means neutrals, blues, "fall" colors)
- a simple and/or clean design (I made this card in less than 10 minutes by keeping the details and layout easy)
- no ribbon (in my humble opinion, Baker's Twine and Linen Thread are exempt from this rule :P)
I also like to add "extra ink" by sponging edges and/or spritzing with markers and the Color Spritzer Tool.
I'll bet you're wondering about those stamped images. Other than the "happy birthday" greeting from the Teeny Tiny Wishes stamp set, the rest of the images are from the new Designer Typeset photopolymer stamps. They are completely clear, and are used with acrylic blocks.
Apparently, even though my birthday isn't for another 2-1/2 weeks, I got an early birthday present this morning!
I couldn't be more excited. I am especially pleased with the changes to the Subtles Collection! I have really missed Pear Pizzazz, and for those of you who haven't been stamping forever, you will really like Soft Sky. :}
And here's a little "birthday present" for you... for whenever your birthday is! It's the card sketch for today's card - yay!! It would make me super happy if you "pinned" this sketch. After all, it's nice to share. ;) All you have to do is click that tiny little red "Pin it" button at the bottom of the post. Thanks!
Showing posts with label More Mustard. Show all posts
Thursday, April 4, 2013
Thursday, November 15, 2012
attitude of gratitude
It's no secret that I love social media (totally addicted). And while I really do enjoy reading all the posts in November of what everyone is thankful for, I never could quite get into it. I certainly agree with expressing thankfulness for the blessings in our lives, but does typing it while waiting at all the red lights on your commute really count? Is it enough?
One of my stamping friends introduced me to an interesting blog a while back. And one of the posts on the blog is encouraging an "attitude of gratitude." She encourages card-makers to create a card expressing their thankfulness. I thought it was a fabulous idea! You actually tell a live person in your own words exactly why you are so thankful to know him/ her. Old fashioned? Maybe. Needed in today's world? Desperately.
I thought I would start with a group of people - the teachers at the grade school. I am so blessed that my boys can attend such a great school with high expectations and a dedicated staff.
To my River Rock card base, I added only one layer (Very Vanilla) and one embellishment. I scored two vertical lines 1/4" apart for the tiniest hint of texture. The leaf from the Wonderfall stamp set is stamped in River Rock, More Mustard, and Cajun Craze ink for a sort of ombré effect. And the sentiment (Blessings From Heaven) is absolutely perfect for this card.
I've used this card sketch before - I just love how easy it is when you want a clean and simple card that you can create quickly. You might be wondering why I would want to stamp such a simple card to carry my message... Well, I like the idea of sharing the "attitude of gratitude" so much, that I thought I would stamp a whole basket of these (therefore needing a quick design!) to leave in the teacher's lounge, so that others can continue the message of thankfulness. I hope they like them :)
For those of you who would love to design a digital card right from your iPhone and send it to your loved ones... now you can!!!
The new Simply Sent App from Stampin' Up! is now available in the iTunes store... and it's FREE! Waiting for the school bus just got a lot more fun!! ;}
One of my stamping friends introduced me to an interesting blog a while back. And one of the posts on the blog is encouraging an "attitude of gratitude." She encourages card-makers to create a card expressing their thankfulness. I thought it was a fabulous idea! You actually tell a live person in your own words exactly why you are so thankful to know him/ her. Old fashioned? Maybe. Needed in today's world? Desperately.
I thought I would start with a group of people - the teachers at the grade school. I am so blessed that my boys can attend such a great school with high expectations and a dedicated staff.
To my River Rock card base, I added only one layer (Very Vanilla) and one embellishment. I scored two vertical lines 1/4" apart for the tiniest hint of texture. The leaf from the Wonderfall stamp set is stamped in River Rock, More Mustard, and Cajun Craze ink for a sort of ombré effect. And the sentiment (Blessings From Heaven) is absolutely perfect for this card.
I've used this card sketch before - I just love how easy it is when you want a clean and simple card that you can create quickly. You might be wondering why I would want to stamp such a simple card to carry my message... Well, I like the idea of sharing the "attitude of gratitude" so much, that I thought I would stamp a whole basket of these (therefore needing a quick design!) to leave in the teacher's lounge, so that others can continue the message of thankfulness. I hope they like them :)
For those of you who would love to design a digital card right from your iPhone and send it to your loved ones... now you can!!!
The new Simply Sent App from Stampin' Up! is now available in the iTunes store... and it's FREE! Waiting for the school bus just got a lot more fun!! ;}
Labels:
app,
Cajun Craze,
Card Template 9,
More Mustard,
River Rock,
Simply Scored,
Very Vanilla
Wednesday, November 7, 2012
gotta love the Mojo...
...Mojo Monday that is! Every week they put up a great sketch, and this week's sketch really caught my eye. I played around with several cards, and here's the one I liked best:
The leaves I used for the circular area on the sketch are a little large, so I omitted the sentiment banner to keep it from looking too "busy."
To create the leaves, I simply die cut Very Vanilla card stock using the Autumn Accents Bigz die through the Big Shot. Then I inked (More Mustard, Raspberry Ripple, Lucky Limeade) three leaves from the Wonderfall stamp set, and did a little maneuver that's like stamping upside down. All you have to do is ink the stamp, and then lay it on it's back/ block with the rubber facing up. Align your die-cut leaf over the inked stamp, and press down. I like to use a spare block to press evenly.
Can you believe that I didn't use any ribbon or even buttons on this card??? Crazy! But I really liked how the leaves looked so crisp and stood out, so the only "embellishment" I added was some paper piercing around the edge of the Lucky Limeade layer.
Well, I'm off to tackle some more stamping projects... I actually had a dream last night that I was making cards! How silly. Let's see how it influences today's creativity! :}
The leaves I used for the circular area on the sketch are a little large, so I omitted the sentiment banner to keep it from looking too "busy."
To create the leaves, I simply die cut Very Vanilla card stock using the Autumn Accents Bigz die through the Big Shot. Then I inked (More Mustard, Raspberry Ripple, Lucky Limeade) three leaves from the Wonderfall stamp set, and did a little maneuver that's like stamping upside down. All you have to do is ink the stamp, and then lay it on it's back/ block with the rubber facing up. Align your die-cut leaf over the inked stamp, and press down. I like to use a spare block to press evenly.
Can you believe that I didn't use any ribbon or even buttons on this card??? Crazy! But I really liked how the leaves looked so crisp and stood out, so the only "embellishment" I added was some paper piercing around the edge of the Lucky Limeade layer.
Well, I'm off to tackle some more stamping projects... I actually had a dream last night that I was making cards! How silly. Let's see how it influences today's creativity! :}
Labels:
Big Shot,
card,
DSP,
Early Espresso,
Lucky Limeade,
MOJO,
More Mustard,
Orchard Harvest,
Paper Piercing,
Raspberry Ripple
Tuesday, November 6, 2012
a little fun for Election Day
I don't know about you, but I'm pretty sure sure my phone and my mailbox, and therefore my recycling bin, are extremely happy that the campaign season is reaching it's end. In addition to going out and voting for real, I thought it would be interesting to have a little voting fun of my own.
I made two Fall cards, which both use the same Autumn Accents die-cut leaves and the Wonderfall stamp set.
For this first card, I used a layer of Orchard Harvest DSP for the background. After stamping the leaves, I crumbled them and sponged the edges with Crumb Cake ink. While it looks like the Vanilla Seam Binding is tied around the stem, the simple knot is adhered with a Mini Glue Dot.
For the second card, I lightly stamped the background with the Netting Background stamp, pressing gently and randomly for a partially stamped image. The leaves are adhered with Dimensionals, and a bow of Linen Thread tied around a stem adds the perfect finishing touch.
So I'm curious..... which card do you like better? If you'd like to play along and have a little fun this Election Day, head on over to my Facebook page and VOTE for your favorite! Have fun and "vote responsibly." ;}
I made two Fall cards, which both use the same Autumn Accents die-cut leaves and the Wonderfall stamp set.
For this first card, I used a layer of Orchard Harvest DSP for the background. After stamping the leaves, I crumbled them and sponged the edges with Crumb Cake ink. While it looks like the Vanilla Seam Binding is tied around the stem, the simple knot is adhered with a Mini Glue Dot.
For the second card, I lightly stamped the background with the Netting Background stamp, pressing gently and randomly for a partially stamped image. The leaves are adhered with Dimensionals, and a bow of Linen Thread tied around a stem adds the perfect finishing touch.
So I'm curious..... which card do you like better? If you'd like to play along and have a little fun this Election Day, head on over to my Facebook page and VOTE for your favorite! Have fun and "vote responsibly." ;}
Labels:
Big Shot,
Cajun Craze,
Crumb Cake,
DSP,
Lucky Limeade,
More Mustard,
Orchard Harvest,
Ribbon,
Very Vanilla
Monday, November 5, 2012
thankful for... card sketches!
I spent yesterday's "extra hour" (and then some) in my stamping space. I made a lot of pretty cards that I'm looking forward to sharing this week. I was thinking that it's been a while since I participated in a blog challenge, so it was time to jump into one. I am very thankful for this week's challenge on The Paper Player's Blog - "Give Thanks."
It has also been a while since I did some coloring, soooo, I dusted off my Blender Pen and grabbed the More Mustard, Cajun Craze, and Soft Suede inks to color the simple image from the Lovely As A Tree stamp set.
The Woodgrain Background stamp and the color spritzing on the More Mustard layer add just the right amount of subtle detail so that the image and the sentiment stand out.
And since I know how thankful we ALL are for card sketches... here you go!
It's a great card sketch for when you need to stamp a quick card. Be sure to "Pin It" so you'll always have it... you will be thankful that you did! :} Have a happy Monday!!
It has also been a while since I did some coloring, soooo, I dusted off my Blender Pen and grabbed the More Mustard, Cajun Craze, and Soft Suede inks to color the simple image from the Lovely As A Tree stamp set.
The Woodgrain Background stamp and the color spritzing on the More Mustard layer add just the right amount of subtle detail so that the image and the sentiment stand out.
And since I know how thankful we ALL are for card sketches... here you go!
It's a great card sketch for when you need to stamp a quick card. Be sure to "Pin It" so you'll always have it... you will be thankful that you did! :} Have a happy Monday!!
Sunday, November 4, 2012
sometimes, you just need vellum
Every once in a while, the vellum on my shelf begs to come out and play. Apparently, that was the case today! :}
After spritzing the Crumb Cake card stock with the Soft Suede marker, I added a strip of Vellum card stock (dry embossed in the Fancy Fan Embossing Folder).
A scrap of DSP, a bit of Cotton ribbon, die-cut leaves, a button and a brad add all the yummy details that this card needs. Isn't this a perfect Fall card??!
I hope you're loving the Wonderfall stamp set as much as I am, because I have more examples to share this week - yay!!
And as if that wasn't exciting enough...
After spritzing the Crumb Cake card stock with the Soft Suede marker, I added a strip of Vellum card stock (dry embossed in the Fancy Fan Embossing Folder).
A scrap of DSP, a bit of Cotton ribbon, die-cut leaves, a button and a brad add all the yummy details that this card needs. Isn't this a perfect Fall card??!
I hope you're loving the Wonderfall stamp set as much as I am, because I have more examples to share this week - yay!!
And as if that wasn't exciting enough...
It's going to be a great week, isn't it?! :}
Labels:
Big Shot,
card,
Crumb Cake,
Embossing Folder,
More Mustard,
Orchard Harvest,
Ribbon,
Soft Suede,
Vellum
Tuesday, October 30, 2012
Placecards for Thanksgiving
Yesterday I shared some decorations I've been working on for Thanksgiving. Here are more details on the placecards...
To make eight placecards, you will need two sheets of 8-1/2 x 11" card stock.
Score each sheet at 2-3/4" and 8-1/4". Cut in half lengthwise (at 4-1/4"), and then cut each of those sections in half (at 5-1/2").
Fold each quarter-sheet in half on your score line, and then decorate. I used the Wonderfall stamp set and the coordinating Autumn Accents Bigz Die for the perfect Fall images. The leaf is crumpled and sponged with Soft Suede ink. To get the two colors on the acorn, I used Crumb Cake and Soft Suede markers to "ink" my stamp. Then I sponged the edges of the acorn, too.
Did you know you can get a digital version of the Autumn Accents Bigz Die? The Wonderfall Kit includes the leaf "punches," several sentiments, and 12 awesome "papers." Plus, it's on sale this week - 50% off!
It can be easy to forget the decorations if you are the one hosting the meal. Start now and save yourself the stress of finishing at the last minute. If you are enjoying your Thanksgiving feast as a guest, be sure to make something pretty for your hostess! :}
To make eight placecards, you will need two sheets of 8-1/2 x 11" card stock.
Score each sheet at 2-3/4" and 8-1/4". Cut in half lengthwise (at 4-1/4"), and then cut each of those sections in half (at 5-1/2").
Fold each quarter-sheet in half on your score line, and then decorate. I used the Wonderfall stamp set and the coordinating Autumn Accents Bigz Die for the perfect Fall images. The leaf is crumpled and sponged with Soft Suede ink. To get the two colors on the acorn, I used Crumb Cake and Soft Suede markers to "ink" my stamp. Then I sponged the edges of the acorn, too.
Did you know you can get a digital version of the Autumn Accents Bigz Die? The Wonderfall Kit includes the leaf "punches," several sentiments, and 12 awesome "papers." Plus, it's on sale this week - 50% off!
It can be easy to forget the decorations if you are the one hosting the meal. Start now and save yourself the stress of finishing at the last minute. If you are enjoying your Thanksgiving feast as a guest, be sure to make something pretty for your hostess! :}
Labels:
Big Shot,
Cajun Craze,
Crumb Cake,
home decor,
More Mustard,
Simply Scored,
Soft Suede
Monday, October 29, 2012
It's a wonderFALL day
It's time to start thinking about (and ordering supplies for) your Thanksgiving table decorations. To get you started, I made a frameable art piece (5x7), placecards, and a candle for the centerpiece.
All of these projects are super easy, especially with the Wonderfall stamp set and the coordinating Autumn Accents Bigz Die.
Before adding the stamped leaves to your candle, wrap a strip of burlap "fabric" around the base - overlap and adhere (I used the Multipurpose Liquid Glue).
Then wrap Cotton Ribbon around the candle - overlap and adhere. While it looks like the Bronze Button is sewn to the ribbon, I simply tied a bow of Linen Tread through the holes, and then glued the button on.
Die cut several leaves from Very Vanilla card stock. Then "stamp upside down" by inking your leaf stamps, and with rubber facing up (block side lying on your table), press the die-cut onto the stamp. I crumbled my leaves and sponged the edges with Crumb Cake ink for a more distressed look. The leaves are adhered to the ribbon with the liquid glue.
Now that you've fallen in love with this stamp set, how about getting it for 15% off???!!! But you have to hurry... the stamps are only on sale today!
While you are shopping, don't forget to check out the FREE digital downloads, online only Clearance Rack, a new project kit, and the Single Stamps:
Never leave a burning candle unattended, remove decoration before using, indoor use only, call the fire department if there's a fire, do not use in the shower......... and SHOP FOR STAMPS!! :}
All of these projects are super easy, especially with the Wonderfall stamp set and the coordinating Autumn Accents Bigz Die.
Before adding the stamped leaves to your candle, wrap a strip of burlap "fabric" around the base - overlap and adhere (I used the Multipurpose Liquid Glue).
Then wrap Cotton Ribbon around the candle - overlap and adhere. While it looks like the Bronze Button is sewn to the ribbon, I simply tied a bow of Linen Tread through the holes, and then glued the button on.
Now that you've fallen in love with this stamp set, how about getting it for 15% off???!!! But you have to hurry... the stamps are only on sale today!
While you are shopping, don't forget to check out the FREE digital downloads, online only Clearance Rack, a new project kit, and the Single Stamps:
Never leave a burning candle unattended, remove decoration before using, indoor use only, call the fire department if there's a fire, do not use in the shower......... and SHOP FOR STAMPS!! :}
Labels:
Always Artichoke,
Big Shot,
Cajun Craze,
Crumb Cake,
fabric,
More Mustard,
Ribbon,
Soft Suede
Tuesday, October 23, 2012
diagonal embossed stripes
I have TWO cute Halloween projects and a fun technique to share today - woohoo! :}
If you've been reading for a while, you know I love texture on my paper-crafting projects. Embossing Folders are an easy way to add great texture, and I especially love when they become multi-taskers in my craft room (any Alton Brown fans out there?). On this card, I used both the Chevron and the Stripes Embossing Folders! :}
All I had to do to make the diagonal embossed stripes is lay the 1-3/4" x 4-1/4" strip of More Mustard card stock at an angle inside the Embossing Folder before running it through the Big Shot - easy peasy! I like how it coordinates with the diagonal stripes on the DSP (Howlstooth & Scaringbone).
And here's what the diagonal embossed stripes look like on a bookmark:
A great gift for the grade school librarian, don't you think?? :}
That pretty much wraps up my Halloween projects... did I make you want the Tricky Treats stamp set yet??? ;)
Oh, I do have one more Halloween project to share... a freebie on my Facebook Page! Happy Halloween!!! :}
If you've been reading for a while, you know I love texture on my paper-crafting projects. Embossing Folders are an easy way to add great texture, and I especially love when they become multi-taskers in my craft room (any Alton Brown fans out there?). On this card, I used both the Chevron and the Stripes Embossing Folders! :}
All I had to do to make the diagonal embossed stripes is lay the 1-3/4" x 4-1/4" strip of More Mustard card stock at an angle inside the Embossing Folder before running it through the Big Shot - easy peasy! I like how it coordinates with the diagonal stripes on the DSP (Howlstooth & Scaringbone).
And here's what the diagonal embossed stripes look like on a bookmark:
A great gift for the grade school librarian, don't you think?? :}
That pretty much wraps up my Halloween projects... did I make you want the Tricky Treats stamp set yet??? ;)
Oh, I do have one more Halloween project to share... a freebie on my Facebook Page! Happy Halloween!!! :}
Labels:
Basic Black,
Basic Gray,
Big Shot,
card,
Embossing Folder,
gift,
Halloween,
More Mustard,
punch,
Ribbon,
Tangerine Tango,
technique
Friday, October 19, 2012
eeek! a Halloween card AND a card sketch!
I guess it's my lucky day - Aaron's pumpkin patch field trip was rescheduled for Monday. So far, Monday is supposed to be warmer and dryer - keep your fingers crossed that it stays that way!
It's your lucky day too, since now I have time to share a cute Halloween card! :}
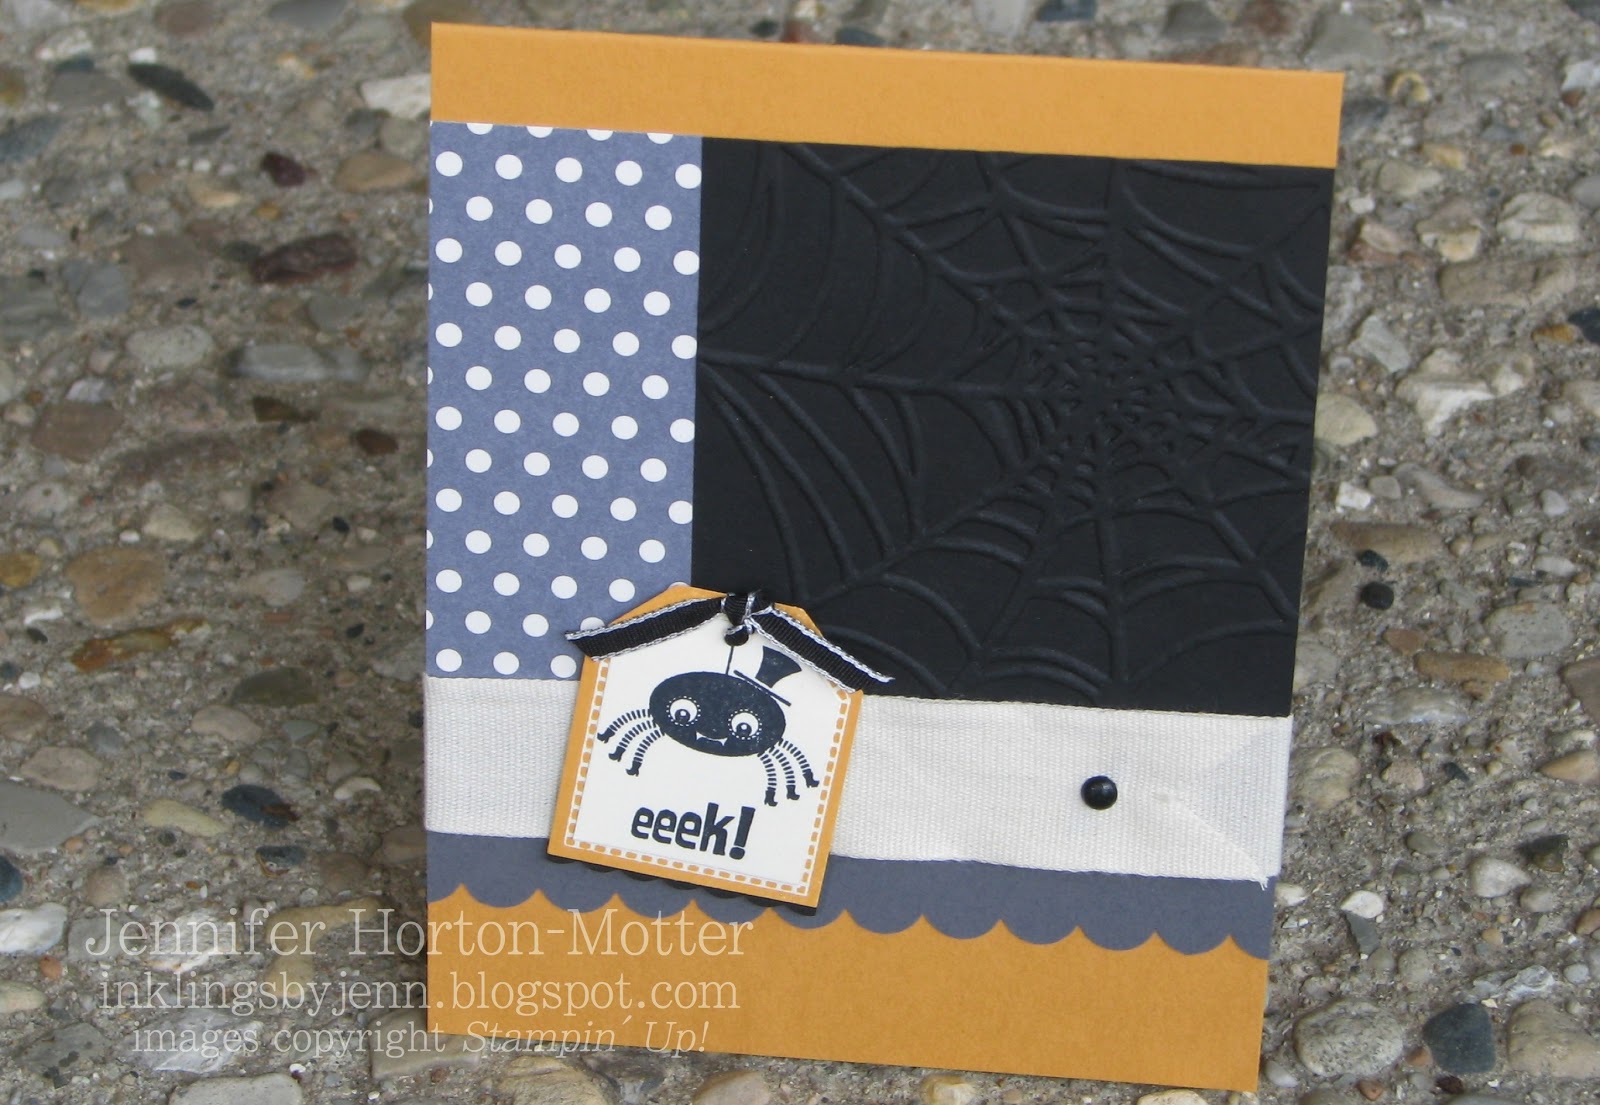
stamp set: Tricky Treats
Embossing Folder: Spider Web
You might be thinking you've seen other cards I've made using this layout, and you're right! I love it for a quick, simple card. And just to get those creative juices going for the weekend, here's the sketch and a few digital examples:
Hmmmm... I just got an idea for a Christmas card using this sketch. Off to the stamping space! Have a fabulous weekend, and as always, Happy Stamping!! :}
Labels:
Basic Black,
Basic Gray,
Card Template 3,
Embossing Folder,
Halloween,
More Mustard,
punch,
Ribbon,
Very Vanilla
Thursday, October 18, 2012
creating a new border
Did you ever have one of those days that time seems to be moving in "fast forward" and you feel like you spend the whole day running to catch up? Today was kinda like that for me... just not enough hours in the day! It didn't help that I've made three trips to the Post Office in the past two days. I had some packages to mail to my downline, so I went out yesterday afternoon to the village Post Office, where at 4:02pm I learned they close at 4pm. Now, I could have driven into town to a larger Post Office, and I should have looked at ALL of the posted hours... but I didn't. Apparently, as I learned today at 11:15am, they close during part of the day for lunch. Good grief. Third trip was a charm! Between this errand, all the others, and a volunteer stop at the grade school this afternoon, I'm thinking that I have a slow leak in one of my tires - grrrr! Well, at least I have something really neat to share with you today!!
This quick and easy Halloween card uses some of my favorites (Howlstooth & Scaringbone DSP, Tricky Treats stamp set). The layout is simple and easy to duplicate - I made it fun and interesting with just a few details. Distressing the edges of the More Mustard card stock adds great texture, aaaand...
check out that awesome border!!! It's stinkin' cute, and ridiculously easy. I just punched out two pieces of Tangerine Tango card stock using the Curly Label punch, cut them in half, and adhered them behind the More Mustard card stock. Easy Peasy! LOVE IT!!!!! Yes, it's these simple little moments that make me sparkle ;)
Well, it's time for me to get the kids ready for bed. And I'd better turn in early myself... I'm working in the school library in the morning, and then chaperoning Aaron's field trip to a pumpkin patch in the afternoon. Just wondering... why is it always cold and rainy every time I'm with a class field trip outside? sigh
Time to break out the long-johns! :P
This quick and easy Halloween card uses some of my favorites (Howlstooth & Scaringbone DSP, Tricky Treats stamp set). The layout is simple and easy to duplicate - I made it fun and interesting with just a few details. Distressing the edges of the More Mustard card stock adds great texture, aaaand...
check out that awesome border!!! It's stinkin' cute, and ridiculously easy. I just punched out two pieces of Tangerine Tango card stock using the Curly Label punch, cut them in half, and adhered them behind the More Mustard card stock. Easy Peasy! LOVE IT!!!!! Yes, it's these simple little moments that make me sparkle ;)
Well, it's time for me to get the kids ready for bed. And I'd better turn in early myself... I'm working in the school library in the morning, and then chaperoning Aaron's field trip to a pumpkin patch in the afternoon. Just wondering... why is it always cold and rainy every time I'm with a class field trip outside? sigh
Time to break out the long-johns! :P
Labels:
Basic Black,
Basic Gray,
card,
Halloween,
More Mustard,
punch,
Tangerine Tango
Friday, October 12, 2012
CASEing the cattie for Fall
It's Friday, it's Friday!! I think I'm going to sleep in tomorrow until... like, 6:30 or 7 -- ha! I'm sure the boys will be up before that. Do your kids always wake up early on weekends, even though it's torture to get them up on school days? Aaagh! Oh well... more time to stamp, right?
My up- up- upline does a really great job of utilizing the projects in the catalog as inspiration during her stamping time. The card on p178 really grabbed her attention, so she "CASEd" it to make a Fall card. I liked her CASE so much, that I CASEd her card to make my own version for Fall. :}
stamp sets: Friendship Preserves, Perfectly Preserved
ink: Island Indigo, Early Espresso
card stock: Raspberry Ripple, Core'dinations Early Espresso, Lucky Limeade, Very Vanilla, More Mustard
DSP: Orchard Harvest
Embossing Folder: Woodgrain
Framelits: Window Frames, Apothecary Accents
punch: Small Oval
embellishments: 1/8" Mini Brads
** a few TIPS: After embossing the Core'dinations card stock with an Embossing Folder, remove it carefully from the folder so that it doesn't tear. I snipped the end of the strip after embossing it, because the skinny points will be more likely to rip if they are trimmed prior to embossing. Use the Sanding Block very gently to expose the inner core color.
Thank you for dropping by my blog today. I hope you have a fabulous weekend!
Thursday, October 11, 2012
simple Fall card; unexpected color combo
I love making Fall cards, especially when I get to add all the yummy details like sponging, shimmer mist, Crochet Trim, layers, etc... But let's face it, if I waited until I had time to make all those, I wouldn't get much done! I like to try to mail out a few Fall cards, so that if I don't get my Christmas cards done in time, I've given myself a "free pass" until Valentine's Day. ;) Is that planning to fail, or being realistic???
Anywho, I came up with a simple Fall card that's super easy to make and doesn't take much time - yay!
My favorite thing about this card is the unexpected color combination. I had something else in mind when I started working on it, but when I went to my card stock shelf, the Perfect Plum jumped up and said "PICK ME!!" So I did.
The Woodgrain background stamp is perfect for this card - love it! At first I used the Woodgrain Embossing Folder on the More Mustard layer, but I felt like it made the card too busy. It needed something that would add subtle detail, without taking too much time, since I want to make several of these... Stripes Embossing Folder to the rescue!
After die-cutting Very Vanilla card stock on the Autumn Accents Bigz Die, I inked a leaf from the Wonderfall stamp set with Cajun Craze ink. While the stamp was lying on it's back, I pressed the card stock onto the stamp... it's like stamping upside down :}
The "thanks" sentiment (Fabulous Phrases) is stamped in Early Espresso ink onto Cajun Craze card stock, and adhered to the back of the leaf. I used Dimensionals to adhere the leaf to my card front, and Mini Glue Dots hold the Perfect Plum button in place. Easy Peasy!
If you are looking to mix things up a bit in your craft room today, try this color combo (Perfect Plum, Cajun Craze, More Mustard) on some Fall cards. I think you'll like it! :}
Anywho, I came up with a simple Fall card that's super easy to make and doesn't take much time - yay!
My favorite thing about this card is the unexpected color combination. I had something else in mind when I started working on it, but when I went to my card stock shelf, the Perfect Plum jumped up and said "PICK ME!!" So I did.
The Woodgrain background stamp is perfect for this card - love it! At first I used the Woodgrain Embossing Folder on the More Mustard layer, but I felt like it made the card too busy. It needed something that would add subtle detail, without taking too much time, since I want to make several of these... Stripes Embossing Folder to the rescue!
After die-cutting Very Vanilla card stock on the Autumn Accents Bigz Die, I inked a leaf from the Wonderfall stamp set with Cajun Craze ink. While the stamp was lying on it's back, I pressed the card stock onto the stamp... it's like stamping upside down :}
The "thanks" sentiment (Fabulous Phrases) is stamped in Early Espresso ink onto Cajun Craze card stock, and adhered to the back of the leaf. I used Dimensionals to adhere the leaf to my card front, and Mini Glue Dots hold the Perfect Plum button in place. Easy Peasy!
If you are looking to mix things up a bit in your craft room today, try this color combo (Perfect Plum, Cajun Craze, More Mustard) on some Fall cards. I think you'll like it! :}
Monday, October 8, 2012
English Ivy "meets" Wonderfall
While getting ready for another stamp class at the Bakery, I started playing around with the English Ivy Stationery. This is pretty stuff! So, at first I felt a little guilty chopping it, but once I finished my card... guilt gone!
I trimmed the stationery sheet so that I had two layers each measuring 3-1/2" x 5". The piece with the pre-printed background was used on the front, and the other piece was used inside the card.
Making the pretty leaves was fun, and easy to do. First die cut Very Vanilla card stock on the Big Shot using the Autumn Accents Bigz Die. Then, ink the stamps from the Wonderfall stamp set. Instead of turning the stamp face down to stamp on the card stock, leave the inked stamp lying face up. Turn the card stock leaf over and press it onto the inked stamp. I like to use an acrylic block instead of my fingers to press down on the leaf so that I get an evenly stamped image. The next step is to crumple each leaf. Then, sponge a little ink around the edges and over the creases for added detail.
I can't wait to share this card tomorrow night! I hope everyone likes it as much as I do! :}
I trimmed the stationery sheet so that I had two layers each measuring 3-1/2" x 5". The piece with the pre-printed background was used on the front, and the other piece was used inside the card.
Making the pretty leaves was fun, and easy to do. First die cut Very Vanilla card stock on the Big Shot using the Autumn Accents Bigz Die. Then, ink the stamps from the Wonderfall stamp set. Instead of turning the stamp face down to stamp on the card stock, leave the inked stamp lying face up. Turn the card stock leaf over and press it onto the inked stamp. I like to use an acrylic block instead of my fingers to press down on the leaf so that I get an evenly stamped image. The next step is to crumple each leaf. Then, sponge a little ink around the edges and over the creases for added detail.
I can't wait to share this card tomorrow night! I hope everyone likes it as much as I do! :}
Saturday, September 22, 2012
Happy 1st day of Fall!
Autumn is a second spring when every leaf is a flower. ~Albert Camus
stamp set: Itty Bitty Banners
ink: Early Espresso, VersaMark
card stock: Raspberry Ripple, More Mustard, Lucky Limeade, Very Vanilla
DSP: Orchard Harvest
Naturals Designer Button, Linen Thread
Stampin' Emboss® Powder: Gold
Autumn... the year's last, loveliest smile.
~William Cullen Bryant
Friday, August 10, 2012
a card for my friend
One nice thing about moving back to the area where you grew up, is reconnecting with friends. I've had the joy of reconnecting with one of my closest friends from middle- & high- school. Every week or so we meet for coffee and conversation. After our first coffee date, I sent her this pretty card:
We made this at Convention in a Make & Take session, and it's just the perfect card for my buddy :}
stamp set: Affection Collection
card stock: Primrose Petals, Early Espresso, Whisper White
ink: Daffodil Delight, More Mustard, Primrose Petals, Midnight Muse, Early Espresso
My "old" friend has never stamped or made cards before, so I'm really, really excited to show her how much fun it is. I get to come over to her house in a few days to share the fun of stamping with her friends and family... I can't wait!!! Now I have to narrow down all of my ideas. What to make, what to make???
Monday, June 18, 2012
my new friend, Eleanor
I might just have a new best friend. Her name is Eleanor. I have barely had any time to get to know her, but the time we've spent together stamping has been wonderful. Want to meet her???
I'll bet you would like more details on that flower, wouldn't you... Surprise! I have a video for you today!! :}
Easy, right?!! I can't wait to make more :} Thanks for dropping by today!
I'm sure you think she's as pretty as I do! Today I'm sharing the first card I made using my new stamp set called Everything Eleanor :} I used three stamps from this set on my card - the "label" shape, a flower, and the bird - all of which I fussy-cut with my Snips.
I started with a 4-1/4" square More Mustard card base. Then I added a 4" square of Fan Fair DSP, which I dry embossed using the new Chevron Embossing Folder and lightly sanded the raised surfaces. The sentiment, from the Loving Thoughts stamp set, is stamped in Island Indigo ink onto Island Indigo card stock.
Isn't the layered flower pretty??? I used 4 layers of Fan Fair DSP, which I die cut using the Floral Frames Framelits, and then sponged the edges with Riding Hood Red ink. An Antique Brad holds the flower together and makes a lovely flower-center.I'll bet you would like more details on that flower, wouldn't you... Surprise! I have a video for you today!! :}
Subscribe to:
Posts (Atom)