Showing posts with label Primrose Petals. Show all posts

Friday, May 3, 2013

let's talk about scrapbooking

Hello and Happy Friday!! I'm hoping to spend the weekend doing a little scrapbooking, but somehow I have the feeling I'll be taking more pictures to "scrapbook later" than I will actually scrapbook. Well, that is if the rain doesn't turn into a downpour at our campout.
I've been pondering scrapbook styles lately... 
My scrapbooks are primarily 12x12 full-page layouts. I will occasionally create a smaller album for a trip or special event. I also like to make digital pages just for the heck of it (these pages of my boys are saved onto a disc for them to keep). But there are so many options... page size, bound book vs individual pages, single page vs full-page layout, traditional vs digital or hybrid... 

Inside my scrapbooks, you will find pages created with "traditional products" --
Note: the chalkboard art technique looks just as great on scrapbook pages as it does on cards. Be sure to try all of your card-making techniques on your scrapbook pages! 

You will also find digital pages...
Note: I started this page to measure 11 x 8-1/2, but I have plans to import it into a 12x12 project. I LOVE that I can do that in seconds with My Digital Studio! 

...and "hybrid" pages. Hybrid projects combine both digital and traditional products.
Note: One great benefit of digi-scrapping is editing my photo size multiple times while creating the layout. On this layout, I ended up making one photo cover the entire 12x12 page - LOVE!
Note: traditional supplies include stamped and punched layers, chipboard, buttons, etc.

So what are your thoughts on scrapbooking? Are you a traditional or digital scrapper - or both! What's your preferred size? Do you scrap single or two-page layouts? What types of projects do you like to look at online? I'd love to get a good discussion going!!

***** Isn't that title/ journaling box on the digi page neat?? Click on over to my Facebook page to get it (and two more!) for free. They will look great on your scrapbook pages! Print them now so you can use them tomorrow while you're scrapping for National Scrapbooking Day!  :}  *****

Pin It!

Thursday, May 2, 2013

sketch happy

Yay, yay, yay! I had a good chunk of time to stamp yesterday!! It was fabulous. I made a ton of cards, and tried out a few sketches. Here's what I came up with for the Paper Players Sketch 143:
I chose all of my papers from the same package (Patio Party), so my card came together very quickly. The two Paper Daisies and the Summer Starfruit Dahlia layer nicely, and are adhered with my favorite liquid glue
Do you spy something new and fabulous??? My sentiment is from the Label Love stamp set, which coordinates ever so nicely with the Artisan Label punch.
Well, I'm off to sub again today... Kindergarten - the BEST! Don't have too much fun without me!   :}

Pin It!

Sunday, April 14, 2013

clean and simple - part 3

Ok, my last "clean and simple" card... for a little while, anyway.  ;) 
This card using CAS Sketch 236 was super fun to make. Three different patterns from the More Amore DSP got to play! To a Notecard, I adhered a layer of Sahara Sand card stock and then a layer of DSP. Instead of stamping some sort of circular image, I Snipped a scallop circle image out of a sheet from the More Amore DSP, and stamped one of the hearts from the Hearts a Flutter stamp set in Primrose Petals ink. 
The Hearts a Flutter Framelits made quick work of cutting out my stamped banner, stamped heart, and a "heart of hearts" from the DSP. 
I decided to omit the greeting, since the background I chose is rather busy. I stamped the greeting I wanted - for my Mom - inside the card, which might surprise her since I don't usually stamp inside my cards... too much to say! 
Which makes me curious... do you usually stamp inside your cards? If you do, all of them or only for certain occasions? Just wondering...

Pin It!

Tuesday, March 19, 2013

Just Because

I can not believe Sale-A-Bration is almost over! Where has the time gone???
I have a super cute card to share with you today! This card was designed by Laura for the shoebox swap I recently participated in. Can you spot the two items you can get through Sale-A-Bration?
The Basic Black card stock layer features the "chalkboard art" technique.  Click here for technique directions and another card.  I love, love, love the Hearts a Flutter Framelits for making this fun little banner!
Ok, did you find the Sale-A-Bration goodies? I chose the "just because" greeting from the Vintage Verses stamp set. And the silver Glimmer Paper is from the FREE package you can get with a $150 merchandise order. Can't order $150 by yourself right now? Grab a few friends a put your orders together! You will not only earn the free Glimmer Paper, but also enjoy our fabulous Hostess Benefits (aka - more FREE stuff)! Hurry... Sale-A-Bration ends March 22nd.  Happy shopping... and stamping!  :} 


Pin It!

Tuesday, February 5, 2013

inspiration

Not only do I enjoy looking through a new catalog and finding tons of pretties that I must have, I love when I find project ideas that inspire me to create my own goodies! Today's card (and sketch- yay!) is inspired by the card sample on page 12 of the Spring Catalog

I made this card for tomorrow's class at the bakery, so I wanted to simplify some of the details. A layer of More Amore DSP creates a great background over the Very Vanilla card base, and there are so many cute patterns in this paper for me to choose from! My sentiment (Seasonal Sayings) is stamped in Primrose Petals ink, and the Real Red Taffeta ribbon adds a nice feminine touch. 

Using three hearts from the Hearts a Flutter stamp set, I stamped onto Very Vanilla and Primrose Petals card stock. These hearts and the bottom DSP heart are easily die-cut with a Hearts a Flutter Framelit. All four hearts are then adhered using Dimensionals. 

I like how cute and easy this card was to make. Here's the simple card sketch for you, so you can make your own... and many others.  Happy stamping!!  :}


Pin It!

Monday, November 26, 2012

simple, modern Christmas card

Hello stamping friends! Sorry for the inconsistent posting the last few days. Between traveling out of town for the holiday and fighting this cold, my head is "in the clouds." The cold, which started Thursday night, is winning the battle - grrr!  And while I really wanted to pound my phone into the floor when the alarm went off this morning, life goes on, and I didn't want to wait another day to share this cute card with you. 
This is my modern style Christmas card from my class at the bakery. To create that modern feel I used a clean design, eye-popping and unexpected colors, and lots of "white space." 
The Whisper White layer has two scored lines an 1/8" apart, a little strip of  Primrose Petals DSP folded over the top edge, and is adhered with Dimensionals. 
I stamped the greeting (Curly Cute stamp set) in Lucky Limeade ink, and then adhered the images. Those cute little Christmas images from the Merry Minis stamp set are stamped in Lucky Limeade, Primrose Petals, and Island Indigo ink, then punched out with the Merry Minis punches.    ***TIP: to adhere the images as evenly spaced as possible, I attached the center image first, then the outside images, and then the remaining two. 

While you are burning up the keyboard this Cyber Monday, don't forget all the great deals in the Online Extravaganza in my online store. Happy shopping:}


Pin It!

Friday, August 10, 2012

a card for my friend

One nice thing about moving back to the area where you grew up, is reconnecting with friends. I've had the joy of reconnecting with one of my closest friends from middle- & high- school. Every week or so we meet for coffee and conversation. After our first coffee date, I sent her this pretty card: 
We made this at Convention in a Make & Take session, and it's just the perfect card for my buddy :}
card stock: Primrose Petals, Early Espresso, Whisper White
ink: Daffodil Delight, More Mustard, Primrose Petals, Midnight Muse, Early Espresso

My "old" friend has never stamped or made cards before, so I'm really, really excited to show her how much fun it is. I get to come over to her house in a few days to share the fun of stamping with her friends and family... I can't wait!!! Now I have to narrow down all of my ideas. What to make, what to make???

Pin It!

Monday, June 4, 2012

beautiful wings

I found another clean and simple card sketch that I just love
I seriously love how "clean" and "not fussy" this card looks! And it only took a few minutes to put together  :}
I started with a Crumb Cake card base, and then added a 3-1/2"x4-3/4" layer of Summer Starfruit card stock. My sentiment is from the Itty Bitty Banners stamp set. I "inked" the stamp with a Primrose Petals Marker, and using a Stamp-A-Ma-Jig, I stamped the bottom "happy birthday" onto the Very Vanilla card stock first. Then I repeated the process using a Raspberry Ripple Marker for the top-most "happy birthday." For the middle "happy birthday," I inked the entire stamp using the new firm-foam Summer Starfruit ink pad. Then I die cut the banner using one of the Bitty Banners Framelits.
I die cut my card stock butterflies with the Beautiful Wings Embosslit... sooooo pretty. Can you believe I didn't use any Stampin' Dimensionals on this card???? Crazy!

Before I show you a few more beautiful wings, don't forget that today is the last day to be entered into the BLOG CANDY drawing! Click here for the details.

Since I was enjoying the butterfly theme in my craft room this morning, I thought I would whip up a cute little 3x3 card for a friend. 
I used Calypso Coral card stock, ink, and Baker's Twine for this little cutie. The images are from the My Friend stamp set. I die cut two layers of White Waffle Paper using the Beautiful Butterflies Bigz Die. I'm sad the Waffle Paper retired... you can make some neat things with it. If you don't have any, you can die cut a few layers of tissue paper for a similar look.

And now, for the last "wings" in this post...   Look what I found this weekend: 

This mama robin sure picked a silly spot for a nest! I hope we don't get a downpour before the babies are grown. When it pours really hard, the rain streams over the edge from the upper level and down into the lower level gutter. Plus, this is right outside my door to the backyard... you know, the door my boys and all of their neighborhood friends use 7 million times a day!!! Keep your fingers crossed that we see some of those scrawny little baby birds soon!

Thanks for dropping by today!! Have a fabulous day  :}

Pin It!

Tuesday, May 22, 2012

new, new, new!

Well, a super busy weekend has turned into a super busy week... I'm really looking forward to the upcoming 3-day weekend! Hopefully I will have all of the drywall dust mess cleaned up by then. That's right, home repair... yuck! So let's look at some prettier things, shall we?  :} 
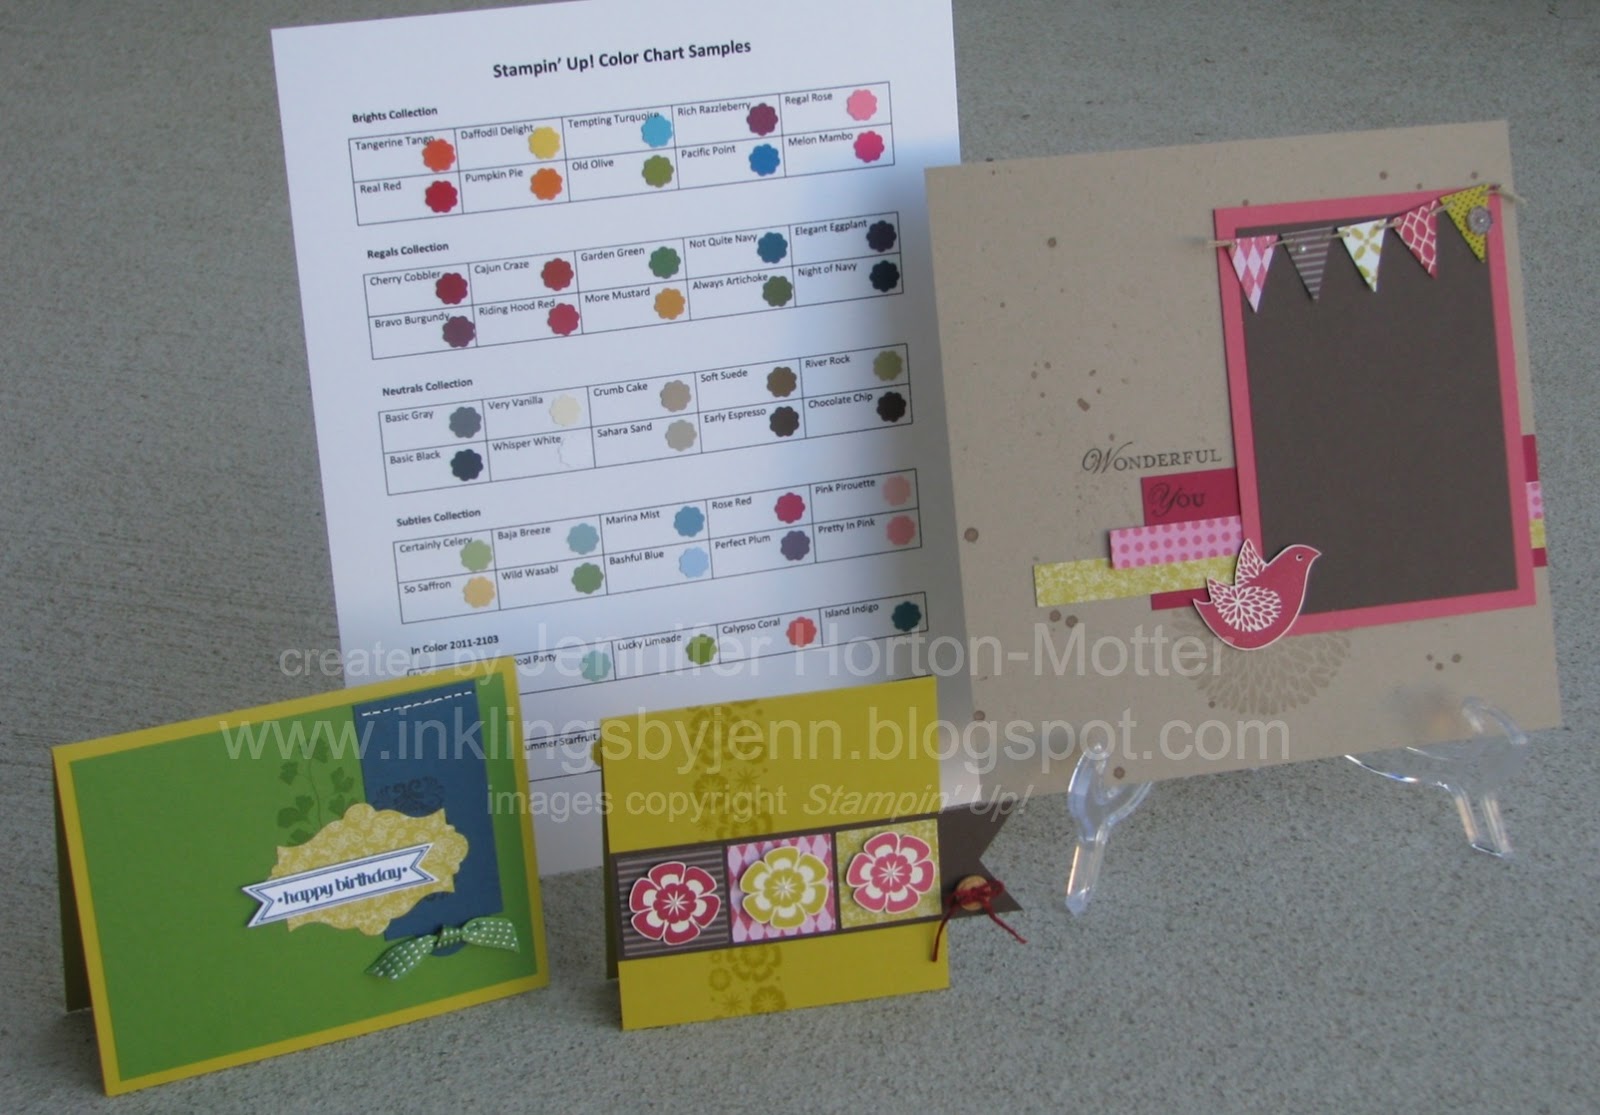
For my May team meeting, I prepared a Color Chart "sampler" page, and designed three cute projects using tons of new goodies. It's always fun to try out all the new products from the upcoming catalog!  So... what's new???

Two new stamp sets: Itty Bitty Banners and Papaya Collage. Three new colors: Summer Starfruit, Gumball Green, and Midnight Muse. Two new Framelit Collections: Apothecary Accents and Bitty Banners. New DSP and Ribbon, too!  :}

New stamp set: Betsy's Blossoms. New stampin' wheel: Betsy's Blooms. Three new colors: Summer Starfruit, Raspberry Ripple, and Primrose Petals. New DSP and button, too!  :}

New stamp set: Betsy's Blossoms. Three new colors: Summer Starfruit, Raspberry Ripple, and Primrose Petals. And new DSP!  :}  *Note: I planned this 8x8 page to go with the new 8x8 Scrapbook Albums in the upcoming catalog!!

I have to say, I prefer the creating of the new projects in my stamp room over creating new sections of drywall in my ceiling and walls, but a girl's got to do what a girl's got to do! And by that I mean, calling a handsome fix-it guy to do the repairs!  ;)

You know, you could be stamping with these brand new goodies too! There are all kinds of perks to joining the Stampin' Up! family. I would LOVE to have you as part of my team. Click here to learn more  :}

And last but not least, you can find full views of the front of each project - as well as other projects from my team meetings - on my Facebook Page. Thanks for stopping by today!!  :}


Pin It!

Friday, May 18, 2012

a busy day!

Holy Moly! I can't believe how busy my rummage sale was today... I can't even imagine how busy tomorrow is going to be! I was worried that I wouldn't get time to stamp at all today (again), but there was a little break around lunchtime. Sooooo, I had a few minutes to whip up a cute little card  :}
I am in love with the new "In Color" Raspberry Ripple... and it looks so great paired with Summer Starfruit and Early Espresso. Then I threw in a touch of Primrose Petals, just for fun  :}
The images from the Betsy's Blossoms stamp set are so stinkin' cute! Snipping out the branch image was a little fussy, but totally worth it!

Well, I better whip up some supper and get to bed early... tomorrow is probably going to be crazy!

Pin It!

Friday, May 11, 2012

Create

Happy Friday!! I have a quick post for you today... a pretty card that I made just for fun.
Lots of wonderful new goodies on this card! The Layered Labels stamp set and the Apothecary Accents Framelits are going to get lots of use in my stamp room!

For those of you who know me personally, or have been reading for a while, you know how much I LOVE playing with color! So when SU releases new In Colors, I'm like a kid in a candy store! I used Summer Starfruit, Primrose Petals, and Raspberry Ripple on this card. I also added Early Espresso and Very Vanilla to help pull it all together.

Speaking of creating... it's always fun to watch the delight and enjoyment children get from paper crafting.

Yesterday afternoon, I had a good time working with my boys and my neighbor's children. They each got to make two cards for Mother's Day. They did a fabulous job of listening and following directions, and the teamwork was wonderful! It's always nice to see kids helping each other, especially when they do it on their own. There will be some happy Moms and Grandmothers on Sunday!!

Pin It!

Thursday, May 10, 2012

a Sketch Challenge & a Sneak Peek!

I woke up this "morning" at 3am... no idea why. It's not like I'm not tired! After tossing and turning for an hour, I decided to get up and do a little blog surfing. Once I saw Connie and Mary's sketch challenge, my brain was fired up and ready to create.
I took Mary's suggestion and started with a 4-1/4" square card (closed), and cut the Early Espresso layer to 5-1/2" wide. So, this card will fit nicely into a Medium Envelope... yay!  :} 
There are lots of new goodies on this birthday card!!! I used two new stamp sets - Make a Cake and Memorable Moments. One of the advantages to using the clear-mount stamps, is that I can place two sentiments on the same block, which makes my stamping easier. In this case, I aligned the "happy" and the "birthday" next to each other on block H. I still used my Stamp-A-Ma-Jig to make sure I spaced them evenly.
Did you spot two new colors? My card base is the new Summer Starfruit, and I used a tiny strip of Primrose Petals card stock. If you look closely, you will also see a strip of the new Patio Party DSP.
I can't begin to tell you how much I LOVE the new pad inside the ink pads - they are AWESOME!! When you order your new stampin' goodies on June 1st, you have to try them. Since you will be ordering the new In Color Collection anyway, you will get your chance!  ;}
Well, I better slam a few more cups of coffee before my little one gets home from school... it's going to be a looooong day. Do you think I could convince him to take a nap with me???

Pin It!
Related Posts Plugin for WordPress, Blogger...