Showing posts with label Framelits. Show all posts

Thursday, February 13, 2014

love... and a new sketch!

Here's another card we made at the class I taught on Saturday: 
love... love... love...
I used Sahara Sand for the card base. The Strawberry Slush layer needed a little texture, so the Chevron Embossing Folder was put to work. 
After stamping the Positively Chevron background stamp in Bermuda Bay ink onto Coastal Cabana card stock, I used a Framelit from the Hearts Collection to die cut my focal point. Don't you just love that little stamped banner??!! This perfect little sentiment is from the Banner Blast (Sale-A-Bration) stamp set, and I punched it out using the Banner (Sale-A-Bration) punch. Three Basic Rhinestones add just the right amount of bling... love:}

P.S. - I love you... so here's my sketch. Enjoy!!

Pin It!

Saturday, February 8, 2014

an anniversary card

I had so much fun today!!!! I got to spend the morning with some very fun ladies at my local library, and teach them how to create hand-stamped cards. We got to know each other a little bit, learn a few techniques, and create three cards.
The last card we made featured a background stamp, a technique called "masking," and the finished project gave my Big Shot quite a workout! 
After dry embossing the Raspberry Ripple layer with the new Decorative Dots Embossing Folder (a FREE Sale-a-Bration choice!), I adhered it to the Crumb Cake card base. The Very Vanilla layer is die-cut using the Top Note die. Then I used a large "sticky-note" to cover the bottom portion of this layer, and stamped the En Francais background stamp in Crumb Cake ink onto the top portion. After removing the "sticky-note," I stamped the anniversary sentiment from the Express Yourself (hostess) stamp set. There are so many great sentiments in this stamp set, and during class several other ladies chose a different sentiment to stamp onto the bottom of the die-cut. 
After attaching a strip of Crochet Trim, I attached the Top Note layer and started adding hearts. The DSP heart and the Crumb Cake heart are courtesy of our two heart punches. The stamped heart and the Raspberry Ripple heart were die-cut using the Hearts a Flutter Framelits. And a Basic Pearl adds the perfect "ta-da" to the finished card.  :}

Pin It!

Friday, February 7, 2014

a Valentine treat

Hello stamping friends!! I have a super cute Valentine treat bag to share today:
I was going to help a group of teachers make this treat bag and some corner bookmarks on Tuesday, but it snowed like crazy, so we had to reschedule for next month. (Is anyone else really sick of winter???) I'm sharing the treat bag today, and I'll share the bookmarks with a simple tutorial in another post.
First, I embossed the Gift Bag using the Adorning Accents Embossing Folder with the tiny little hearts. Then I attached the whole focal point with Dimensionals.
To create the focal point: I used the Circles #2 Die to die-cut the Red Glimmer Paper, and tied some Linen Thread around the circle for some extra "pretty." The Hearts A Flutter stamp set and coordinating Framelits, along with Real Red, Blushing Bride, and Soft Sky ink, create the three stamped pieces. I also stamped "love you" (from the Express Yourself hostess stamp set) inside the larger heart. The last heart is courtesy of the adorable Small Heart punch and Blushing Bride card stock.
Wouldn't this be the cutest packaging for a simple gift of candy or a gift card??  :}

On a personal note: I've really missed sharing with all of you, and a big "aww, thanks" to those of you who check in on me from time to time. I know I won't be posting every day again anytime soon, but I will pop in here and there to share a variety of projects.
If there's one thing I've learned in the past few months, it's that moving stinks even more than I already knew! I can't believe it's been a year since we closed on our house in Wisconsin... and I'm so dismayed at how slow the "settling in" has gone. Just when I think we are back on track, BAM - Aaron's asthma goes bonkers. Or BAM - plumbing leak. I know we'll get done, eventually... 
Being cooped up in the house with the unusually cold temperatures and extra snow this past month has been sort-of a good thing for me. It's given me a little time to focus some energy in my craft space - YAY!!! I'm having a hard time trying to fit everything in to a smaller space. I try things one way for a while, and when it doesn't work I move it all around again. Sigh... at least it's exercise, right???

Pin It!

Thursday, May 16, 2013

the best things in life

The best things in life really aren't things... but sometimes it takes a few things to help make the good stuff happen. 
Giving myself time to relax and let go of stress is definitely a good thing. Quiet time with my stamping goodies does just that. Sending a hand-stamped card to brighten someone's day is also one of the good things in life, so it works out quite nicely! 
After distressing the edges of the 4 x 5-1/4" Certainly Celery layer, I stamped my greeting (Feel Goods) in Lucky Limeade ink, and adhered that layer directly to my Certainly Celery card base. 
Even though coordinating stamp sets and Framelits are technically "things," I would have to say they might just lean towards being one of the best things in life simply because they make my crafting time easier and more enjoyable.  :}   For this card I used the Secret Garden stamp set and Framelits. The flowers are stamped in Calypso Coral ink onto Whisper White card stock, and the leaves are stamped in Lucky Limeade ink onto Certainly Celery card stock. One flower is adhered directly to the card, another has 1 Dimensional under it, and the third flower has two Dimensionals under it. 
Besides quiet stamping time for yourself, what are some of the "best things" in your life?

Pin It!

Monday, May 13, 2013

Secret Garden

My mother-in-law loves to garden. She's even won awards for her flower gardens. So a Mother's Day card for her using the Secret Garden stamp set was perfect!
After stamping the leafy image twice in Pear Pizzazz ink, I die cut the leaves with the Secret Garden Framelits, and adhered them to my Island Indigo card base. Over those leaves, I added a strip of the new Gingham Garden DSP (look for this pretty paper in the upcoming catalog) down the center of the card. 
Onto Very Vanilla card stock, I stamped one flower in Melon Mambo ink, and another flower in Daffodil Delight ink. After using a Blender Pen to color the flowers, I die cut both of them with the Secret Garden Framelits. My sentiment is also from an upcoming new-cattie product --- Banner Greetings (a new Hostess stamp set)

I wish I had even 10% of my mother-in-law's green thumb. Unfortunately, plants don't survive long around me. Perhaps that's why I make so many flowers out of paper... 


Pin It!

Sunday, May 12, 2013

Happy Mother's Day!

Today is such a special day... A day for thanking our Moms and all of the Mother figures in our lives who have guided us, prayed for us, and taught us to be who we are today. 
One of the best things about stamping your own cards, is that you can create a one-of-a-kind card that fits the personality of the receiver. My Mom loves the vintage style, and really loves cards with lots of layers. I worked on this card quite a while yesterday to get it "just right." Hope she likes it! 
I started with a Pretty in Pink card base. To that I added a layer of Tea For Two DSP, which I dry embossed in the Lacy Brocade Embossing Folder to double-up on the quilted look. Then came the layers... 
For the two sentiments I used two different stamp sets - You're Amazing and Teeny Tiny Wishes. Both sentiment layers have Crumb Cake ink sponged around the edges, and the larger sentiment also has a little spritzing on it with a Lucky Limeade marker. 
Since my darling angels that made me a mother are begging for breakfast, I'll give you the shorthand version for the rest of the layers.  :} 
Delicate Doilies Sizzlit, Lucky Limeade card stock

Happy Mother's Day to all of our mothers, in our homes and in our hearts, and to all those who have "mothered" us through the years. God bless you!  

Pin It!

Wednesday, May 8, 2013

Teacher Appreciation Week - Wednesday

While making the teacher appreciation gift packaging for the Wednesday gift, I stumbled across a really nice color combination: Basic Black, Melon Mambo, and Soft Sky. Yowza! These colors are great together!! 
Everyone can use a fun clip-on scent holder for the car, right?? The bags are tied closed with Melon Mambo Scallop Dots ribbon. Then I used 1/8" Basic Black Taffeta ribbon to tie on the tag. 
For the tag, I started by stamping (Forever with You) in black StazOn®, and die cutting the image with the Window Frames Framelits. Then I adhered a strip of Melon Mambo card stock. After punching out a layer of Soft Sky card stock with the Decorative Label punch, I wrote my greeting, and attached it to the tag with Dimensionals. A single rhinestone adds just the right amount of "bling." 

For those of you following Aaron's animal alphabet book pages, here are a few more for your classroom and/or punch art inspiration...  


Pin It!

Friday, May 3, 2013

let's talk about scrapbooking

Hello and Happy Friday!! I'm hoping to spend the weekend doing a little scrapbooking, but somehow I have the feeling I'll be taking more pictures to "scrapbook later" than I will actually scrapbook. Well, that is if the rain doesn't turn into a downpour at our campout.
I've been pondering scrapbook styles lately... 
My scrapbooks are primarily 12x12 full-page layouts. I will occasionally create a smaller album for a trip or special event. I also like to make digital pages just for the heck of it (these pages of my boys are saved onto a disc for them to keep). But there are so many options... page size, bound book vs individual pages, single page vs full-page layout, traditional vs digital or hybrid... 

Inside my scrapbooks, you will find pages created with "traditional products" --
Note: the chalkboard art technique looks just as great on scrapbook pages as it does on cards. Be sure to try all of your card-making techniques on your scrapbook pages! 

You will also find digital pages...
Note: I started this page to measure 11 x 8-1/2, but I have plans to import it into a 12x12 project. I LOVE that I can do that in seconds with My Digital Studio! 

...and "hybrid" pages. Hybrid projects combine both digital and traditional products.
Note: One great benefit of digi-scrapping is editing my photo size multiple times while creating the layout. On this layout, I ended up making one photo cover the entire 12x12 page - LOVE!
Note: traditional supplies include stamped and punched layers, chipboard, buttons, etc.

So what are your thoughts on scrapbooking? Are you a traditional or digital scrapper - or both! What's your preferred size? Do you scrap single or two-page layouts? What types of projects do you like to look at online? I'd love to get a good discussion going!!

***** Isn't that title/ journaling box on the digi page neat?? Click on over to my Facebook page to get it (and two more!) for free. They will look great on your scrapbook pages! Print them now so you can use them tomorrow while you're scrapping for National Scrapbooking Day!  :}  *****

Pin It!

Tuesday, April 30, 2013

sweet mojo

Here's a little insight into my floopy thought process... When I saw this week's Mojo Monday sketch, I thought, "aww, what a sweet card that would make! Sweet, sweet, something sweet... chocolate, chocolate covered cherries (no clue as to why I thought of those), oh hey - the cherries will be ready to pick in a few months... cherries! I have a cherry stamp!" Can't image where my son gets the ADD from... SQUIRREL!
And so here we are.   :} 
It is a pretty sweet card, isn't it?! The Riding Hood Red card base measures 4-1/4" square (closed). Can you believe I ended up raiding three DSPs (Twitterpated, Summer Smooches, Regals Stack) for those little strips?  *** Tip: I doubled up the Lucky Limeade Baker's Twine before tying it around the 4" square Lucky Limeade card stock so that my bow would stand out more - cute!!
I used Lucky Limeade and Riding Hood Red Markers to ink the cherry stamp (Button Buddies), which I die cut using a Labels Collection Framelit. Two Riding Hood Red buttons (from my vault, of course) are adhered over the fruit with Mini Glue Dots - mega cute!! For my greeting, I used a Basic Black Marker to ink the words on a stamp in the Storybook Friends stamp set.  Happy, happy, happy  :}   
I think pretty much everything I used, except the stamp for my greeting and the Framelit, is retiring. Remember, retiring accessories (DSP, embellishments, ribbon, stamp wheels, card stock) are available only while supplies last. You can shop for your favorites here, before they are all gone. Oh, and several goodies are on sale!  Have a SWEET day!! 

Pin It!

Sunday, April 28, 2013

saying farewell to favorites

While I do get super excited when a new Stampin' Up! catalog is about to start, sometimes it's hard to say goodbye to some of my favorite retiring products. The Build a Blossom stamp set and Blossom Petals punch are two coordinating goodies I'm having trouble letting go of. They will most likely make their way into my "vault."  :} 
I like how you can make a special, elegant flower that's sure to cheer anyone up! The stamp set has both flower and leaf images that fit perfectly in the punch. 
When assembling the flower, I like to punch out a scrap circle to have a base for adhering the petals. 
One of my favorite flowers to make with these goodies is a poinsettia. It looks nice on cards, scrapbook pages, and gifts!

And buried in my computer files was a video tutorial I made a while ago showing you how easy this is to make! 
Don't you just want to make some right now!!  ;)  I love how amazing the flowers turn out. Make a few for your friends and they will think you are the craftiest person they ever met.  :}  
Be to to shop for all of your favorite retiring goodies before they are all gone!

Pin It!

Saturday, April 27, 2013

happy 2nd birthday, Olive Jane

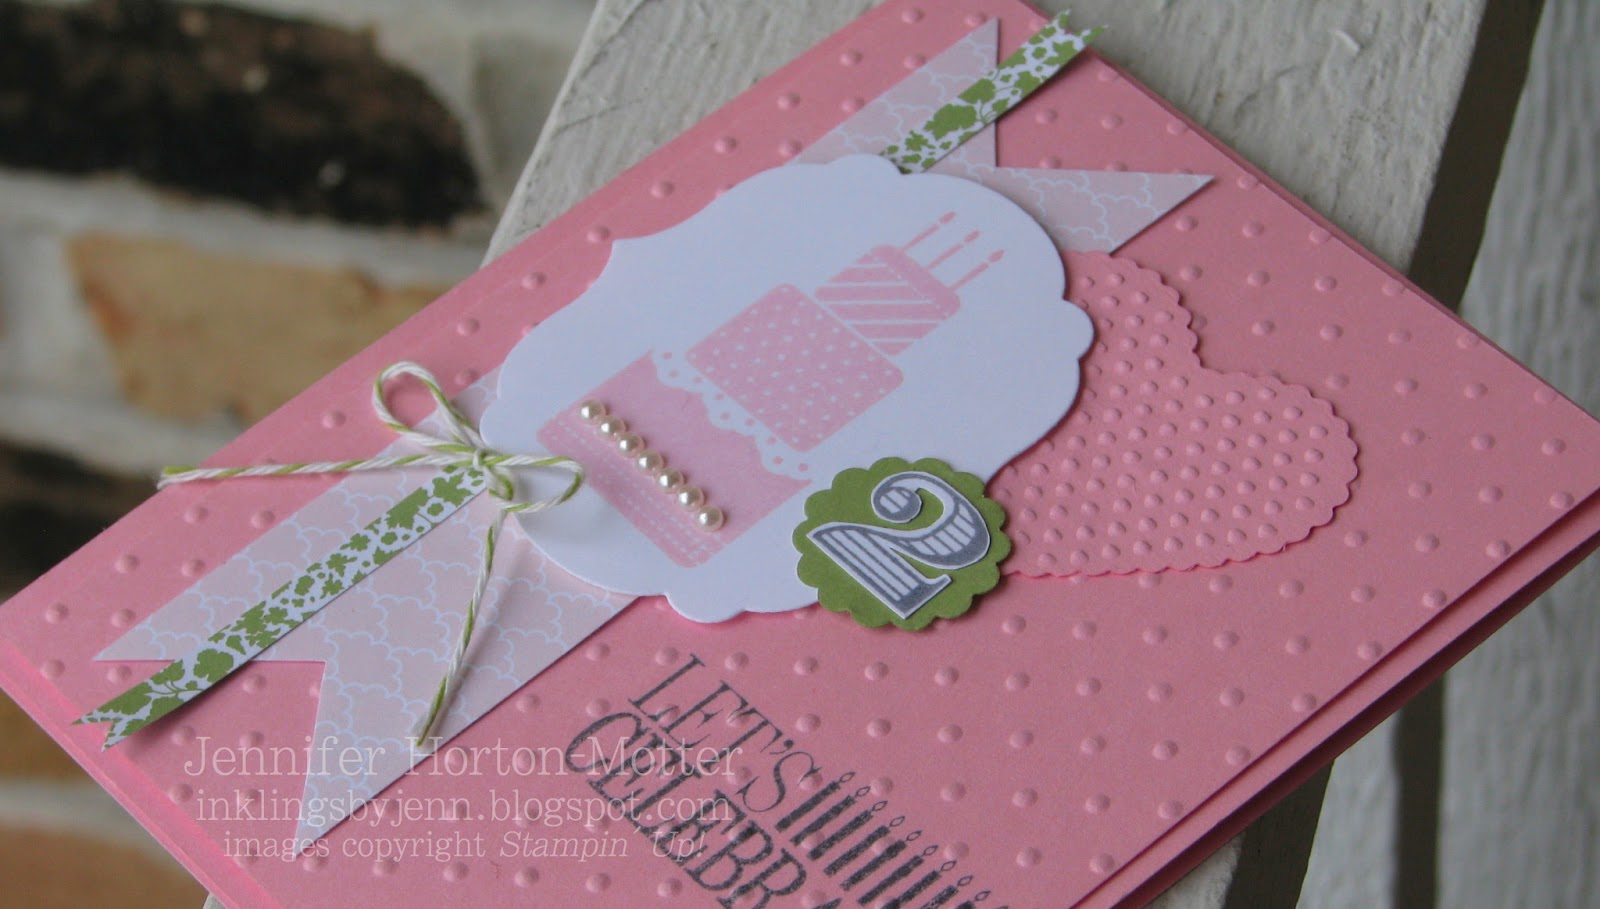
Today is my sweet little niece's 2nd birthday! I'm looking forward to celebrating with her tomorrow at her big birthday bash. Of course Aunt Jenn made coordinating tags and a special birthday card!  :} 
I chose Pretty in Pink (a retiring color), Pear Pizzazz (a returning color), and Basic Gray for my colors. The birthday cake (Make a Wish stamp set) looks so pretty after die-cutting with a Labels Collection Framelit, and adhering some Basic Pearls
Having the age number on birthday cards for little ones is just too cute, so I stamped and fussy-cut a number 2 (from the Memorable Moments stamp set), and adhered that to a Pear Pizzazz 7/8" Scallop Circle. Technically, the Baker's Twine is Lucky Limeade and not Pear Pizzazz, but I'm hoping Olive won't notice that subtle difference.   ;) 
Birthday gifts should have tags that coordinate with the card, right??? It was super easy to make the coordinating tags by using the same colors and DSP (Twitterpated), as well as incorporating some of the same design elements. 
I die cut the top edge of the tag with a Labels Collection Framelit.  *** Tip: if you want to use a Framelit to create a decorative edge, turn the handle on your Big Shot just enough so that only the portion you want trimmed gets cut, then turn the handle the other way to back up the platform. 
I used the same embossing folder on the card and tags. *** Tip: use the embossing folder after die-cutting or your texture will get smooshed. The Memorable Moments stamp set has that nice stitched image to fit perfectly in the Famelit, and I like the font of the greetings in this stamp set. I added a stamped number 2 (Number It) to the tags as well, and I used the same embellishments (Basic Pearls) on both projects. 

I can't wait to give Olive a great big hug and watch her open all the presents. Two is a fun age at gift opening time, since they now know exactly what those bags and boxes are all about! 

Pin It!

Tuesday, April 16, 2013

Sitting on a cornflake... coo coo ca choo

Soooooo, today's card... it would be easier to say "don't ask," but I know someone will... 
This all started because Aaron brought home the most adorable project ever.  He made it at school while working on the letter Ww. As a Mom, I instantly thought, "this is a keeper for the scrapbook!" As a former kindergarten teacher I instantly thought "I have to save this in my letter Ww file." As a paper-crafter, I instantly thought "punch art!" Good grief!! 
But, seriously... who do you send a punch-art-Walrus card to??? I wanted to make this little guy so much I started to think of all sorts of stupid things (have a walrussy birthday???). Which led to thinking "I am crazy. Wait, wait wait... I am the Walrus... I have an 'I am' stamp (from last year's Convention)... yes! I will send this to my friend who is a Beatles fan." Although I'm pretty sure she's not a huge fan of this particular song - talk about "out there."

So there you have it... the reason for why you would make a punch art walrus other than for a ZOO scrapbook page. Yup, I am about as crazy as the song.   :}
It did turn out super cute though! I used an Oval Framelit to create the curved top of his head. I just ran the Chocolate Chip card stock about a third of the way through the Big Shot so it only trimmed the one end. A smaller Oval Framelit made the "snout?" out of River Rock card stock. I Spritzed the oval with a Chocolate Chip Marker and sponged the edges with River Rock ink. 
I used the Owl Builder punch to create the eyes, and the Small Oval punch to make the nose. For the tusks, I used the Petite Pennants punch to punch out two Very Vanilla triangles, and trimmed up each long side to make them thinner. 

Want to see the project that inspired all this silliness?
Adorable, right???  :}
Come to think of it, perhaps today's post was just "destined to be." After all, I did substitute teach today. ***Shout-out to Harristown Elementary as one of the nicest school buildings to sub in!  Aaaaand, the only stamp on today's card is from a Convention stamp set, and I registered for Convention 2013 today. Maybe, just maybe, I'm not so crazy after all... coo coo ca choo!

Pin It!

Monday, April 15, 2013

from YUCK to WOW - the evolution of a card sketch

Today has been very productive - yay! Got some laundry done and my grocery shopping finished. (One thing that frustrates me with our new location - having to go to 2 grocery stores to get the things we need, and even then, doing without several things I was used to getting in a larger community.) Then, I had some crafting time with my sister-in-law - double yay!! She worked on birthday party decorations for my sweet little niece, and I worked on cards. 
To get me going, I started with the Mojo Monday sketch 289. Right away I knew it was going to be a challenge for me... it's kind of a "busy" sketch. I'm going to share the first card I made from the sketch, just so you know that I don't love everything I make. In fact, when I finished, I said "this might be one of the ugliest cards I ever made!" My sis-in-law is so sweet and tried to say nice things like, "well, it's bright... maybe it's just the paper." Ummm, yeah... 
The idea I had in my head did not translate well into card stock and paper.   :(   As a joke, my sis-in-law is sooooo getting this in the mail on some random day! I think the message inside will say something along the lines of "I made this just for you to show you how much I care..."

One thing I think turned out well was using two colors for the brad trios. I'll have to remember that for later.

I wasn't going to let this sketch beat me, and I had another triangle of Summer Smooches DSP left, so I started over and made a pretty awesome card, that I am quite pleased with!   :}
Love, love, LOVE, LOVE this color combo- Lucky Limeade, Whisper White, and Rich Razzleberry. It's so striking together! I eliminated the square from the sketch and let the bow from the Lucky Limeade Baker's Twine stand in for the small flower... aaaahh - much better. 
I used one of the Single Stamps for the focal point - the Basic Label stamp fits perfectly in one of the Apothecary Accents Framelits. Then, using the Stamp-a-ma-Jig, I stamped my sentiment (Forever with You) to the left of center, leaving room for the tiny DSP strip and flower to overlap. 
Isn't that flower pretty??? I made it by punching out 7 scallop circles from Rich Razzleberry card stock, which are held together with a brad (can you believe there are 9 brads on this card???). Starting with the top layer, I spritzed some water, and scrunched it up around the brad. I repeated the process, working my way down through the layers one at a time.
Looking at the finished card, I think it's one of the prettiest cards I ever made. So have you ever experienced a YUCK card - something that turned out completely different from your idea? Were you able to fix it? I'd love to hear your story!  :)


Pin It!

Sunday, April 14, 2013

clean and simple - part 3

Ok, my last "clean and simple" card... for a little while, anyway.  ;) 
This card using CAS Sketch 236 was super fun to make. Three different patterns from the More Amore DSP got to play! To a Notecard, I adhered a layer of Sahara Sand card stock and then a layer of DSP. Instead of stamping some sort of circular image, I Snipped a scallop circle image out of a sheet from the More Amore DSP, and stamped one of the hearts from the Hearts a Flutter stamp set in Primrose Petals ink. 
The Hearts a Flutter Framelits made quick work of cutting out my stamped banner, stamped heart, and a "heart of hearts" from the DSP. 
I decided to omit the greeting, since the background I chose is rather busy. I stamped the greeting I wanted - for my Mom - inside the card, which might surprise her since I don't usually stamp inside my cards... too much to say! 
Which makes me curious... do you usually stamp inside your cards? If you do, all of them or only for certain occasions? Just wondering...

Pin It!

Saturday, April 6, 2013

FREE shipping on all of your scrapbook supplies!

It's been a while since I shared a "taditional" scrapbook page, so I have a pretty SPRING scrapbook layout to share with you today! 
The 12x12 pages are Certainly Celery card stock, and the three stamped chevron images that are stamped directly onto the pages in Lucky Limeade ink are from the Oh, Hello stamp set. All of the DSP on this two-page layout is from the Tea for Two package... I love how it all coordinates!
Remember in yesterday's post I said my card was inspired by a scrapbook page? Well, check out the title of this page! This is what gave me the idea for the card.  :}   
supplies used for the banner: 
Pretty in Pink grosgrain ribbon
Crumb Cake, Calypso Coral, Early Espresso, Certainly Celery, Pretty in Pink, and Very Vanilla card stock
Framelits: Hearts a Flutter
more supplies used on this page: 
Lucky Limeade Baker's Twine

Soooo, now that you want to scrapbook some of your Spring photos, how about getting FREE shipping on those supplies???  Yahoo!!! 
Remember, some of the colors I used on my scrapbook layout are retiring, so shop now before they're gone! Feel free to contact me if you have any questions. Happy shopping!  :}

Pin It!

Friday, April 5, 2013

playing with Certainly Celery

Well, since Stampin' Up! announced yesterday a little refreshing of the colors for the 2013-2014 Catalog, I thought it would be nice to play with some of the retiring colors a bit. Today I'm sharing two cards, both made with Certainly Celery for the card base.    

 This card was inspired by the scrapbook page I'm sharing at my class tomorrow. 
Don't you love this clean, simple design? I wanted the word SPRING to be the focus, so I kept the rest of the card rather monochromatic. A spritz from the Color Spritzer Tool adds just the right amount of "background."
I used markers (Island Indigo, Calypso Coral, Lucky Limeade, Pretty in Pink, Early Espresso, and So Saffron) to color the letters from the Occasions Alphabet stamp set, and punched them out with the Petite Curly Label punch. If you didn't get the chance to earn a free one during Sale-A-Bration, they are available for purchase now - yay!!

And this card is a very simplified version of my sketch #11
A layer of Tea for Two DSP creates the background... 
... and three images from the Spring Sampler stamp set, punched out and layered over card stock circles, create the focal point.  

***** I also wanted to play around with some of the returning colors, so I created a fun freebie for you to print. You can find it on my Facebook page. Have a fabulous weekend!! ***** 

Pin It!
Related Posts Plugin for WordPress, Blogger...