Showing posts with label quilt card. Show all posts

Sunday, May 12, 2013

Happy Mother's Day!

Today is such a special day... A day for thanking our Moms and all of the Mother figures in our lives who have guided us, prayed for us, and taught us to be who we are today. 
One of the best things about stamping your own cards, is that you can create a one-of-a-kind card that fits the personality of the receiver. My Mom loves the vintage style, and really loves cards with lots of layers. I worked on this card quite a while yesterday to get it "just right." Hope she likes it! 
I started with a Pretty in Pink card base. To that I added a layer of Tea For Two DSP, which I dry embossed in the Lacy Brocade Embossing Folder to double-up on the quilted look. Then came the layers... 
For the two sentiments I used two different stamp sets - You're Amazing and Teeny Tiny Wishes. Both sentiment layers have Crumb Cake ink sponged around the edges, and the larger sentiment also has a little spritzing on it with a Lucky Limeade marker. 
Since my darling angels that made me a mother are begging for breakfast, I'll give you the shorthand version for the rest of the layers.  :} 
Delicate Doilies Sizzlit, Lucky Limeade card stock

Happy Mother's Day to all of our mothers, in our homes and in our hearts, and to all those who have "mothered" us through the years. God bless you!  

Pin It!

Friday, March 15, 2013

quilting... my way :}

If only I could sew (sigh). I've tried, many times. And still, I can barely sew on a button, and it looks terrible when I'm finished! Taking some sewing classes/ lessons is definitely on my "to do" list... just as soon as I get some free time - ha! Anywho, I get a bit of a "fabric fix" by making quilt cards. Here's one I made for a swap last month-  
Two blocks of paper (Tea for Two DSP) instead of fabric have a quilted look and feel, and it's really easy to do! I adhered the DSP to a Lucky Limeade card stock layer, and dry embossed them in the Square Lattice Embossing Folder.
After adhering the "quilted" layer, I tied on the grosgrain ribbon over the "seam." I stamped the greeting (Pretty Petites*) three times in Lucky Limeade, punched them out with the Petite Curly Label* punch, and adhered them with Dimensionals. Easy Peasy! 

*Sale-A-Bration items


Want to see two more examples of quilt cards?  Woohoo!!  :} 
card stock: Cherry Cobbler, Crumb Cake, Always Artichoke, Very Vanilla


card stock: Cherry Cobbler, Lucky Limeade, Very Vanilla
DSP: Festival of Prints Stack
punch: Jewelry Tag

Pin It!

Saturday, December 1, 2012

another quilt card, and more fun!

Since I know how much you just loved yesterday's quilt card, I thought I would share another one with you! 
This is one of my Christmas projects for Tuesday's class at the bakery. There are so many things I love about this card. For one thing, I love the greeting (More Merry Messages). It says exactly how I want others to feel - happy! And it's so... British.  :}  Perfect for a Christmas card since the sending of Christmas cards originated in England.
After adhering the four strips of DSP to a 4"x5-1/4" piece of Very Vanilla card stock, I gave the whole layer a "quilted" look - and feel! - by dry embossing it with the Petals-a-Plenty Embossing Folder
I die-cut a scrap of Garden Green card stock with one of the Framelits in the Labels Collection. Then I used a template from the Festive Paper Piercing Pack to add the pierced details.
Apparently I tried to use all of my Framelits on this card! I used two other sets to complete my layered focal point... one of the Apothecary Accents Framelits for the Crumb Cake layer, and the smallest from the Window Frames Collection (after stamping) for the Cherry Cobbler layer.

I hope all of you have had an enjoyable Saturday so far. I've had a great day with my boys! We woke up to find that "Elfie" had returned to stay with our family for December. 
And, he brought very cool Advent calendars with him - yay!! I'll bet he was planning on writing us a message on the memo board, but had a hard time finding a dry-erase marker  ;) 

We also started a new family tradition this December - a family Advent calendar. Each day, we will spend time together doing the activity stated on that particular day's card. I created all of the cards as a swatchbook using MDS2. (We will be looking at them on my computer until the printed version arrives!) I'm leaving space on some of the cards to add small photos and journaling after we complete the activities. 
 I created a simple swatchbook cover that includes the year... 

 ...and here is the page for December 1st.  Not only will we have fun enjoying the Christmas season together as a family, we will have a mini scrapbook album, too!

I'm looking forward to sharing the rest of our family activities with you. Do you have any special Christmas traditions that you love sharing with your family? 

Pin It!

Friday, November 30, 2012

Season's Greetings

Happy Friday!!!! Boy, am I happy to see the weekend! We had a busy schedule this week, and I think it felt even more crazy since I have this darn cold. I am feeling better, so hopefully I will be able to enjoy some "down time." 
I like to spend my free time stamping and digi-scrapping. While I have many friends who enjoy these hobbies as well, I know several others who enjoy quilting. Today's project, a "quilt card," brings them together. 
Isn't that just neat??! I know it's a star pattern, but I don't know which one. Quilters: feel free to leave a comment and clue me in. The best part, is that it's easy to create. I started with a Baja Breeze card base and added a 1-1/2" wide strip of Snow Festival DSP. I love how all of Stampin' Up!'s Designer Series Paper coordinates within each package. It makes a project like this simple, since I don't have to hunt for matching papers! My greeting (More Merry Messages) is stamped in Baja Breeze ink.
The star-quilt design is built on a 3" square of printer paper, and matted with a 3-1/4" square of Gumball Green card stock. 
To create this star pattern, choose three coordinating papers. 
Punch out five 1" squares from "print A" (snowflakes). Set four aside; cut one into four triangles.  
Punch out two 1" squares from "print B" (stars). Cut in half, diagonally. 
Punch out one 1" square from "print C" (flowers); cut it into four triangles.
Pick a corner, and adhere the first square (print A). Adhere the two adjacent triangles. Continue to adhere adjacent triangles until you reach the remaining corner squares.
*** note: The center square is empty, since I knew I would be stamping and punching out the ornament.  
***TIP: I find it easier to use a liquid adhesive on a project like this. It gives me a second to scoot the paper pieces together for a perfect fit.  :} 
 
So what do you think... something you would try? I'd love to hear your thoughts. Have a wonderful weekend!!  :}

Pin It!

Tuesday, October 2, 2012

an easy Christmas card for busy Moms

Yesterday's Christmas card was pretty fancy, so I thought today I'd share a simple Christmas card, that still gets the "wow" you want from the person you're sending it to:
This is a great card to try if you need to make several in a short amount of time. You can punch out the DSP squares while you're helping the kids with homework, watching TV, or "listening" to your hubby talk about sports - just keep the squares in a little container until you are ready to use them. If you start now, you might have two or three made before December! *wink, wink* By using the Postage Stamp punch, you get a faux stitched look between the squares, saving you the time of adding faux stitching later with a marker. Adhering the pieces to the 3-3/4 x 5" card stock layer (Very Vanilla on this card) is easy - the hard part is choosing in which order you want the squares!  ;} 
After adhering all of the layers and pieces, choose a sentiment and an embellishment, and you're done! You don't even need Dimensionals (gasp) to finish this card. 

If you're really liking this Candlelight Christmas DSP (and I know you loved the ornaments on yesterday's card), I invite you to check out the October Promotion from Stampin' Up! 

If you have any questions at all, feel free to email me  -  jenn.inklings@gmail.com  -  and I will be happy to help you. Have a wonderful day!!

Pin It!

Thursday, September 27, 2012

Christmas "Mojo"

As I've said before, I'm not sure my boys know in which order the Fall and Winter holidays arrive on the calendar. Every year, around the release of the new catalog, my stamping space becomes a flurry of Christmas, Halloween, Thanksgiving, and  Fall- & Winter-themed projects. Pretty soon there will be some Valentine's Day thrown in as well! I love it though... it's nice to spend so much time "celebrating" every holiday!  ;) 
When I saw last week's Mojo Monday sketch, I immediately needed to make a Christmas card. Now, if only I had squeezed in some time last week to make the card! Oh well... better late than never!
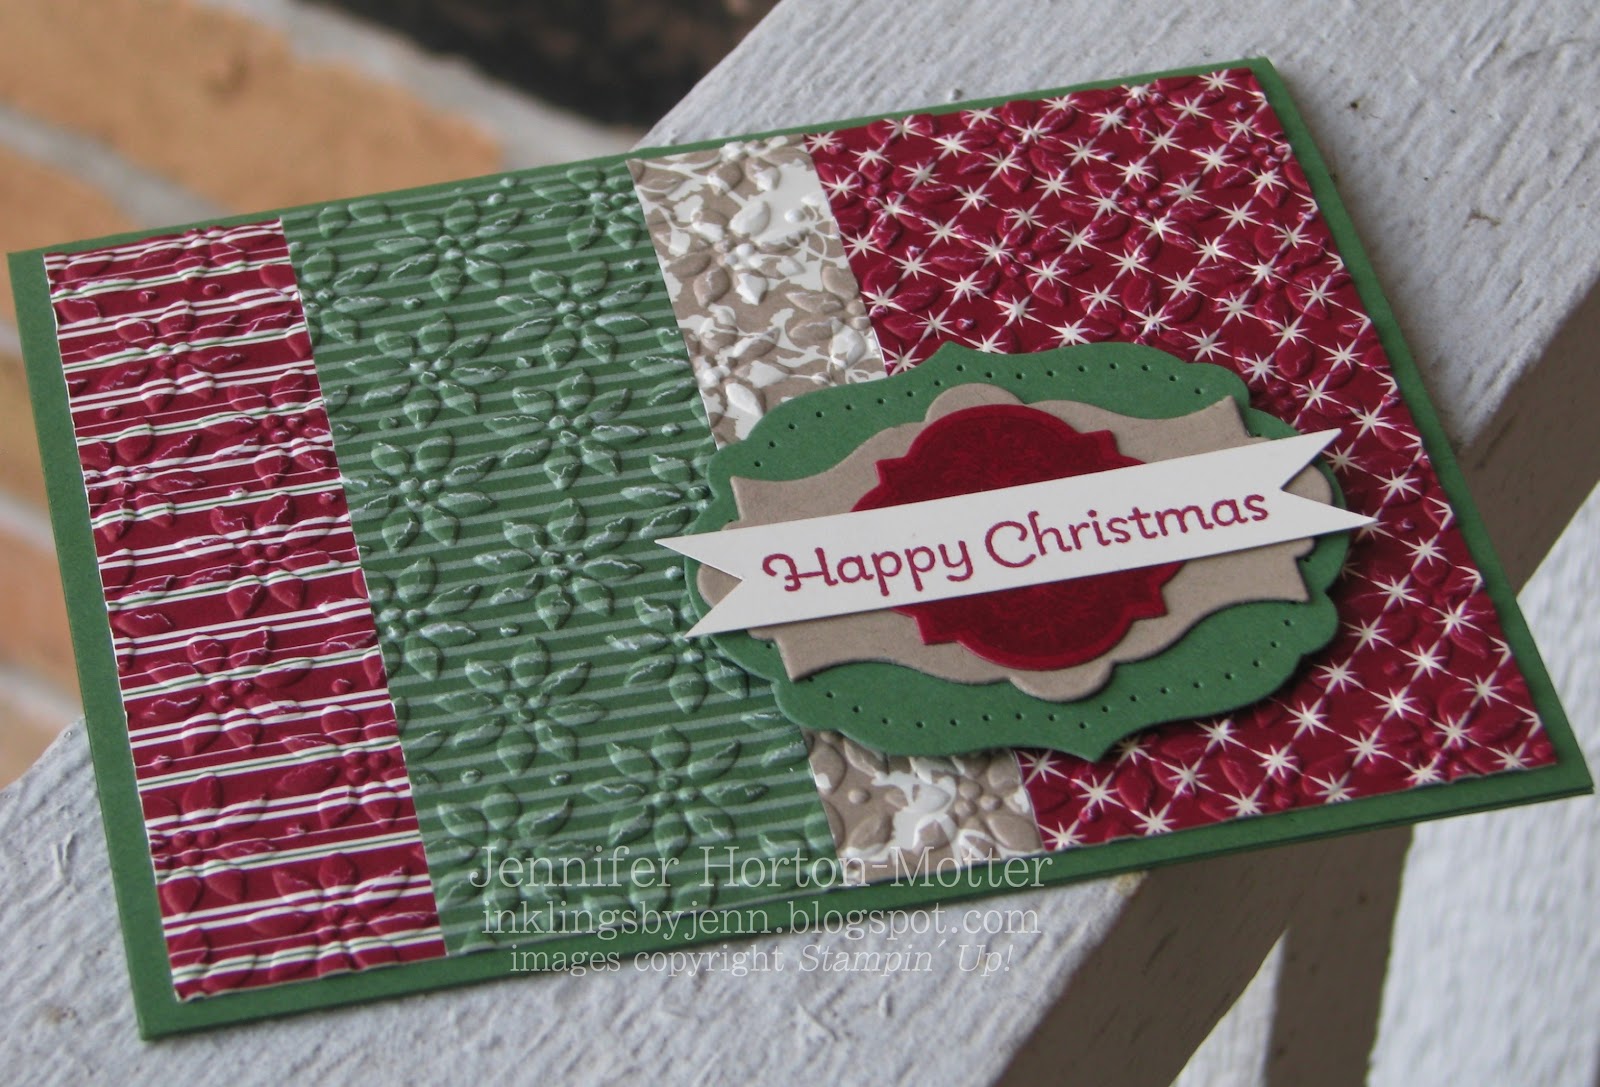
stamp set: Petite Pairs
ink: Cherry Cobbler, Garden Green
DSP: Festival of Prints stack, Regals stack 
1" Square punch.   Festive Paper-Piercing Pack.
Window Frames Framelits.   Square Lattice Embossing Folder.
Naturals Designer Button.   Linen Thread. 

I really liked the card Mary Fish made for the sketch - I loved how she used the Window Frames Framelits for the "circle" layers. And the piercing adds the perfect little detail. 
I've been working a lot lately on the Christmas card class I'm teaching as a fundraiser for the Macon County History Museum. The quilters who meet there are interested in attending, so I sorta have "quilts" on the brain  :}  I can't wait to share with you the cards I designed for that class - they're really pretty!
On this card, I used the Flying Geese quilt pattern for my "quilted" focal point. It was a little time consuming, but easy. Using the 1" Square punch, I punched out 4 squares of DSP and 4 squares of Very Vanilla card stock. Then I cut each in half diagonally. First, I adhered a vanilla triangle to the top-left corner of a piece of copy paper (2x4"). Then I added a blue DSP triangle to "complete" the fist "square." The other blue triangle and a vanilla triangle followed, which completed the top row of the "quilt." After every piece was adhered to the copy paper, I dry embossed the layer using the Square Lattice Embossing Folder for a quilted fabric appearance. A layer of Early Espresso card stock behind my "quilted" focal point really helps draw attention to this beautiful quilt-card technique! 

Well, happy holidays ;)  Be sure to come back tomorrow for a Halloween project!  

Pin It!
Related Posts Plugin for WordPress, Blogger...