Showing posts with label Twitterpated. Show all posts

Saturday, April 27, 2013

happy 2nd birthday, Olive Jane

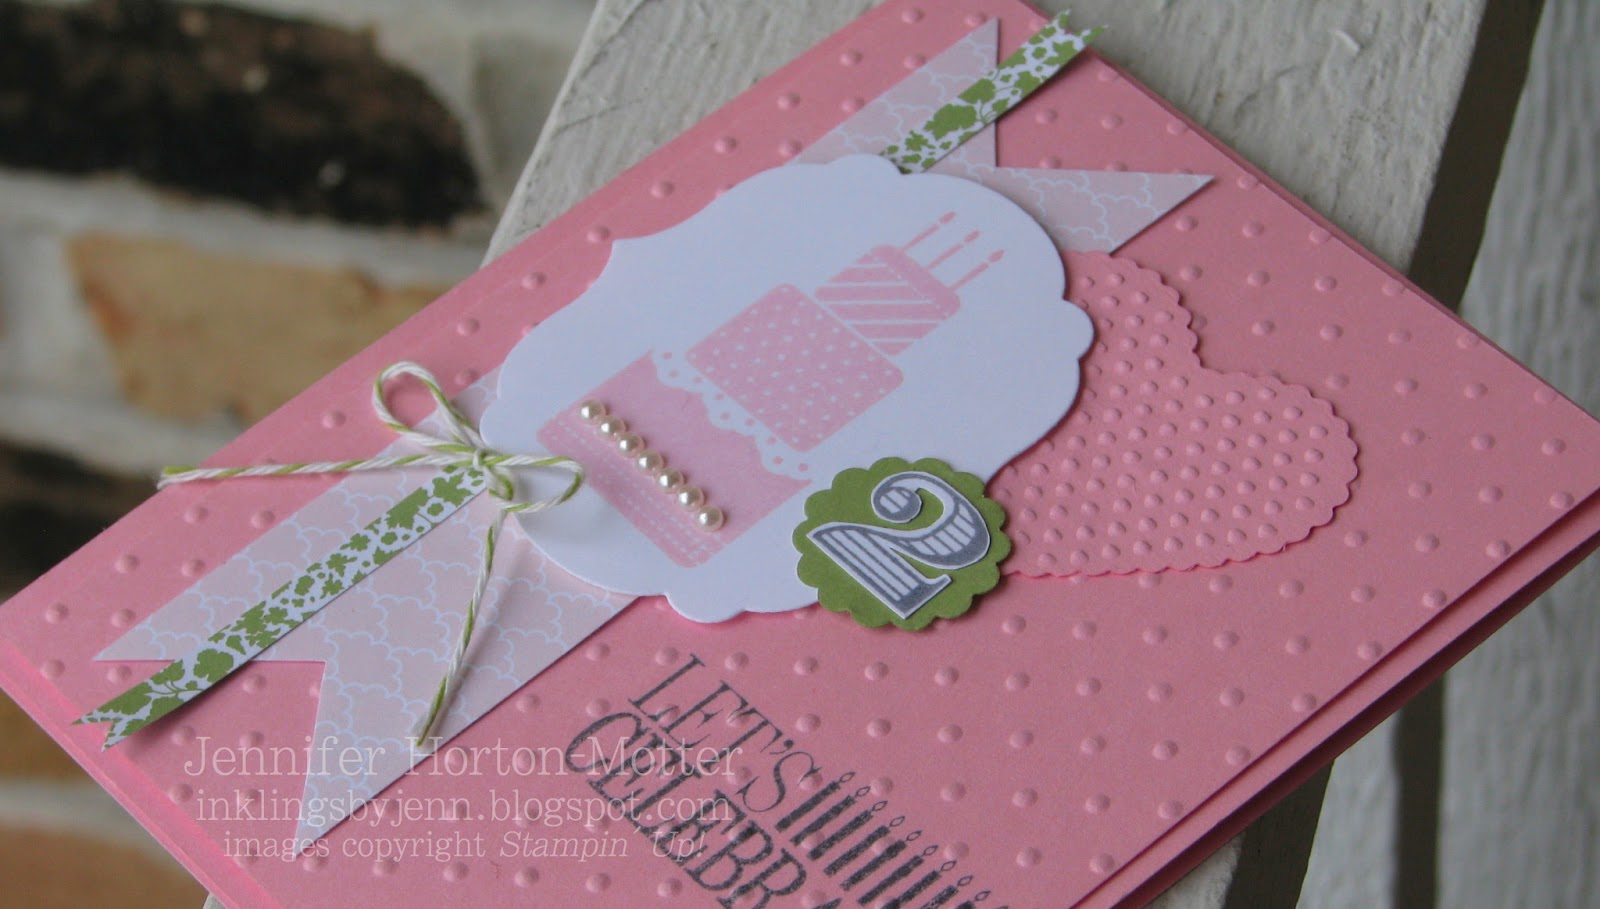
Today is my sweet little niece's 2nd birthday! I'm looking forward to celebrating with her tomorrow at her big birthday bash. Of course Aunt Jenn made coordinating tags and a special birthday card!  :} 
I chose Pretty in Pink (a retiring color), Pear Pizzazz (a returning color), and Basic Gray for my colors. The birthday cake (Make a Wish stamp set) looks so pretty after die-cutting with a Labels Collection Framelit, and adhering some Basic Pearls
Having the age number on birthday cards for little ones is just too cute, so I stamped and fussy-cut a number 2 (from the Memorable Moments stamp set), and adhered that to a Pear Pizzazz 7/8" Scallop Circle. Technically, the Baker's Twine is Lucky Limeade and not Pear Pizzazz, but I'm hoping Olive won't notice that subtle difference.   ;) 
Birthday gifts should have tags that coordinate with the card, right??? It was super easy to make the coordinating tags by using the same colors and DSP (Twitterpated), as well as incorporating some of the same design elements. 
I die cut the top edge of the tag with a Labels Collection Framelit.  *** Tip: if you want to use a Framelit to create a decorative edge, turn the handle on your Big Shot just enough so that only the portion you want trimmed gets cut, then turn the handle the other way to back up the platform. 
I used the same embossing folder on the card and tags. *** Tip: use the embossing folder after die-cutting or your texture will get smooshed. The Memorable Moments stamp set has that nice stitched image to fit perfectly in the Famelit, and I like the font of the greetings in this stamp set. I added a stamped number 2 (Number It) to the tags as well, and I used the same embellishments (Basic Pearls) on both projects. 

I can't wait to give Olive a great big hug and watch her open all the presents. Two is a fun age at gift opening time, since they now know exactly what those bags and boxes are all about! 

Pin It!

Thursday, February 14, 2013

Happy Valentine's Day!!

I hope everyone had a fabulous day. I have a quick post to share with you tonight... a little Valentine's love I left in the teacher's lounge (at the kids' school) today  :} 
I simply covered a can of coffee with some Twitterpated DSP and card stock. The cute little coffee cup stamp is from one of the stamp sets you can get for free right now during Sale-a-Bration  -- Patterned Occasions (w:129621  c:129624) 

I used the 3-1/2" Circle die to create the perfect background to cover the lid. The heart Embosslit and Punches made it easy to add pretty details. If you don't already have the Teeny Tiny Wishes stamp set, add it to your cart - it has 24 greetings to cover almost every occasion! 

How about a bonus project tonight??? Here's the Valentine card Aaron chose for his teacher:
He likes the images from the Up, Up & Away stamp set... but what kid doesn't like baloons??? 

 Thanks for dropping by!! Love ya... mmmmwaaah!  :} 

Pin It!

Tuesday, May 1, 2012

more projects...

Oh my goodness, my camera's memory card is full of projects I haven't shared yet. I can't believe how quickly things pile up when you get busy! Since I know you are still recovering from yesterday's loooong post, I'll just share a couple of things today ;)
I made simple "thank-you" cards for my oldest son's birthday. I really like this color combination: Not Quite Navy, Pear Pizzazz, and Chocolate Chip. The sentiment from the Thank You Kindly stamp set is stamped in Chocolate Chip ink onto the Pear Pizzazz DSP. I will definitely miss this stamp set when it retires at the end of this month!!

Lots of retiring goodies on this card, too. I will miss the Blushing Bride and Concord Crush, but at least I will have five new colors to play with! The sentiment is from the retiring Sweetly Said stamp set, and the three doily shapes are from the retiring Doily Triple Layer punch.

How about some things that are still available on the Carryover List? If you haven't already added these to your supplies, you can still order the Blossom punch and the Twitterpated DSP - yay!! And while you're ordering, you have to add these 3-1/2x5" Notecards! They're great for making quick and easy cards... pre-cut, pre-scored, and envelopes included!!  (107311   $5.95 for 20)

Here's the rest of the Carryover List:
Ok, so three projects and a list... that's still a "couple of things," right??  ;)  If you have a question or need to stock up on your stampin' goodies, you can always reach me from my Stampin' Up! website. Have a fabulous day!!  :}

Pin It!

Wednesday, April 4, 2012

birthday fun

Good morning! The project I'm sharing today is my brother's birthday card - Happy Birthday to my little brother! The card is in the mail, but it will be late- shocker ;)

I chose the colors - Poppy Parade, Basic Gray, and So Saffron - from this color challenge. I finally got a chance to put some ink to the You're My Type stamp set... yay! Since this is a "guy" card, I kept the layers pretty simple, using some First Edition and Twitterpated DSP.
I distressed the edges of the Very Vanilla card stock pieces for some no-fuss details. I also sponged some So Saffron ink on the edges of the sentiment banner. For a simple embellishment, I punched two Poppy Parade pieces (using the scallop shaped punch from the Itty Bitty Shapes Punch Pack) and added a So Saffron brad to the center.

Well, I'm off to squeeze in a bit of exercise before my little one gets home... no pain - no gain, right???  Have a fabulous day  :}

Pin It!

Friday, March 2, 2012

Twitterpated Birthday

Oh my goodness, I haven't felt this tired in a long time... yuck! Aaron's asthma has reared it's ugly head, so it was a long night. I'm not sure what I'll get a chance to stamp today - if anything at all - so I'm thankful I finished this card yesterday!

Did you ever work on a project that felt like a creativity roller coaster? When I saw this sketch challenge, I instantly had some ideas I wanted to play with. The sketch isn't complicated, and I have plenty of stamping goodies to play with. I was feeling good as I started the project, but then, well, I don't know... it just wasn't working out. So I did the best thing you can do - walk away. I left it on my desk and tended to some household chores (you know, the stuff I should be doing but choose to stamp instead). I am happy to report that when I came back to my project, I tried a few different things with success!
I started with a Blushing Bride card base. It measures 3-1/4" x 6" (closed) and has a top-fold. I am so in love with the Twitterpated DSP... I will be sad when it's gone. The three flower images from the Bordering on Romance stamp set are stamped in Basic Gray ink. I used a Blender Pen to watercolor the images. I punched out three 1-1/4" circles from Basic Gray textured card stock, and distressed the edges with my fingernail. Layering them behind the flowers really helps the pretty flowers stand out.
I used both Basic Gray 5/8" Satin Ribbon and Blushing Bride 3/8" Pleated Satin Ribbon... because I love ribbon! The birthday sentiment from the Petite Pairs stamp set is stamped in Basic Gray ink onto a piece of Baja Breeze card stock, which I die cut in the Big Shot using a Sizzlits Die from the Lots of Tags collection. I pierced a second little hole so I could tie the Twitterpated Button to the tag with Baker's Twine. Then I used a mini Glue Dot and a Dimensional to adhere the tag.

Speaking of birthdays... did you know today is Dr. Seuss's birthday? I'm sure if you have school-aged children, they will have a blast at school today. I know mine will!! Thanks for dropping by... time for me to finish off the coffee and brew another pot  :} 

Pin It!

Saturday, February 18, 2012

hooked on challenges :)

Oh my goodness! I just can't help myself... I found another challenge... actually a whole blog focused on Stampin' Up! projects. What drew me in to the SUO Challenge 38, were the "parameters" - use two colors, plus a neutral or two. Here's what I came up with:
The Twitterpated Product Suite helped me see how gorgeous Blushing Bride and Riding Hood Red look together. Basic Gray and a touch of Whisper White are the perfect "neutrals" to pair with that combination.
The card base is Riding Hood Red card stock. I added some details to the layer of Blushing Bride card stock by stamping the large floral image from Bordering on Romance in Blushing Bride ink, and then distressing the edges.
The two layers of Twitterpated DSP are matted with Basic Gray card stock. And check out the large layer on the left... it's fabric!! I think the Twitterpated Fabric is my favorite so far (well, maybe a tie with the Spice Cake fabric). I simply used SNAIL adhesive and wrapped the edges of the fabric around a layer of Whisper White card stock, then adhered that layer to the Blushing Bride card stock with a liberal amount of adhesive.
After tying on some Basic Gray Satin Ribbon, I went to work on the focal point. I stamped the images (also from Bordering on Romance) in Basic Gray ink onto Whisper White card stock. Then I colored in the images with markers: Pear Pizzazz, Lucky Limeade, Blushing Bride, Regal Rose, and Riding Hood Red. I distressed the edges, and sponged them with Blushing Bride ink. Then I adhered the pretty focal point to a layer of Riding Hood Red card stock, which I snipped out after dry embossing it using one of the Designer Frames Embossing Folders. Because of all the bumpy layers, I needed a "double-stack" of Dimensionals to attach the focal point to my card.  At the last minute, I added two Blushing Bride Twitterpated Buttons to push my card over the top  :}
By the way, do you recognize this card layout? I revisited a previous Mojo Monday sketch, and "tweaked" it  :}  So fun!!
Thanks for checking in today - hope you have a wonderful weekend, with lots of time to stamp!!

Pin It!

Friday, February 3, 2012

scrappy squares

My Technique Tuesday class earlier this week was called "Oh Scrap!" We made a variety of projects that featured different ways to use scraps. This card was easy to make, and makes good use of those little scraps of coordinating DSP.
All of the squares of Twitterpated DSP were punched with the 1-1/4" Square punch. They are layered around two (adhered together at a 90 degree angle) squares of Pear Pizzazz card stock. The secret is adhering the first square correctly... When you put your adhesive on the back of the first square, only place the adhesive on half, so that when your squares come back around, you can slip the edge of the last square under the first one.
Even though this card was inspired by one of my Mom's cards, I changed it up a tiny bit. On my card, the Basic Gray layer is stamped first using one of the pretty stamps from Bordering on Romance, and then the card stock is dry embossed using the 'Square Lattice' Embossing Folder and the Big Shot. I had to keep the die cut 'Paper Doily'... LOVE that die!!
I look forward to sharing more projects with you that will help you go through those scraps (which multiply when we're not looking, right?). Do you have a favorite "use-up-the-scraps" project or technique?

Pin It!

Monday, January 23, 2012

a little basket

Good evening stamping friends. I hope you all had a nice weekend. I sure did! I finally got to dig into my scrapbooking projects that have been piling up for quite some time. I look forward to sharing those with you later this week.
I have a quick post today... a cute little basket I made using the Twitterpated DSP:
It was really easy to make! I started with a 6x6" square of DSP, and scored at 2" and 4". Then I rotated the DSP 90〫and scored again at 2" and 4". (Your DSP will look like a tic-tac-toe grid.) The only "tricky" part is scoring again diagonally in the four corner squares. The center square becomes the base of the basket.
Here's another view more from the top of the basket:
I used my Crop-a-Dile to punch four holes, and then tied Island Indigo Baker's Twine to keep the corners of the basket together. I used the new Bordering on Romance stamp set to create the cute little tag. I can't wait to give this away with some yummy chocolates inside :)

Pin It!

Tuesday, January 17, 2012

Makeover Monday Challenge

So today I am patting myself on the back. Not only did I manage to get some stamping done while tending to a sick child who stayed home from school and a four-year-old whose energy knows no limits, I stepped outside my comfort zone and tried my very first challenge from a blog. Yay me!!
I decided to try the Makeover Monday Challenge #10 from the Paper Crafter's Library blog. Here's what I came up with:
I stamped the Woodgrain background stamp in Baja Breeze ink onto Baja Breeze card stock. Then I added a scrunched/ pinched strip of white Waffle Paper to the back before attaching it to a layer (3-5/8" x 5-1/8") of Island Indigo card stock. I adhered those layers to my Blushing Bride card base.
Next, I die cut Riding Hood Red card stock and Twitterpated DSP using the Beautiful Butterflies Bigz die. The card stock butterfly is adhered directly to the card; the DSP butterfly is attached with Dimensionals.
I stamped the sentiment from the new Loving Thoughts stamp set in Island Indigo ink onto a strip of Whisper White card stock. Then I spritzed it with the Blushing Bride marker / Color Spritzer Tool, as well as my mixture of Frost White Shimmer Paint in rubbing alcohol. After trimming the ends, I attached the sentiment with Dimensionals. The small card stock butterflies are die cut using the Beautiful Wings Embosslit, and then adhered directly to the sentiment strip.

At the bottom of the card, I wrapped White Baker's Twine around three times, threaded the twine through the center of a Filigree Brad, and tied the ends into a bow.

This card was a lot of fun to make, and I'm so proud of myself for trying something different! If you like it, leave me a nice comment... if you don't, well, leave me a nice comment anyway  ;)  Just teasing! Thanks for stopping by my blog - have a wonderful day!!

Pin It!

Monday, January 16, 2012

scrappy fun

I didn't quite know where to start today, so I settled on actually starting in my scrap drawers (and well, let's face it, there were plenty of scraps on my desk that hadn't even been cleaned up yet). I keep a set of small drawers just to the left of my work space, where I organize my scraps by color collection (Brights, Subtles, In Color, etc.) While I am very good about using scraps when working on a project, I don't often start with scraps. Well, today I did just that, and it feels good to use up some "stuff."
I started with the strips of Twitterpated DSP that were accidentally cut crooked in the Big Shot (still sitting on my desk). They couldn't be used for making a medallion, but were just too pretty to throw away... I hope I'm not the only one with this "issue."  ;)  I salvaged the best parts of the strips and layered them on this card. I added a tiny bit of dry embossing to my card front using a Finial Press Embossing Folder that I cut up. Click here to learn more about that technique.
In my "In Color" scrap drawer, I had a large piece of Pear Pizzazz that I had previously stamped and dry embossed with the Snow Burst Embossing Folder, then didn't like how it turned out... again, my issue, I couldn't bring myself to toss such a large piece of quality card stock. I trimmed it up and spritzed it liberally with my mixture of Frost White Shimmer Paint (in rubbing alcohol). To this layer, I attached a Paper Daisy using a Pear Pizzazz Glimmer Brad. I also used the Dotted Scallop Ribbon Border punch on a tiny scrap of Riding Hood Red card stock, and tucked that behind the Pear Pizzazz layer.
Then I used some of the Pleated Satin Ribbon that I had cut the wrong length for a previous project, that was still taking up valuable real estate in my work space. I trimmed it a bit, and attached it using Sticky Strip.
I used two Blushing Bride scraps to stamp the flower from the new Mixed Bunch stamp set, and then punched out those images using the new Blossom punch. I stamped leaves in Pear Pizzazz ink onto a long, skinny scrap of Pear Pizzazz card stock (stamp set: Build a Blossom / punch: Blossom Petals). I needed one more flower to balance the card, so I punched a scrap of Riding Hood Red card stock with the Blossom Bouquet Triple Layer punch, and stamped in the center with Riding Hood Red ink (Mixed Bunch). These flowers are crumpled to distress them a bit, attached with Dimensionals, and two Twitterpated Buttons add a cute finishing touch.

I am feeling so great about using up a few scraps! Want some more "scrappy" ideas??? Local friends can sign up for January's Technique Tuesday: Oh, Scrap! - register by January 30th to reserve your spot.

Pin It!

Saturday, January 14, 2012

the Gift Box

Today I kicked off a new round of my Hostess club! It's soooo much fun to spend time stamping with friends. At my "breakfast club," my ladies get to eat some yummy breakfast goodies, drink coffee and juice, make a free project, and spend time working on their own projects. It doesn't get any better than that!
For the January club project, I came up with this cute little Valentine box using the Kraft gift boxes (these are awesome- $2.95 for four boxes!!) as the base. Then I added a bunch of pretty layers.
A torn strip of the Twitterpated Designer Fabric is tied in a simple knot to dress up the sides of the box. A 3-1/4" square piece of Twitterpated DSP is adhered to the lid. Then the fun begins...
I used the new Designer Rosette Bigz XL die and two 12" long strips of Twitterpated DSP to create the medallion. For the next layer, I die cut two circles of White Waffle Paper using the Circles #2 die. Those are adhered to a 1-3/4" punched circle of Whisper White card stock with SNAIL, and then adhered to the medallion. From the new Take It to Heart stamp set, I stamped the largest heart (in this project) in Riding Hood Red, and the other heart in Blushing Bride. After snipping both out, I adhered the larger heart to a layer of Blushing Bride card stock that was die cut with one of the new Hearts Collection Framelits dies. I used a Riding Hood Red marker to stamp the sentiment (from the Loving Thoughts stamp set), and then snipped that out and adhered it behind the larger heart. I used Dimensionals to attach the heart/banner layer. The smaller stamped heart and another punched heart (Small Heart) are attached with Glue Dots, and a teeny tiny Basic Pearl finishes it off. Love, it, love it, love it!! I so wish you could see it in person... it's even prettier. Especially since the hearts, banner, and DSP square are spritzed with my mixture of Frost White Shimmer Paint (in rubbing alcohol). If only I could capture that pretty shimmer with a camera, sigh.
So what are you giving to your Valentine this year?

Pin It!

Friday, January 13, 2012

Wonderful You

Do you ever find yourself hooked on a particular layout for your cards or scrapbook pages? Sometimes you find a really good "template," and you just can't help trying it out in different colors for different seasons. This is one of my "go to" card templates:
Today I used this template to make a card using the Twitterpated Product Suite, but I rearranged the pieces a tiny bit:
 I used a Blender Pen to color in the images that I stamped in Basic Gray ink onto Whisper White card stock. All of the floral images are from the new Bordering on Romance stamp set, and the sentiment is from the new Loving Thoughts stamp set.
While I was coloring, I didn't realize I had a tiny bit of Blushing Bride ink on my fingers, which of course ended up on my card stock. I know none of you have ever had an ink boo-boo on your work (wink), but just in case that ever happens, you can rescue your work.
Can you see the little ink smudges? I "saved" it by grabbing my Color Spritzer Tool and Blushing Bride marker. Perfect!! Now, it looks like I meant to spritz it in the first place. Yay!

Pin It!

Wednesday, January 11, 2012

Thoughts Of You

Last night I had soooo much fun playing with new stampin' goodies from the Occasions Mini. Plus, I sort of got to stamp with my upline - a.k.a. Mom  ;)  We were stamping together with our phones on "speaker"... it's the best we can do since we live four hours apart  :(
Just chatting and stamping put me in a better mood, which must have helped get the creative juices going in my brain... I LOVE how this card turned out!!

There are so many yummy layers :)  I stamped the Woodgrain background in Basic Gray onto the Basic Gray card base. Then I added two layers of Twitterpated DSP and a bit of Riding Hood Red 3/8" Pleated Satin Ribbon. I finally put ink to the new Take It To Heart stamp set  :)  I decided to stamp on Watercolor Paper and so I could do some watercoloring with my AquaPainter. The sentiment from the Loving Thoughts stamp set (great set!) is stamped in Pear Pizzazz. I hand cut the banner and small heart, but used a new Framelits Die from the Hearts Collection to die cut the large heart. To finish it all off, I added a Large Pearl - love this new size!
Hmmmmm, what to stamp next...... maybe I should call Mom and ask!  ;)

Pin It!

Tuesday, January 10, 2012

Paper Doily - LOVE it!!

I had a few minutes today, before Aaron's little bus brought him home, to whip up this cute birthday card:
I've been wanting to play with the new Paper Doily Large Sizzlits Die, so I grabbed that first. The rest of the card just sort of "fell into place." A layer of Pink Pirouette (punched with the Dotted Scallop Ribbon border punch) is tucked behind the layer of Basic Gray card stock, which I dry embossed using the Elegant Lines embossing folder. The floral image stamped in Pear Pizzazz is from the new Bordering On Romance stamp set. I added Basic Gray 5/8" Satin Ribbon and a birthday sentiment from the Petite Pairs stamp set. The die-cut (Twitterpated DSP) doily is adhered to the card with a Dimensional, and a Twitterpated Button finishes the card.  *smiles*
The Paper Doily is beautiful! However, it was a little large for the card I wanted to make today. So, after I die-cut my DSP, I made a few snips and had the exact size I needed - yay!
What are you going to make with the new Paper Doily Large Sizzlits Die???  :)

Pin It!

Monday, January 9, 2012

With Sympathy

Yesterday I started working on my second sympathy card in 2012. It's for my upline's upline; her daughter passed away Saturday morning  :(
I would really like to be done with sympathy cards for the year. As if working through grief isn't hard enough, sympathy cards are so difficult for me to make. In the past I've "cased" others' ideas, but over the last few days I've surprisingly been able to create my own designs. I thought I would share them with you, since I know many others struggle to create sympathy cards.


I made the first card using MDS; the second card is made using traditional papercrafting supplies. I chose to add the Blushing Bride layers to the card since Leslie's daughter's favorite color was pink.
If you have a minute, please include the friends and family of both Ed and Laura (especially her six-month old son) in your thoughts and prayers.

Pin It!

Thursday, January 5, 2012

a little romance...

I am so ready for Spring... which is funny since we really haven't even had Winter weather yet and it feels like Spring outside right now. I love Christmas and everything that goes with it (maybe even a little snow), but after the New Year I'm ready to move on. Too bad I live in Wisconsin, where Winter often takes up residence until April or May.
Sooooo...... at least I get to use my stamps and pretty papers to make it look like Spring inside my craft room. Today I worked with the new Bordering On Romance stamp set:
I used Basic Gray Textured card stock for the card base. If you look closely you can see a little torn strip of the new Twitterpated DSP. I stamped a background in Pear Pizzazz ink on the Pear Pizzazz card stock, which also has a little layer of Baja Breeze card stock tucked behind it. For the focal point, I stamped the floral image from Bordering on Romance in Basic Gray ink and watercolored it with a Blender Pen. After I tore the right edge, I tucked a torn strip of Riding Rood Red card stock behind it. Both the focal point and Pear Pizzazz layer have a little spritz from a Pear Pizzazz marker and the Color Spritzer Tool. I added a piece of Baja Breeze Seam Binding behind my focal point and adhered that layer to the card with Dimensionals. For a final touch, I added a new Blushing Bride Twitterpated Button. Cute!!

Pin It!
Related Posts Plugin for WordPress, Blogger...