Showing posts with label fabric. Show all posts

Monday, October 29, 2012

It's a wonderFALL day

It's time to start thinking about (and ordering supplies for) your Thanksgiving table decorations. To get you started, I made a frameable art piece (5x7), placecards, and a candle for the centerpiece.
All of these projects are super easy, especially with the Wonderfall stamp set and the coordinating Autumn Accents Bigz Die.  

Before adding the stamped leaves to your candle, wrap a strip of burlap "fabric" around the base - overlap and adhere (I used the Multipurpose Liquid Glue). 

Then wrap Cotton Ribbon around the candle - overlap and adhere. While it looks like the Bronze Button is sewn to the ribbon, I simply tied a bow of Linen Tread through the holes, and then glued the button on. 

Die cut several leaves from Very Vanilla card stock. Then "stamp upside down" by inking your leaf stamps, and with rubber facing up (block side lying on your table), press the die-cut onto the stamp. I crumbled my leaves and sponged the edges with Crumb Cake ink for a more distressed look. The leaves are adhered to the ribbon with the liquid glue. 
Now that you've fallen in love with this stamp set, how about getting it for 15% off???!!! But you have to hurry... the stamps are only on sale today
While you are shopping, don't forget to check out the FREE digital downloads, online only Clearance Rack, a new project kit and the Single Stamps
Never leave a burning candle unattended, remove decoration before using, indoor use only, call the fire department if there's a fire, do not use in the shower......... and SHOP FOR STAMPS!!   :}

Pin It!

Saturday, February 18, 2012

hooked on challenges :)

Oh my goodness! I just can't help myself... I found another challenge... actually a whole blog focused on Stampin' Up! projects. What drew me in to the SUO Challenge 38, were the "parameters" - use two colors, plus a neutral or two. Here's what I came up with:
The Twitterpated Product Suite helped me see how gorgeous Blushing Bride and Riding Hood Red look together. Basic Gray and a touch of Whisper White are the perfect "neutrals" to pair with that combination.
The card base is Riding Hood Red card stock. I added some details to the layer of Blushing Bride card stock by stamping the large floral image from Bordering on Romance in Blushing Bride ink, and then distressing the edges.
The two layers of Twitterpated DSP are matted with Basic Gray card stock. And check out the large layer on the left... it's fabric!! I think the Twitterpated Fabric is my favorite so far (well, maybe a tie with the Spice Cake fabric). I simply used SNAIL adhesive and wrapped the edges of the fabric around a layer of Whisper White card stock, then adhered that layer to the Blushing Bride card stock with a liberal amount of adhesive.
After tying on some Basic Gray Satin Ribbon, I went to work on the focal point. I stamped the images (also from Bordering on Romance) in Basic Gray ink onto Whisper White card stock. Then I colored in the images with markers: Pear Pizzazz, Lucky Limeade, Blushing Bride, Regal Rose, and Riding Hood Red. I distressed the edges, and sponged them with Blushing Bride ink. Then I adhered the pretty focal point to a layer of Riding Hood Red card stock, which I snipped out after dry embossing it using one of the Designer Frames Embossing Folders. Because of all the bumpy layers, I needed a "double-stack" of Dimensionals to attach the focal point to my card.  At the last minute, I added two Blushing Bride Twitterpated Buttons to push my card over the top  :}
By the way, do you recognize this card layout? I revisited a previous Mojo Monday sketch, and "tweaked" it  :}  So fun!!
Thanks for checking in today - hope you have a wonderful weekend, with lots of time to stamp!!

Pin It!

Saturday, January 14, 2012

the Gift Box

Today I kicked off a new round of my Hostess club! It's soooo much fun to spend time stamping with friends. At my "breakfast club," my ladies get to eat some yummy breakfast goodies, drink coffee and juice, make a free project, and spend time working on their own projects. It doesn't get any better than that!
For the January club project, I came up with this cute little Valentine box using the Kraft gift boxes (these are awesome- $2.95 for four boxes!!) as the base. Then I added a bunch of pretty layers.
A torn strip of the Twitterpated Designer Fabric is tied in a simple knot to dress up the sides of the box. A 3-1/4" square piece of Twitterpated DSP is adhered to the lid. Then the fun begins...
I used the new Designer Rosette Bigz XL die and two 12" long strips of Twitterpated DSP to create the medallion. For the next layer, I die cut two circles of White Waffle Paper using the Circles #2 die. Those are adhered to a 1-3/4" punched circle of Whisper White card stock with SNAIL, and then adhered to the medallion. From the new Take It to Heart stamp set, I stamped the largest heart (in this project) in Riding Hood Red, and the other heart in Blushing Bride. After snipping both out, I adhered the larger heart to a layer of Blushing Bride card stock that was die cut with one of the new Hearts Collection Framelits dies. I used a Riding Hood Red marker to stamp the sentiment (from the Loving Thoughts stamp set), and then snipped that out and adhered it behind the larger heart. I used Dimensionals to attach the heart/banner layer. The smaller stamped heart and another punched heart (Small Heart) are attached with Glue Dots, and a teeny tiny Basic Pearl finishes it off. Love, it, love it, love it!! I so wish you could see it in person... it's even prettier. Especially since the hearts, banner, and DSP square are spritzed with my mixture of Frost White Shimmer Paint (in rubbing alcohol). If only I could capture that pretty shimmer with a camera, sigh.
So what are you giving to your Valentine this year?

Pin It!

Thursday, December 1, 2011

Finishing Fall

I tell ya... I really could use a few more hours in the day. Ever feel like you are so far behind that you may never catch up??? That's exactly how I feel. And that's not a good way to be heading into the holiday season... yikes! Time for some stamping therapy, right?  ;)
Sorry I missed so many days posting. I wanted to share a few more fall projects before I put them away and decorate for Christmas.


All of these projects were part of my "Spice Cake" display. The colors are More Mustard, Soft Suede, Pool Party, River Rock, and Very Vanilla. While I am excited to start sharing my Christmas projects, I have to say I'm a little sad to be putting away the Spice Cake DSP and Gently Falling stamp set - I've loved and used them so much.  I hope you have enjoyed seeing my fall projects, and have found a little time to stamp some for yourself.
I'd better get to bed... it's already way past my bedtime, and it's another long day tomorrow. See you soon!  :)

Pin It!

Tuesday, September 20, 2011

more team-meeting projects

Hello stamping friends! I'm playing a little catch-up this week, but it feels good to be back into my stamping groove. I have two projects to share with you today, both from my August team meeting.


I really wanted to use the Flirtatious Designer Fabric to make a cute rosette, like the one I learned to make with my Convention Make-and-Take projects. (Yes, I have actually finished every single Convention project... first time ever!) I am really enjoying using the new Wisteria Wonder, so I turned to my Color Coach, which suggested I add Lucky Limeade and Elegant Eggplant. To make the fabric rosette, I used a 1" x 12" strip of fabric. First, tie a knot at one end, and adhere to the center of a square cut from a Sticky Sheet. Using every ounce of coordination you have, twist the fabric strip at the same time as you wrap it around the knot, pressing it into the Sticky Sheet. Trim excess Sticky Sheet, and adhere the rosette to your project. On this card, the rosette is adhered to Elegant Eggplant card stock punched using the Blossom Bouquet Triple Layer Punch.
I stamped the stem image from Raining Flowers in Lucky Limeade ink onto Lucky Limeade card stock, and slipped a piece of Flirtatious Specialty DSP (that matches the fabric -- LOVE that!) behind that layer before attaching to the Elegant Eggplant layer. The sentiment from Curly Cute is stamped in Elegant Eggplant ink.


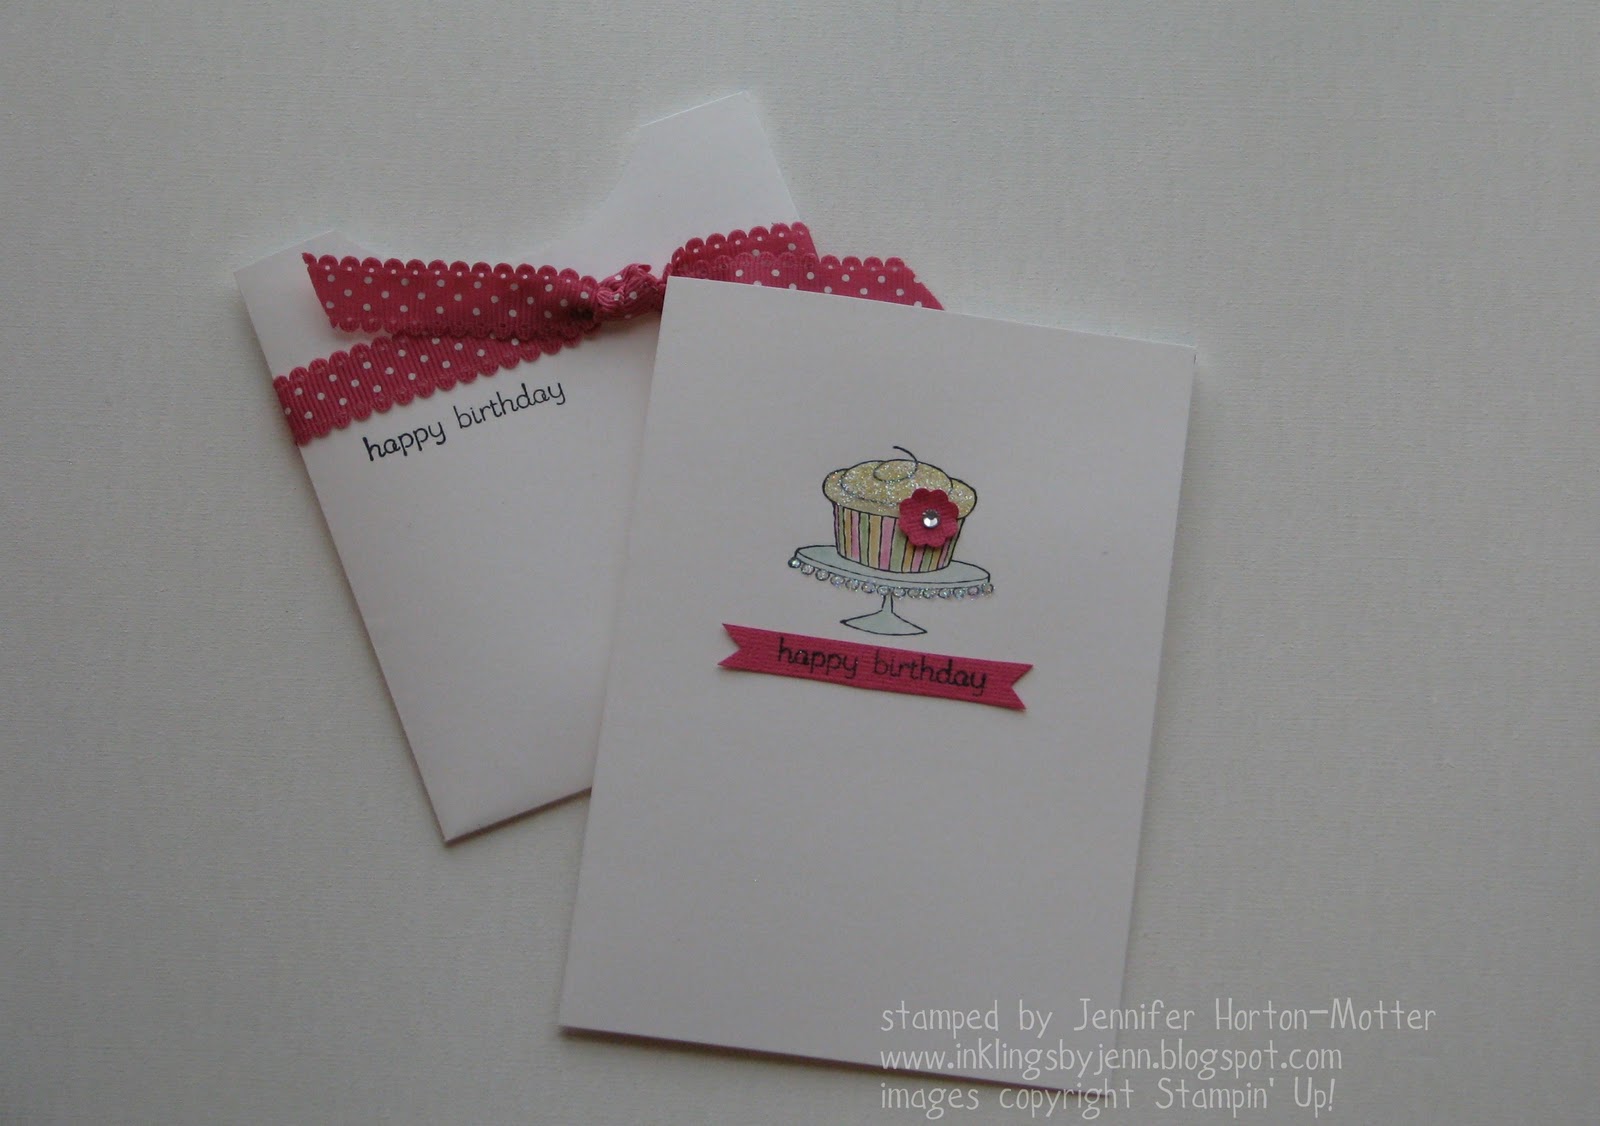
This card is from my "Workshop in a Bag" treat I got at Convention. It uses the Note Cards, which are great to have around in your stamping stash for quick little projects. You get twenty 3-1/2"x5" pre-cut and pre-scored notecards, plus envelopes... awesome!

While the card looks very fancy, it's really quite simple. Just be sure to stamp your image with StazOn® ink if you are going to color it in. This pretty little cupcake is from Easy Events - a great "covers-everything" kind of set. I used a Blender Pen with Daffodil Delight, Melon Mambo, Peach Parfait, and Wild Wasabi to color the cupcake; the cake stand is colored with Pool Party.
Here's a close-up of the "bling":
To get a little sparkle on your projects, tap your 2-Way Glue Pen onto the chosen area, and sprinkle on some Dazzling Diamonds Glitter. So pretty!!

Pin It!

Monday, August 1, 2011

Hostess Club

I have been stamping like crazy this past week! I'm almost done with my "Make & Take" projects from Convention. I never finish all of my projects during the Make & Take session, but this year... well, I didn't complete one single thing! I had an enjoyable chat, though ;)
Today I am working on the project for my stamp club that meets tomorrow night. As I started working, I realized I forgot to post the July project. We made a cute little magnet:


Using the Big Shot, we cut Magnet Sheets, Flirtatious Specialty DSP, Pretty in Pink card stock, orange tulle, Flirtatious Fabric, and Melon Mambo Textured card stock on the Fun Flowers Bigz L die. The layer of Pumpkin Pie card stock is punched with the Doily Triple Layer punch. The sentiment from Fabulous Phrases is stamped in Melon Mambo ink onto Pretty in Pink card stock.

Here's a view of the back:


A little tip- Trim your magnet sheet to a "square" slightly larger than the shape your are die-cutting. Then peel off the paper backing and adhere your DSP "square." This way you cut both at the same time, and don't have to try to line everything up.

Well, I'm off to finish up the August club project. You can purchase supplies for this project any time from my online store. Don't forget the online only Clearance Rack! :)

Pin It!

Sunday, July 17, 2011

a very special gift


 I just have to share this little gift with you. Back in April, I participated in a promotion for demonstrators to earn VIP status at Convention. We received several perks including reserved seating, a VIP room, "meet and greet" time with Shelli and other members of the corporate team, and a VIP tour of the Stampin' Up! home office. We received a special gift from Shelli on our tour: a bag filled with her favorite caramels and a roll of 3/8" Ruffled Ribbon.


I just love the tag! What a great way to add a personal touch to a simple gift. I'll bet you're thinking of the tags you can make to "dress up" your next gift for someone special. You will love watching their reaction, knowing that you took the time to make something special for them.
The sentiment and one of the background stamps on the tag come from the Daring Adventure stamp set. The other stamped images are from Creative Elements (this set is sooooo on my next order!). The tag is tied to the cellophane bag with a strip of Timeless Portrait Fabric (122337) and a piece of Island Indigo 3/8" Ruffled Ribbon (122974). But I'm pretty sure you'll agree with me that the best part about the tag, is that it's signed by Shelli.  **smile!**

Pin It!
Related Posts Plugin for WordPress, Blogger...