Showing posts with label Simply Scored. Show all posts

Saturday, May 11, 2013

Teacher Appreciation Week - Thursday

A week of teacher appreciation gifts was a great idea... right up until I saw Tuesday's and Wednesday's gifts in Aaron's backpack! Aaagh! I emailed his teacher so she could ask him if he has anything in his bag to turn in. Silly little boy...
Sometimes a gift card is the perfect gift. I do worry that it doesn't seem very personal... that's where the "delivery system" takes center stage. Once a gift card is wrapped up in pretty packaging, it becomes fabulous!
Using a 4 x 12" piece of card stock, I designed a pretty gift card holder. Since my gift card is for that yummy coffee shop we all know and love, I thought the BIG mug in the Tea Shoppe stamp set would be perfect. I put the holder together so that it looks like the card is sitting in the mug.   :} 
I used a 22" piece of Riding Hood Red Taffeta ribbon to tie the gift card holder closed. Since I didn't want the ribbon to fall off once the holder was open, I adhered a 4-1/4" square of Chocolate Chip card stock to the back. 
If I were personally hand-delivering these gift cards, I would have stopped there. But since they were being delivered by two little boys, I enclosed them in Clear Envelopes for a little extra safe keeping.   :}  

And now... a few more pages from Aaron's animal alphabet book- 


Pin It!

Thursday, April 25, 2013

the return of Soft Sky

It will be a few days before I get my goodies from the "new Cattie pre-order," but I'm too darn excited about some of the colors that are retuning. Sooooo, I got into my vault (aka "paper-crafting stuff I'm hoarding"). I pulled some Soft Sky card stock, retired ribbon, and retired DSP from my vault, and paired them with this week's Mojo Monday sketch to create this pretty card- 
I might be getting a little obsessed with the Papillon Potpourri stamp set, but it's so pretty, and has punches that coordinate! Technically it's Groovy Guava in that retired DSP, but I think it works nicely with Calypso Coral on this card. I'm so happy Calypso Coral is moving into our "core" colors!
To add a subtle look of four "boxes," I added score lines an inch apart on the Whisper White card stock.   **Tip: Before adhering punched butterflies (or flowers) to your project, curl the edges up slightly to add more interest. 

So how do you start playing with these fun new colors like Soft Sky if you don't have a vault of retired goodies??? All you need is a good color combination! Here's what Soft Sky looks like when paired with Pumpkin Pie and Wild Wasabi- 
Love this color combo!! I see a lot of "boy" cards in my crafting future using these colors. 
FYI - those Pumpkin Pie brads are on the "chopping block." The retiring accessories are available only while supplies last, so be sure to shop now before all the good stuff is gone!   ;) 

Pin It!

Wednesday, November 28, 2012

a one-layer card???!!!

Those who know me "in real life" or who've been reading a long time, know that I love using tons of layers and embellishments on my hand-stamped projects. I'm happiest when fussy-cutting stamped images and playing with ribbons. So today's card should come as quite a surprise to you!
Yes, you can make a card using only one layer of card stock!!! I'd heard the rumors, but I needed to find out for myself.  ;)  And I am in love with the finished card! 
My Simply Scored Scoring Tool was hard at work to make this card. Using a half-sheet of Crumb Cake card stock (4-1/4" x 11"), I first scored a fold-line at 5-1/2". Then I scored three lines at 8-7/8", 9", and 9-1/8". The final three score lines are at 10", 10-1/8", and 10-1/4". 
I stamped my greeting (Greetings of the Season) in Soft Suede ink between the sets of scored lines. A Vintage Faceted Button holding a tiny Linen Thread bow is the perfect embellishment.
Oh my goodness, I wish you could see the shimmer on this card in real life! I spritzed the card front - a lot - with my shimmer mist (rubbing alcohol and a few drops of Champagne Mist Shimmer Paint in a spritz bottle). It is absolutely gorgeous!! 
For all you busy Moms out there... this just might be your Christmas card this year.  :}  You can finish one in seconds! 
 
Don't forget that today is the last day for the Online Extravaganza! There are so many good deals, including MDS2+ for half off... that's $39.98plus tax for over $500 worth of digital content. Oh, and be sure to check out the super bargains for today only!  Have fun shopping  :}

Pin It!

Monday, November 26, 2012

simple, modern Christmas card

Hello stamping friends! Sorry for the inconsistent posting the last few days. Between traveling out of town for the holiday and fighting this cold, my head is "in the clouds." The cold, which started Thursday night, is winning the battle - grrr!  And while I really wanted to pound my phone into the floor when the alarm went off this morning, life goes on, and I didn't want to wait another day to share this cute card with you. 
This is my modern style Christmas card from my class at the bakery. To create that modern feel I used a clean design, eye-popping and unexpected colors, and lots of "white space." 
The Whisper White layer has two scored lines an 1/8" apart, a little strip of  Primrose Petals DSP folded over the top edge, and is adhered with Dimensionals. 
I stamped the greeting (Curly Cute stamp set) in Lucky Limeade ink, and then adhered the images. Those cute little Christmas images from the Merry Minis stamp set are stamped in Lucky Limeade, Primrose Petals, and Island Indigo ink, then punched out with the Merry Minis punches.    ***TIP: to adhere the images as evenly spaced as possible, I attached the center image first, then the outside images, and then the remaining two. 

While you are burning up the keyboard this Cyber Monday, don't forget all the great deals in the Online Extravaganza in my online store. Happy shopping:}


Pin It!

Thursday, November 15, 2012

attitude of gratitude

It's no secret that I love social media (totally addicted). And while I really do enjoy reading all the posts in November of what everyone is thankful for, I never could quite get into it. I certainly agree with expressing thankfulness for the blessings in our lives, but does typing it while waiting at all the red lights on your commute really count? Is it enough?   
One of my stamping friends introduced me to an interesting blog a while back. And one of the posts on the blog is encouraging an "attitude of gratitude." She encourages card-makers to create a card expressing their thankfulness. I thought it was a fabulous idea! You actually tell a live person in your own words exactly why you are so thankful to know him/ her. Old fashioned? Maybe. Needed in today's world? Desperately. 
I thought I would start with a group of people - the teachers at the grade school. I am so blessed that my boys can attend such a great school with high expectations and a dedicated staff.  
To my River Rock card base, I added only one layer (Very Vanilla) and one embellishment. I scored two vertical lines 1/4" apart for the tiniest hint of texture. The leaf from the Wonderfall stamp set is stamped in River Rock, More Mustard, and Cajun Craze ink for a sort of ombré effect. And the sentiment (Blessings From Heaven) is absolutely perfect for this card. 
I've used this card sketch before - I just love how easy it is when you want a clean and simple card that you can create quickly. You might be wondering why I would want to stamp such a simple card to carry my message...  Well, I like the idea of sharing the "attitude of gratitude" so much, that I thought I would stamp a whole basket of these (therefore needing a quick design!) to leave in the teacher's lounge, so that others can continue the message of thankfulness. I hope they like them :) 

For those of you who would love to design a digital card right from your iPhone and send it to your loved ones... now you can!!! 
The new Simply Sent App from Stampin' Up! is now available in the iTunes store... and it's FREE!  Waiting for the school bus just got a lot more fun!!  ;} 

Pin It!

Monday, November 12, 2012

how about a card sketch on this chilly day?

Oh my goodness!! It's 32º outside right now!! Quite a change from playing outside with the kids yesterday... BRRRRR! Well, if it's going to be this cold outside, I might as well post a Christmas card! 
To "dress up" the Crumb Cake layer, I added two score lines - easy peasy! The sentiment (Wacky Wishes hostess set) is stamped in Crumb Cake ink. 
I stamped the ornament images (Ornament Keepsakes stamp set) in Crumb Cake, Garden Green, and Cherry Cobbler ink, and then die cut them with one of the Holiday Ornaments Framelits.

Don't you just love making quick, simple Christmas cards?! This layout is a "go to" for me when I want a clean design that I can put together in minutes. And because I love you all, here's the card sketch... 
Don't forget to "Pin It" to save for later! And stay tuned later this week... I'll be sharing a special card using this same template. Have a fabulous Monday!!  ;


Pin It!

Thursday, November 8, 2012

Woohoo!!

I feel like a little kid today... I'm so excited to share my projects with you! So excited that almost skipped making coffee so I could start my blog post... almost
I found a really neat blog the other day, and since they're hosting a challenge, I thought I'd play along. This week's challenge on the Cupcake Craft Challenges blog is to use the color Kraft.  Teehee, that's like challenging me to breathe!!
Did you know that the color Crumb Cake used to be named Kraft? It's been a while since the latest color revamp, so I forget sometimes... but it's handy to know in case you're ever in a knock-down, drag-out battle of Trivial Pursuit -- the Paper Crafting Edition.  ;} 
You might not give the color Crumb Cake (Kraft) all that much thought. I mean, who gets excited about shades of brown? (well, besides me) But Crumb Cake is the perfect neutral... the perfect "base" for tons of projects. It can be simply the "glue" that brings the colors in your project together, or a main player in vintage and masculine projects. 
On today's project, the Crumb Cake card stock was the base that I started with, and built all of my elements around. 
Ok, stop staring at the wine and focus on the tag.  ;}   Hubby made the wine, and I made the gift tag so I could thank a friend.
I started with a 3" wide strip of Crumb Cake card stock, scored a fold line at the top, and used the 1-3/8" Circle Punch to make a hole so that the tag could just slip onto the neck of the bottle. 
Then I used sticky notes to mask the bottom and the left side before I stamped the Woodgrain Background stamp in Early Espresso ink. I pressed lightly for that soft, partially stamped image. I removed the sticky notes and spritzed the Crumb Cake card stock with Gold Glow Smooch Spritz®A strip of Orchard Harvest DSP and embossed Raspberry Ripple card stock complete the "base" of the tag. (click here to see how to create the embossed diagonal stripes
The leaves are die-cut from Very Vanilla card stock (Autumn Accents Bigz Die) and stamped (Wonderfall stamp set) in Cajun Craze, Lucky Limeade, and Raspberry Ripple ink. I made the medallion out of another pattern in the Orchard Harvest DSP, scoring the 12" strip every 1/4". I had to add the apple (Perfectly Preserved), since this is a bottle of apple wine... hubby made this with apples from a local (for us at the time) orchard in Kenosha, WI. A Vintage Faceted Button and some Linen Thread are just the most gorgeous finishing touches! To make the doubled up Linen Thread bow (hmm... that's a "Kraft" color, too) simply fold a length in half and thread both pieces through the button holes at the same time.

Now, I know you're lovin' this project and you're ready to grab your Crumb Cake card stock... but WAIT, there's MORE! 
How about a freebie on my Facebook Page AND a video tutorial??!!  Woohoo!!! 


You're Welcome  ;}  Thanks for dropping by today. Luv ya!

Pin It!

Tuesday, October 30, 2012

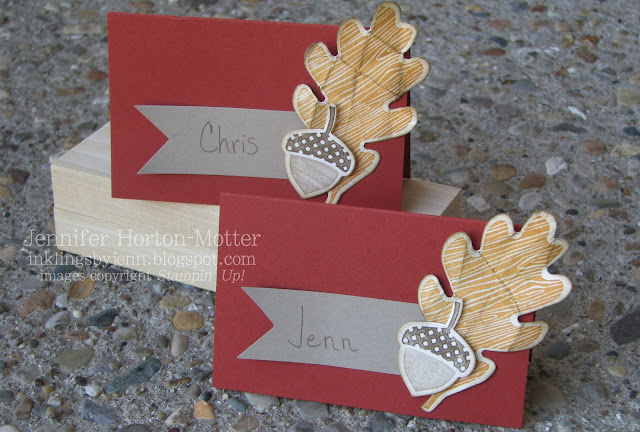
Placecards for Thanksgiving

Yesterday I shared some decorations I've been working on for Thanksgiving. Here are more details on the placecards... 
To make eight placecards, you will need two sheets of 8-1/2 x 11" card stock. 
Score each sheet at 2-3/4" and 8-1/4". Cut in half lengthwise (at 4-1/4"), and then cut each of those sections in half (at 5-1/2"). 
Fold each quarter-sheet in half on your score line, and then decorate. I used the Wonderfall stamp set and the coordinating Autumn Accents Bigz Die for the perfect Fall images. The leaf is crumpled and sponged with Soft Suede ink. To get the two colors on the acorn, I used Crumb Cake and Soft Suede markers to "ink" my stamp. Then I sponged the edges of the acorn, too.

Did you know you can get a digital version of the Autumn Accents Bigz Die? The Wonderfall Kit includes the leaf "punches," several sentiments, and 12 awesome "papers." Plus, it's on sale this week - 50% off! 


It can be easy to forget the decorations if you are the one hosting the meal. Start now and save yourself the stress of finishing at the last minute. If you are enjoying your Thanksgiving feast as a guest, be sure to make something pretty for your hostess!   :}

Pin It!

Tuesday, October 16, 2012

shoebox swap - part 2

Good morning! I have another project from the "shoebox swap" to share today. My upline had this adorable treat holder for us, and I tweaked mine a little bit, adding some Sweater Trim to tie the holder closed.
These are so quick and easy to make! They would be great for Secret Santa gifts, as well as for teachers, mail carriers, hair stylists, and of course the UPS guy that delivers all your favorite stampin' goodies!  ;)
When you open the treat holder, there's a little pocket inside that will hold a tea bag or small chocolate square. Here's how simple this is to create: 
Start with a 3-1/2 x 11" piece of card stock. Use your Simply Scored Scoring Tool to score at 3-1/2", 4", and 7-1/2". Put the Diagonal Plate in place, and score diagonally at 7-1/2". Cut along the diagonal score line to remove the top-right triangle section. 
Fold at each score line. Add a strong adhesive (I used the Multipurpose Liquid Glue) along the bottom edge of the triangular section, and fold over to create a little pocket. Then... decorate! 
You can simply fold it closed, but if you want ribbon, add that to your project before adding the focal point on the front. If you want a super fast way to decorate the front, one of the designs in the Snow Festival DSP is a sheet of 16 squares. They are perfect for making quick projects and gift tags. With two sheets in the package, you have 32 treat-holder "fronts" right at your fingertips.  :} 
I know you'll have fun making these cute treat holders. Start now so you can make a bunch!

Pin It!

Friday, October 5, 2012

Spider Cider Treat Pouch

Brrrrrr! It's so cold outside. Fall weather drives me crazy... shorts yesterday, coats today. Cooler weather always makes me want to curl up and read with a cup of coffee (boy, do I miss living close to a Barnes & Noble!). I didn't get to curl up, but I did get to glance through a few children's books today  ;)  
On Friday mornings I am the "librarian" at the grade school. I couldn't believe how crazy-busy it was this morning!! Kids came out of every corner. It's usually fairly hoppin' on Fridays, but I guess the cooler weather made them want to grab a book, too. I just LOVE seeing all these kids discover the joy of reading. 
Do you remember the cute little treat pouch I posted yesterday? I liked making it so much, that I thought I would try a larger version for a fun gift, and include some cider mix so that Ben's teacher could curl up with a good book and a toasty beverage. 
stamp set: Monster Munchies
tools: Big Sot, Extra-Large and Large Oval punches, Simply Scored 


For this treat pouch, I put the treat in the front pocket, and the card in the back pocket. 
The folded card measures 3-3/4 x 4-3/4" (closed). The Halloween sentiment from the Seasonal Sayings stamp set is stamped in VersaMark ink, and heat-embossed with tangerine Tango Embossing Powder
Even the inside of the card gets some cute touches! 

Soooooo, I'll bet you would like the measurements for this larger sized pouch, right? Say "please."  ;) 

Use the pictures from the tutorial I posted yesterday, and these measurements: 

Start with a 10" x 10" square of Designer Series Paper.
1 - Using the Simply Scored Diagonal Plate, score at the corner (0") and at 1".
2 - Rotate a half-turn (180º) to the left. Score at 1".
3 - Rotate a quarter-turn (90º) to the left, and score at 3-1/2".
4 - Rotate a half-turn (180º) to the left, and score at 3-1/2".

Fold the treat pouch the same way as the smaller version. Easy, peasy! Now, if you love your friends, share this post (Facebook, Pinterest) and save them the time of figuring out the measurements. They will love you for it! (You know they're going to want to make a Christmas version with hot cocoa - if you share the measurements, maybe they'll make one for you!)
Well, that's a Halloween gift done for one teacher... guess I'd better start on another gift for Aaron's teacher  :}

Pin It!

Thursday, October 4, 2012

a gift for my new friend

I have to say that with our move, we have met some of the nicest people! So far, everyone has been very friendly and helpful, which makes uprooting our family a much easier ordeal. One of the Moms I met has been so nice, that I think I'll surprise her with a little treat tomorrow  :} 
I made this at my upline's team meeting in August, and I've been saving it for someone special. 
This paper started as an 8 x 8" square, and ended as a little treat pouch with two "pockets." One pocket holds a little card (3-1/2" x 3" closed), and I tucked a yummy piece of chocolate into the other.
The cute leaves (from the Wonderfall stamp set) are stamped in Soft Suede ink onto Cajun Craze and Soft Suede card stock. The button and linen thread add the perfect finishing touch to the front. 
Since the back has to be pretty too, a flower made out of 6 layers of card stock (1-1/4" Scallop Circle punch) is a nice little detail.

Soooooo, I'll bet you want to know how to make this little cutie, right?? Ta Da!!
Start with an 8" x 8" square of Designer Series Paper.
1 - Using the Simply Scored Diagonal Plate, score at the corner (0") and at 3/4".
2 - Rotate a half-turn (180º) to the left. Score at 3/4".
3 - Rotate a quarter-turn (90º) to the left, and score at 2-3/4".
4 - Rotate a half-turn (180º) to the left, and score at 2-3/4". 

Place the pattern that you want to be on the outside of your pouch facedown. The corners that have the center score-line should be on your left and right.
1 - Fold the left and right sides inward. If you use a bone folder to make the folds more crisp, be sure to press gently. 
2 - Fold the top point down towards you (center score-line). 
3 - Fold up on the score-line close to the straight-edge. 
4 - Flip your project over, and fold up on the last score-line.

That's it - you're done! Well, add a little adhesive at the top corner or punch a hole and tie some ribbon through it to keep it together... then you're done.
Hmmmm, I'll bet this would be super cute as a Halloween treat!   Stay tuned...  ;}

Pin It!

Wednesday, August 29, 2012

black and brown

Here are the last two crayon gifts ... 

Black & White Day 
stamp set: Need for Speed

Brown Day 
stamp set: Dinoroar

Ok, so technically Aaron's teacher did not have an official "brown day," but I couldn't have a bunch of leftover crayons!

This was such a fun series of projects to create... but I'm kinda glad it's over and I can move on to some Fall and Christmas projects  :}

Pin It!

Sunday, July 1, 2012

stamping with friends

We all know how fun it is to spend time stamping with our friends. I'm not sure which is more therapeutic - the stamping or the conversation. It's been a while, but the last time my friend Dawn and I got a chance to stamp together, she inspired me to make this card: 
The focal point and the ribbon have tons of detail, so I wanted to keep the rest of the card pretty simple. I love using the Simply Scored to create fun and interesting backgrounds, that don't overpower my project.
The ribbon took care of the vertical "lines," so I used the Diagonal Plate and scored every half-inch for this background. I scored the inside of the card so that the diagonal lines would be raised (rather than dented in) on the card-front.

And here's a look at the card my talented friend Dawn created: 
She scored her card on the front, creating a more subtle texture, which is a perfect compliment to these subtle colors.
I hope you can find time this week to stamp with one of your good friends. It's usually difficult to find the time for fun with friends, but it's always well worth it!

Pin It!

Sunday, June 3, 2012

a simple card sketch + a few reminders

What a beautiful day! I can't wait to run around outside with my boys. But first, I gotta share some creative stuff  :}

I found a neat blog with some great card sketches. They're not fussy, and therefore, easy to recreate! The clean and simple card sketch 192 caught my eye, so I had to whip up a card.
To keep things simple, I started with a 3-1/2"x5" pre-cut, pre-scored Note Card (love these things!). I added a 3"x4-1/2" layer of Calypso Coral card stock (using Dimensionals).
Before I added the Whisper White layer, I used the Simply Scored to score two lines an 1/8" apart. The Calypso Coral DSP is die cut with the Big Shot using the new Apothecary Accents Framelits. I did end up adding three embellishments, but they're super simple. The Calypso Coral Baker's Twine is tied around the cupcake wrapper before adhering it to the card with a Dimensional. I used a 2-Way Glue Pen to add Dazzling Diamonds Stampin' Glitter® over the "frosting." And a Whisper White brad adds a very subtle detail.

Before I sign off, I have two reminders... 
After you open your My Digital Studio program, click on "Help," and then click on "Check for Updates."

And last but not least, click here for details on how you can win some BLOG CANDY.

Thanks for stopping by... Have a wonderful day!!!  :} 


Pin It!
Related Posts Plugin for WordPress, Blogger...