Showing posts with label Peach Parfait. Show all posts

Wednesday, May 23, 2012

Ribbon Wreath

I finally finished a project on my "really-really want-to-make" list!!! For those of you who have a 2010-2011 SU catalog handy, my inspiration comes from the ribbon wreath on p190. It's not like it takes a long time to make a ribbon wreath - I finished in a few hours. I probably would have finished sooner if I didn't take breaks to draw outside with chalk, lose a lightsaber battle, and have a snack in the shade... but those are some of the best parts of working from home  :}  It's just one of those projects that kept getting pushed to the side, but I had time today since I didn't want to get a ton of supplies out while the drywall was being sanded. For this project, all you need is a hoop, ribbon, and Craft & Paper Scissors. I have two of these high quality scissors - one for paper, and one for fabric and ribbon.
Isn't it pretty??? Since I have several miles spools of ribbon in my craft room, this is the perfect project for me! All of these ribbons are from Stampin' Up! ... some are current, some are old, some are really old. I chose a variety of pinks, yellows, oranges, and greens for a bright, summery look.

I started with a hoop (approximately 13" diameter) that I purchased from my local craft store (I think I found it in the same aisle as the mirror pieces). Then I tied all my ribbons on... that's it! So easy!! 

A few tips for you: 
I used approximately 1 to 3 yards of each ribbon.
Push the tied ribbons close together as you're working.
Trim the ends as you go; don't wait to trim them all at the end.
Use a good amount of the wider ribbons first; it's much easier to fill in with skinny ribbons.
Try to use a variety of ribbon textures (satin, twill, grosgrain, scalloped edges) on your wreath for visual interest.
Mixing solid, striped, stitched, and dotted ribbons of varying widths is fun!
If you are using Pleated Satin Ribbon, pull gently when tying.
Ribbons with a heavier stiffness hold up to being cut longer; floppy ribbons should be cut shorter.

I bought more than 1 hoop because I have plans to make more. I will definitely create a Ribbon Wreath for Christmas... what else... oooh! Fall colors would be pretty!!  :}  What colors do you think I should try next?


Pin It!

Wednesday, May 9, 2012

Kraft Gift Box

Today I'm sharing the third project from my "Three in 3D" class...
Isn't it pretty??? I started with the Kraft Gift Box (124106  $2.95 for a set of 4) and added a piece of Designer Series Paper to each side. (The DSP layers measure 3"x2") Then I wrapped a piece of Chocolate Chip 1/2" Scallop Dots Ribbon around the box with the seam in front. A faux bow covers the seam and adds a super cute touch.
I wanted something really pretty to decorate the top of the gift box, and I was inspired by a flower that was on a card from the talented Mary Fish. I used the Build A Blossom stamp set to stamp 16 medium-sized petals and 8 small petals in Peach Parfait ink onto the same color card stock. Each petal is punched out using the Blossom Petals Builder punch. To add a realistic touch, I curled the edges of the petals against the side of the Paper-Piercing Tool. Each "layer" of the flower is adhered to a punched circle, starting with the bottom "layer" and building up. I used a lot of adhesive, which needs a good amount of drying time.
To create the flower center, I die cut two pieces of Chocolate Chip card stock using the Daisies #2 Bigz die and my Big Shot. A Dimensional holds the flower onto the box lid.

The next time you're placing an order, be sure to add at least one set of Kraft Gift boxes. They're great to have on hand to wrap up cute little gifts for co-workers, friends, and teachers.

Pin It!

Friday, April 20, 2012

more fun with a card sketch

  
Remember this card sketch?

I brought it out of hiding the other day, and I love how easy it is to use  :}  It worked well on a card for one of my technique classes.
One of my favorite things about Stampin' Up! is how everything coordinates. For this card, I was even able to coordinate the Houndstooth Embossing Folder with a houndstooth patterned stamp from the Posy Punch Hostess stamp set. Cute, cute, cute! 

Here's a closeup and a list of supplies:
Stamp Sets: Posy Punch, Perfectly Penned
Ink: Concord Crush, Pear Pizzazz
Card stock: Concord Crush, Peach Parfait, Whisper White
DSP: Pear Pizzazz (In Color Paper Stack)
Accessories: Pear Pizzazz 3/8" Pleated Satin Ribbon, Peach Parfait Glimmer Brad
Tools: Fancy Flower punch, 3/4" Circle punch, Big Shot, Houndstooth Embossing Folder

A few members of my downline even had some fun with my card sketch...


So go ahead and give this sketch a try - it's super easy and fun to work with  :}  Thanks for stopping by today!

Pin It!

Thursday, March 1, 2012

Framelit Fun

Happy 1st day of March!! Even though we've had such a mild winter, I totally have Spring Fever... well, more like Summer Fever because Spring in Wisconsin isn't going to be much different than a mild Winter (sigh). So today I'm sharing a bright, pretty card perfect for Spring:
This is another card from my class on Tuesday  :}  The colors are Poppy Parade, Peach Parfait, and Pear Pizzazz. After stamping the large label image in Basic Gray ink, I used a Blender Pen to watercolor the flowers and leaves.
Before adhering the focal point with Dimensionals, I used my magic potion of Champagne Mist Shimmer Paint mixed with rubbing alcohol in a travel-sized spritz bottle to add some shimmer to the background layer. The golden sparklies look so pretty on the Everyday Enchantment DSP!

Well, thanks for dropping in today... let's all think warm thoughts and try to convince Spring to come early  :}

Pin It!

Monday, February 27, 2012

fun colors

Good morning! I hope you all had a nice weekend. Ours was busy, as usual. The highlight was last night's Blue & Gold Dinner for Ben's Cub Scout pack. Good food, funny skits, and great family time   :} 
Today's project is a nice, simple card we made at my last Team Meeting. I love it because it's super easy, and you can make it in minutes, without leaving a mess in your craft room. 
The Peach Parfait card base has a top-fold. I scored the Whisper White layer at 1/4" and 1/2". The heart image from the Sprinkled Expressions stamp set is stamped in (from the bottom) Poppy Parade, Calypso Coral, and Peach Parfait. I used the same color markers to ink the sentiment stamp. For a simple embellishment, I added a brad from the Everyday Enchantment Ribbon & Brad Pack. Then I attached the Whisper White layer using Dimensionals.
That's it! Super easy!! And what makes it even more awesome is that the stamp set and brad were free! Yeppers, they are Sale-A-Bration choices  :}  You can earn these items free for yourself by placing an order online or by calling/emailing me with your order.

Happy stamping! Enjoy the rest of your day  :}

Pin It!

Friday, February 17, 2012

It's Finally Friday!!

Happy Friday, stamping friends! Whew, it has been a long week. I'm looking forward to a quiet weekend  :}
For today's project, I made a card using a sketch from Stampin' Connection - an online forum just for Stampin' Up! demonstrators.
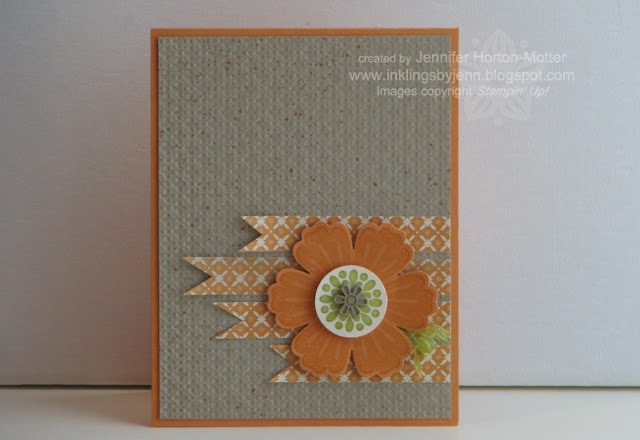
The Crumb Cake layer is dry embossed using the Square Lattice Embossing Folder. After embossing it with the Big Shot, I smoothed it back down, so that the texture would be more subtle, and then I spritzed it with a Peach Parfait Marker in the Color Spritzer Tool.
I cut four 1/2" wide strips of Everyday Enchantment DSP in different lengths, and then snipped the flaggie-thingies into the ends.
The flower image from Mixed Bunch is stamped in Peach Parfait ink onto Peach Parfait card stock, and then punched out using the Blossom punch. I stamped the flower center (also from Mixed Bunch) in Lucky Limeade ink onto Very Vanilla card stock, and then punched it out using the 1" Circle punch. I added a Crumb Cake Flower Brad to the center for just a simple embellishment. Instead of punching out some leaves, I decided to use three snips of Lucky Limeade Organdy Ribbon, which I curled up by running them along the edge of my Snips (closed).
Here's a close-up so you can see those details:

Access to Stampin' Connection is another great reason to join the Stampin' Up! family. There are over 200,000 project samples, made by Demos at every experience level, with more samples added every day. Plus, there are tons and tons of discussions about workshop ideas, business tips, and product knowledge. And if that's not enough, thousands of Demos are available to offer you a kind word and a virtual "hug" if you ever need one  :}  There are so many benefits for joining "the family," including a discount. Click here if you would like more info.

Thanks for stopping by today... have a wonderful day!!!  :}

Pin It!

Friday, February 10, 2012

a card for EVERY occasion!

My project today just makes me giggle  :}  Today is Aaron's 100th Day of School, and they are celebrating with a "Circus Day in 4K." Well, I can't let a celebration pass by without a card to acknowledge it, right???
So, I made Aaron's teacher and teacher's aide Happy 100th Day of School cards. I like these cute little 3x3 cards for a quick just because note. And, they are an easy way to use up some scraps  :}
Attached to the Real Red card base is a strip of Tempting Turquoise (punched with the Pinking Hearts Border punch), a strip of Daffodil Delight, and a piece of 'Big Top Birthday' DSP.
The clown and sentiment (Under the Big Top stamp set) are stamped in Basic Black ink. I used Peach Parfait, Real Red, Old Olive, Daffodil Delight, and Tempting Turquoise markers to color the clown.
The Tempting Turquoise button adds a cute finishing touch. Did you know that the Brights 'Designer Buttons' are one of the Sale-A-Bration choices? For every $50 you spend not including tax & shipping, you get to choose a freebie from the Sale-A-Bration catalog. Want more freebies? Host a workshop and earn even more goodies. Like getting freebies every month? Join the Stampin' Up! family and get freebies every month for the rest of the year. Whether you want to get a discount on the supplies for your hobby or build a business, there's room for everyone on my team. You can shop, learn more, and contact me if you like from my website.
Have a great day and a wonderful weekend!

Pin It!

Friday, January 27, 2012

a cute little card... and more :)

Running late today... you know how it goes as a Mom... over-worked and underpaid  ;}  Yesterday was a doozy of a day, with today looking up to be almost as nutty. Tomorrow will be crazy busy - have to take both vehicles to the mechanic, attend a 5-year old birthday party, and catch up on all of the housework I neglected this week. At least I got to stamp quite a bit earlier this week.
Today I'm sharing a cute and quick little 3x3 card. I love making these little cuties:
Supplies: Peach Parfait, Pool Party, & Very Vanilla card stock. Everyday Enchantment DSP. Soft Suede ink. Curly Label punch. Basic Pearl.

Remember all that scrapbooking I got to work on this past weekend and early this week? Well, I'm not even close to caught up, but at least I made a dent  :}  I thought I'd share some of my pages with you. Some of them I worked on from scratch... others were layouts from my classes that have been waiting for photos... and some were layouts that have sitting around half-completed for too long.


There are a lot of retired goodies (some of which are still available in the Clearance Rack in my online store) used on these pages, so I won't list supplies. Feel free the leave a comment if you have questions.
I hope you all have a nice weekend!!

Pin It!

Friday, January 20, 2012

a color challenge

Well, I guess one good thing leads to another... I decided to try another blog challenge. This one is a color challenge from the "Create with Connie and Mary" blog. When I saw the color challenge - Peach Parfait, Calypso Coral, and Lucky Limeade - I got really happy. I have made a TON of projects using this color combination! In fact, these are the main colors in my Catalog Display area. Want to see???
If you see any dust, could you just ignore that?  ;)  Someday I'll get around to the dusting... someday...

Now, I could have linked to several previously posted projects I made using Peach Parfait, Calypso Coral, and Lucky Limeade... but where's the fun in that? Since the Creative Elements stamp set I used for yesterday's project was still sitting on my desk, I used that to make today's card for the CCMC185 - Color Challenge.
Isn't it pretty??? It's a wee bit over the top, but not really complicated. The Peach Parfait DSP has the swirly background stamped in Calypso Coral ink, as well as spritzing with Calypso Coral and Lucky Limeade markers using the Color Spritzer Tool. I stamped the flower in Calypso Coral ink onto Very Vanilla textured card stock, and then lightly colored it in using a Blender Pen and Peach Parfait ink. For the butterfly, I used the "rock-and-roll" technique (Peach Parfait and Calypso Coral ink). After snipping out the butterfly, I sponged the edges with Crumb Cake ink so it would stand out a little more. The sentiment is stamped in Calypso Coral ink onto Peach Parfait card stock. And I couldn't resist adding a small Pearl to add one more finishing detail. Fun challenge!!

Well, the snow is really coming down now. I guess I'll force myself to hunker down inside all weekend and stamp... I'm thinking some scrapbooking is on the agenda. What are you doing this weekend? I hope you find time to create a few projects of your own!  :)

Pin It!

Saturday, June 18, 2011

Summer Scrappin'

I wanted to share this cute scrapbook layout... perfect for summer! This is the project I had ready for my Scrapbook Club members on our crop night. I used the Summer Splash stamp set from page 17 of the Summer Mini Catalog. The colors are Daffodil Delight, Baja Breeze, Crumb Cake, Tangerine Tango, Peach Parfait, and Whisper White.

The surf board image is stamped in VersaMark® ink, and heat embossed with Tangerine Tango embossing powder (123106) - LOVE this stuff!! I inked the bucket-and-pail image with markers.
To create the "sand," I tore an edge along the long side of a strip of Crumb Cake card stock. Then I sponged Crumb Cake ink along the torn edge. Next I spritzed the strips with the Color Spritzer Tool and a Crumb Cake marker. The last step was to add a fine mist of Gold Glow Smooch Spritz® (118770). Be sure to completely cover your work area before spritzing :)
Other supplies: 1-3/4" and 1-3/8" Circle punches; 2-3/8" and 1-3/4" Scallop Circle punches; Simple Letters Alphabet Bigz Dies (115960) and the Big Shot.
If you are looking for a local group to stamp with, I have a new hostess club starting in July. Contact me to learn more :)

Pin It!

Thursday, June 2, 2011

Ribbon Fibers

Looking for a fun new way to use your ribbon? You can create your own fibers using the 1/2" Stitched-Poly Ribbon. This ribbon is available in Blushing Bride, Peach Parfait, Poppy Parade, Concord Crush, and Pear Pizzazz. To create the fibers, start by cutting your ribbon to the desired length; make sure you have enough length to tie the knot. Using your Craft & Paper Scissors (108360), cut one edge of the white stitching off. Hold the uncut edge in one hand, and use your free hand to pull the colored "threads" out of the weaving. Let the small pieces that were on the cut edge fall away. You will be left with the colored fibers, which you can tie onto your project. Easy and fun!

 Supplies: Baja Breeze, Tangerine Tango, and Whisper White card stock; 1/2" Peach Parfait Stitched-Poly  Ribbon; Peach Parfait DSP from the Hostess Pack; Bold Blossom stamp set; Baja Breeze, Tangerine Tango, and Pear Pizzazz ink.


Pin It!

Thursday, May 19, 2011

Blossom

If you haven't tried the Triple Layer punches yet, drop everything, grab some card stock, and start! They are so much fun to use!!  You get three different punches in one... woohoo!! The Blossom Bouquet Triple Layer Punch (122464 $23.95) coordinates nicely with the Bold Blossom stamp set (wood 123232 $12.95 / clear 122232 $9.95). For this card I punched pieces from the "first" and "third" setting.


The base of this card is Pear Pizzazz card stock. I used a 4"x5.25" layer of Daffodil Delight DSP from the Patterns Designer Series Paper Stack: Brights (117155 $19.95). After punching and layering the flower pieces, I added a flower center by using one of the punches from the Itty Bitty Shapes Punch Pack (118309 $16.95 for three cute little punches). I also added a tiny drop of Moonlight Smooch® Pearlized Accent Ink (119969 $4.95) to the center of each flower. And, well, I just have to add ribbon to almost everything ,  so I chose the Daffodil Delight 3/8" Taffeta Ribbon (119766 $6.95) to finish off my card.

Pin It!

Monday, May 16, 2011

A "Success"-ful card :)

Each month, SU demos receive an awesome magazine called Stampin' Success. Inside there are great business ideas, as well as more project samples than I will ever have time to make. At the back of the magazine is a card template than has been used to create a project or two featured in the articles. I use the card template as a challenge to myself - and my downline, too! It's good to step out of your comfort zone once in a while, and it's super awesome to have a new template to experiment with each month. This card uses the template from the April issue of Stampin' Success.

The 4-1/4" square base is Tangerine Tango card stock. The Peach Parfait DSP is from the In Color Hostess Pack. I used the Petal Pizzazz stamp set to create the flower layers, which I cut out with my Snips and attached with Dimensionals.
To get multiple colors on each stamped image, I used the 'Rock & Roll' technique... First I inked the stamp in Daffodil Delight. Then, with the stamp at a slight angle, I rolled the edges in Peach Parfait ink. Finally, with the stamp at a steep angle, I rolled the edges in Tangerine Tango ink.
The sentiment is from the Tiny Tags stamp set and punched out with the Jewelry Tag punch. A clear Bitty Button makes the perfect flower center.

Pin It!

Saturday, April 9, 2011

Peach Parfait

When this color was introduced as 1 of the new "In Colors"... well, I was a little less than thrilled. I've never been a big fan of orange, and I already had Pumpkin Pie. Then I started using Peach Parfait in my projects... wow! How my feelings have changed. I kinda feel like asking SU if Peach Parfait could stay on down the road as a core color. Personally, I think it would play nicely with the other colors in the Subtles Collection. But, I'm not the boss, so I will enjoy using Peach Parfait until June 2012.


The Color Coach lists the "Dynamic Duo" as Peach Parfait and Cajun Craze. The Peach Parfait Designer Series Paper is from the Sale-a-Bration DSP and Accents package. Both sentiments are stamped in Cajun Craze ink from the Thank You Kindly stamp set. I used three Punches to create the flower layers: Fancy Flower, 5-Petal Flower, and the circle punch from the Itty Bitty Shapes Punch Pack. I used the Dotted Scallop Ribbon Border punch on a strip of Cajun Craze card stock. Since I couldn't decide which card layout I liked better, I made both. Which orientation do you like better?


This is a card from my Spring/ Easter card class held in March. We used the Sale-a-Bration DSP and a stamp from the Sale-a-Bration set Punch Bunch. Peach Parfait, Pear Pizzazz, and Not Quite Navy - the "Creative Combination" - markers were used to ink the stamp.


The "Sweet Set" colors are Peach Parfait, Baja Breeze, and Riding Hood Red. I used those colors of markers to ink this image from the Cute by the Inch Hostess stamp set. The DSP on the bottom of this card is also a Hostess choice :)
Now, you are surely wondering where I got that super cute shape cut from Riding Hood Red card stock, that layers nicely behind the Scallop Square???... from my scrap drawer, of course ;)
This neat shape was leftover from a treat pouch I made using one of the Holiday Windows (116821 $29.95 - set of 4) and the Movers and Shapers Bigz XL Die (114506 $42.95). This shape is the "window" that was cut out. And you can't toss something that cute out... I knew that "someday" it would come in handy! :)

Pin It!
Related Posts Plugin for WordPress, Blogger...