Thursday, May 31, 2012

your last chance!

Today is the last day for the current catalog - get your favorites before they are gone. My card today was made in honor of the retiring products...
Retiring stamp set: Flight of the Butterfly
Retiring card stock: Peach Parfait and Blushing Bride
Retiring DSP: Nursery Nest

Retiring Tools: Butterfly Punch, Crop-A-Dile


Click here to see all of the retiring products. 


Pin It!

Wednesday, May 30, 2012

So, what can you do with chipboard?

That's the question we answered last night at my Technique Tuesday class. You can... 


...stamp directly on it
Stamp Set: For All You Do
Card Stock: Peach Parfait, Poppy Parade, Pear Pizzazz, Marina Mist

...color it a solid color by patting the chipboard with a Craft Ink Pad
Stamp Set: Trendy Trees
Card Stock: Blushing Bride, Bravo Burgundy Textured, Tempting Turquoise

...cover the chipboard with VersaMark® Ink, sprinkle on colored embossing powder, and heat emboss
Stamp Sets: Delicate Doilies, Create a Cupcake
Card Stock: Concord Crush

...cover it with Designer Series Paper
 Stamp Sets: Autumn Days, It's Your Day
Card Stock: Pear Pizzazz, Peach Parfait, Always Artichoke


...cover it with fabric
...die cut a variety of shapes
Stamp Set: Fifth Avenue Floral
Card Stock: Blushing Bride, Garden Green 

** Note - the stamp sets in green are on the Retiring List. **

Just a reminder... tomorrow is the LAST day to order from the current catalog. Be sure to get your favorites before they're gone! You can even order in your PJs from my online store and it ships right to your doorstep!  Happy shopping  :} 
 

Pin It!

Monday, May 28, 2012

digital scrapbook page

I've been working on a scrapbook page for my husband, and while this one is more suitable for Veteran's Day than Memorial Day, I thought I would share it today anyway... 
I created this page using My Digital Studio and the following Digital items: Number One Digital Kit, Downtown Grunge Photobook Template, Keep this Memory Photobook Template, and Staples (included on MDS content disc).

I really like how this scrapbook page turned out... it's a nice tribute to my husband's family's commitment to serving our country. Chris's brothers also served in the Marine Corps, so I might end up working on some pages for them... after I finish my own projects - HA! I am so thankful for the men and women who have fought and continue to fight to keep America free. My heart goes out to the families who have lost their brave loved ones. I can't even begin to imagine that kind of pain.

As America celebrates Memorial Day, let us take a few minutes to pay tribute to those who have given their lives in our nation's wars.


Pin It!

Sunday, May 27, 2012

My Digital Studio "hybrid" project

Hello, stamping friends! I hope you are enjoying a nice weekend with your family  :}
I have a pretty "hybrid" project to share with you today... 
I created the background (the "picture" inside the frame) using My Digital Studio. I also used MDS for the scripture piece.  Then, I used real DSP and embellishments to make the project extra pretty  :} 

the details: 
I started my project in MDS as a 5x7 card, with a Melon Mambo background.
Over the top of the background, I layered a square punch, which I "paper-filled" with one of the Twitterpated DSP patterns (Blushing Bride - "Fancy Fan" design), and lowered the opacity to 40%.
The top layer is a stamp-brush from Eclectic Overlays in Early Espresso.
I printed my background onto photo paper.

*Tip: to make sure I was working within the measurements of my 4x6 frame, I added two rectangle punches to cover an inch at the top and an inch on the left. By color-filling them with Whisper White, it saves a tiny bit of printer ink  ;)

*Tip: in order to type my text the correct size for my frame, I started with the Digital Flag Punch. I added my text box over that, so I could choose the right font size. Before printing onto Very Vanilla card stock, I deleted the Flag Punch.

After printing the scripture onto the Very Vanilla card stock, I cut it to the size I wanted. For subtle detail, I stamped the background image from the Creative Elements stamp set in Crumb Cake ink ("stamping off" first for a lighter image), and used the same ink with a Sponge Dauber to sponge a hint of color onto the edges.
The background layer is framed behind the glass, and the card stock and DSP strips are adhered to the glass (using SNAIL adhesive), with the left edges tucked under the frame.
1/8" Very Vanilla Taffeta Ribbon and Linen Thread are strung through one of the new Naturals Designer Buttons (available to order June 1st), which is adhered to the frame using Mini Glue Dots. A tiny string of Pearls adds an elegant finishing touch. 

Thanks for dropping by my blog today! I hope you and your family have a blessed day!


Pin It!

Wednesday, May 23, 2012

Ribbon Wreath

I finally finished a project on my "really-really want-to-make" list!!! For those of you who have a 2010-2011 SU catalog handy, my inspiration comes from the ribbon wreath on p190. It's not like it takes a long time to make a ribbon wreath - I finished in a few hours. I probably would have finished sooner if I didn't take breaks to draw outside with chalk, lose a lightsaber battle, and have a snack in the shade... but those are some of the best parts of working from home  :}  It's just one of those projects that kept getting pushed to the side, but I had time today since I didn't want to get a ton of supplies out while the drywall was being sanded. For this project, all you need is a hoop, ribbon, and Craft & Paper Scissors. I have two of these high quality scissors - one for paper, and one for fabric and ribbon.
Isn't it pretty??? Since I have several miles spools of ribbon in my craft room, this is the perfect project for me! All of these ribbons are from Stampin' Up! ... some are current, some are old, some are really old. I chose a variety of pinks, yellows, oranges, and greens for a bright, summery look.

I started with a hoop (approximately 13" diameter) that I purchased from my local craft store (I think I found it in the same aisle as the mirror pieces). Then I tied all my ribbons on... that's it! So easy!! 

A few tips for you: 
I used approximately 1 to 3 yards of each ribbon.
Push the tied ribbons close together as you're working.
Trim the ends as you go; don't wait to trim them all at the end.
Use a good amount of the wider ribbons first; it's much easier to fill in with skinny ribbons.
Try to use a variety of ribbon textures (satin, twill, grosgrain, scalloped edges) on your wreath for visual interest.
Mixing solid, striped, stitched, and dotted ribbons of varying widths is fun!
If you are using Pleated Satin Ribbon, pull gently when tying.
Ribbons with a heavier stiffness hold up to being cut longer; floppy ribbons should be cut shorter.

I bought more than 1 hoop because I have plans to make more. I will definitely create a Ribbon Wreath for Christmas... what else... oooh! Fall colors would be pretty!!  :}  What colors do you think I should try next?


Pin It!

Tuesday, May 22, 2012

new, new, new!

Well, a super busy weekend has turned into a super busy week... I'm really looking forward to the upcoming 3-day weekend! Hopefully I will have all of the drywall dust mess cleaned up by then. That's right, home repair... yuck! So let's look at some prettier things, shall we?  :} 
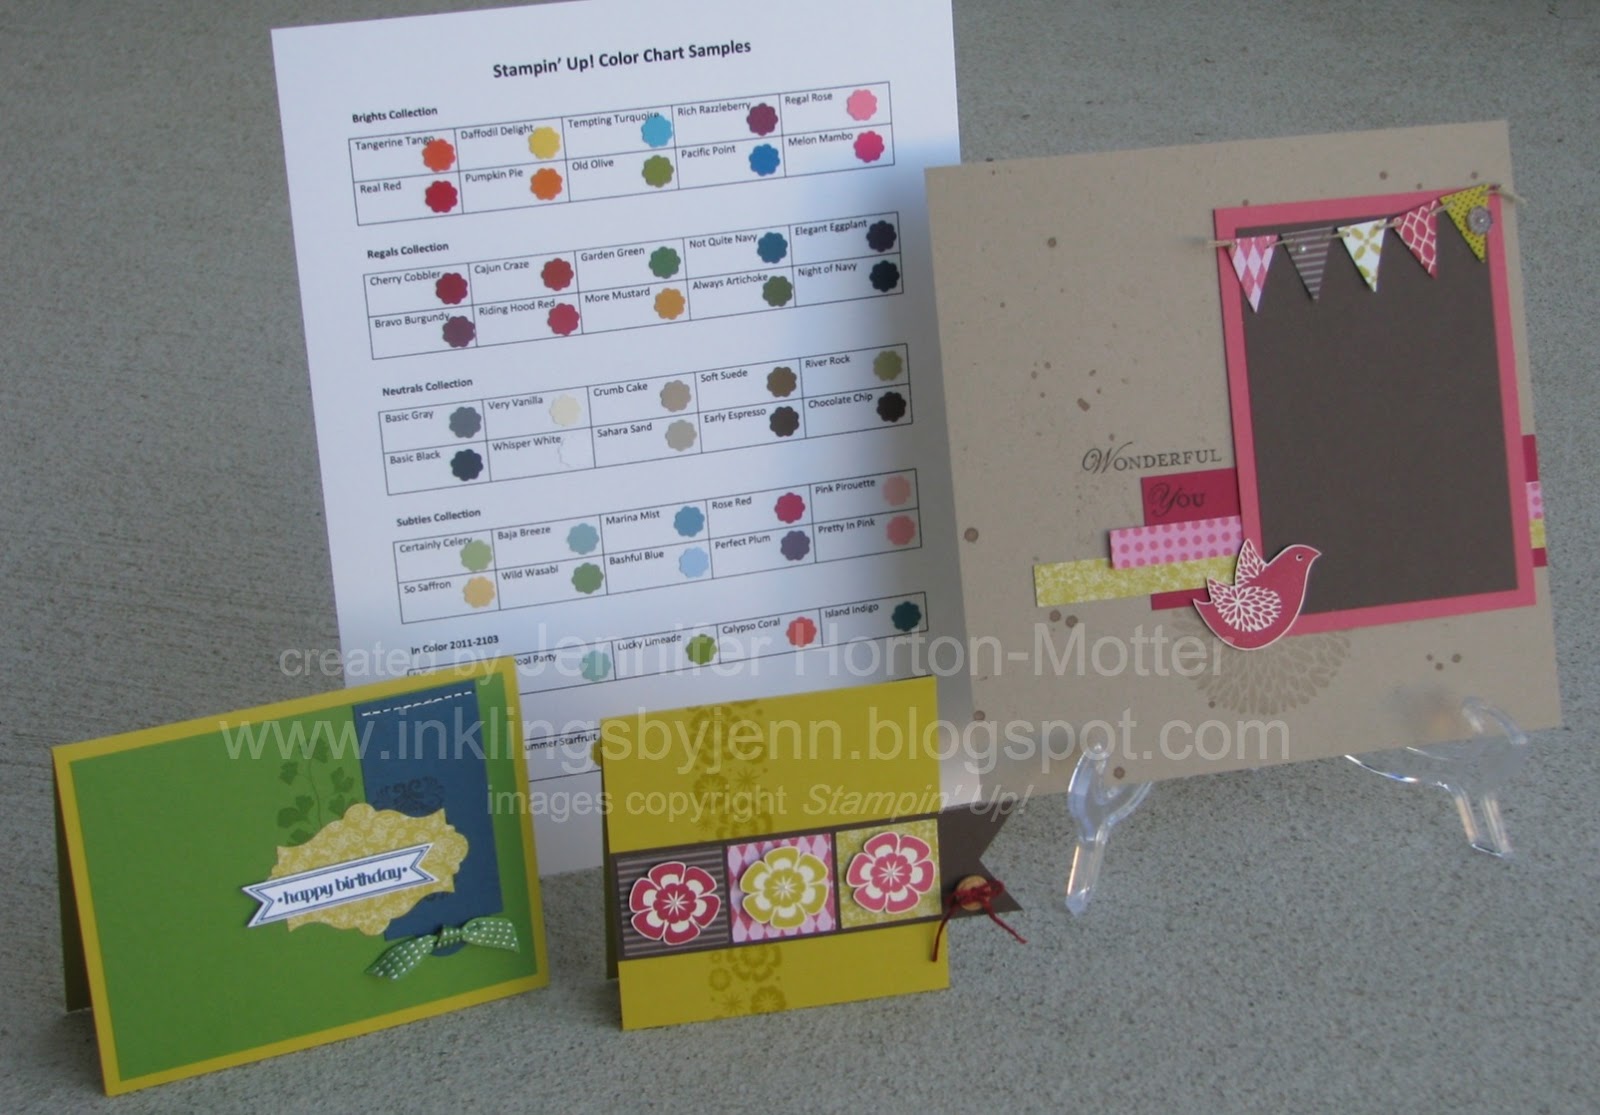
For my May team meeting, I prepared a Color Chart "sampler" page, and designed three cute projects using tons of new goodies. It's always fun to try out all the new products from the upcoming catalog!  So... what's new???

Two new stamp sets: Itty Bitty Banners and Papaya Collage. Three new colors: Summer Starfruit, Gumball Green, and Midnight Muse. Two new Framelit Collections: Apothecary Accents and Bitty Banners. New DSP and Ribbon, too!  :}

New stamp set: Betsy's Blossoms. New stampin' wheel: Betsy's Blooms. Three new colors: Summer Starfruit, Raspberry Ripple, and Primrose Petals. New DSP and button, too!  :}

New stamp set: Betsy's Blossoms. Three new colors: Summer Starfruit, Raspberry Ripple, and Primrose Petals. And new DSP!  :}  *Note: I planned this 8x8 page to go with the new 8x8 Scrapbook Albums in the upcoming catalog!!

I have to say, I prefer the creating of the new projects in my stamp room over creating new sections of drywall in my ceiling and walls, but a girl's got to do what a girl's got to do! And by that I mean, calling a handsome fix-it guy to do the repairs!  ;)

You know, you could be stamping with these brand new goodies too! There are all kinds of perks to joining the Stampin' Up! family. I would LOVE to have you as part of my team. Click here to learn more  :}

And last but not least, you can find full views of the front of each project - as well as other projects from my team meetings - on my Facebook Page. Thanks for stopping by today!!  :}


Pin It!

Friday, May 18, 2012

a busy day!

Holy Moly! I can't believe how busy my rummage sale was today... I can't even imagine how busy tomorrow is going to be! I was worried that I wouldn't get time to stamp at all today (again), but there was a little break around lunchtime. Sooooo, I had a few minutes to whip up a cute little card  :}
I am in love with the new "In Color" Raspberry Ripple... and it looks so great paired with Summer Starfruit and Early Espresso. Then I threw in a touch of Primrose Petals, just for fun  :}
The images from the Betsy's Blossoms stamp set are so stinkin' cute! Snipping out the branch image was a little fussy, but totally worth it!

Well, I better whip up some supper and get to bed early... tomorrow is probably going to be crazy!

Pin It!

Wednesday, May 16, 2012

introducing Gumball Green

It's funny how tastes change... even when it comes to color preferences. When I was younger, I really did not like the color green. Now, I can't get enough of it! I was happy to see a "green" in the new In Color Collection - Gumball Green. Oh, I'm going to have so much fun using this color!! Here's a cute card I whipped up last night for a friend:
I dry embossed the Gumball Green layer using the Elegant Bouquet Embossing Folder. My image/ sentiment - from the Easy Events stamp set - is stamped in Early Espresso ink, and then colored in using Gumball Green and Summer Starfruit markers. I layered Summer Starfruit card stock (die cut through my Big Shot using one of the Apothecary Accents Framelits) behind the focal point for added oomph.
I wanted "just a little something extra," and while my friend loves details and embellishments, ribbons and bows aren't really her "thing." So I grabbed one of the new Naturals Designer Buttons and some Linen Thread for the perfect finishing touch.

Oh, I have so many yummy plans for this new color... but I better tackle my "To Do" list first. Our annual subdivision rummage sale is this weekend, and I'm not quite ready yet...


Pin It!

Monday, May 14, 2012

Betsy's Blossoms sneak peek

Did you ever end up almost late for something because an idea jumped into your creative brain, that you just had to make right then? That's totally what happened to me this morning! While I was eating breakfast, an idea for a card flew into my head using the new Betsy's Blossoms stamp set.
I could picture this pretty little creation and each detail, and I knew it would only take a few minutes...  I stamped a simple background using Raspberry Ripple ink and card stock. Then I tied two pieces of Early Espresso 1/8" Taffeta Ribbon around that layer. For added interest, I adhered the background layer to the Early Espresso card base using Dimensionals.
For my focal point, I stamped the largest flower in the Betsy's Blossoms stamp set in Summer Starfruit ink onto Very Vanilla card stock. I wasn't crazy about how it looked punched out with a circle punch, so I took a few seconds and hand cut this pretty blossom with my Paper Snips. After adhering it to the card with Dimensionals, I added a Large Basic Pearl to the center for that perfect finishing touch.

Luckily I made it to my youngest son's Mother's Day program at school... just in time. The 4K teachers at the school do such a wonderful job! The kids sang songs about Mommies, sat with us for a story time, and served us muffins and juice. We even had a lovely "corsage" waiting for us when we arrived!
Such a clever project! Who knew you could make a styrofoam cup so cute??! Love it  :}

Pin It!

Sunday, May 13, 2012

Happy Mother's Day...

...to my mother...  

...to my mother-in-law... 

... and to all of the mothers in our homes, our hearts, and those watching us from above.

Pin It!
Related Posts Plugin for WordPress, Blogger...